Creating Nodes - Services
Chapter description
In this chapter, we continued the previous project about services, so make sure you understand all the topics from the previous chapter. Services are one-time requests that should perform a one-time action, and the result of that action is returned as a response. To be able to better understand the interactions between packages, we will use a node called image_saver, which will save the image in the computer's memory after receiving a request. In addition, you will also learn how to perform recurring actions using timers.
You can run this tutorial on:
Repository containing the final effect after doing all the ROS Tutorials you can find here.
Install ROS package
First, we need to install the image_view package, which contains the image_save node. To install the additional ROS package, we use apt. The syntax of ROS packages is standardized and looks like this:
sudo apt-get install ros-$ROS_DISTRO-NAME-OF-PACKAGE
For image_view package use:
sudo apt-get install ros-$ROS_DISTRO-image-view
How service works?
The image_view package includes the image_saver node that allows you to save the image. In order for the node to work properly, we need to tell it what topic with the image it should subscribe to. Also we should remap the topic related to the camera info /camera_info. This topic contains information about camera parameters such as resolution or data for image calibration. We also set parameter save_all_image to false. With all this information, the command to run should look like this.
rosrun image_view image_saver _save_all_image:=false /image:=/camera/color/image_raw /camera_info:=/camera/color/camera_info __name:=image_saver
/camera/color/image_rawand/camera/color/camera_infoparameter depends on the type of camera you are using. Userostopic listto find camera topics.
At this point, the node is already running and waiting for the /save service to be called. We can call this service from the terminal. Usage of rosservice is similar to rostopic.
rosservice call /image_saver/save "{}"
As a result, you should see new photo in your current directory.
Create timer
Very often in robotics you have to perform an activity cyclically, every certain amount of time. In this case, we can use a timer. In this example, we create a basic timer action that will print a message in the terminal.
#include <ros/ros.h>
#include <sensor_msgs/Image.h>
#include <std_msgs/UInt8.h>

ros::Publisher brightness_pub;

void imageCallback(const sensor_msgs::ImageConstPtr &image)
{
   long long sum = 0;
   for (int value : image->data)
   {
      sum += value;
   }
   int avg = sum / image->data.size();

   std_msgs::UInt8 brightness_value;
   brightness_value.data = avg;
   brightness_pub.publish(brightness_value);
}

void timerCallback(const ros::TimerEvent&)
{
   ROS_INFO("Timer activate");
}

int main(int argc, char **argv)
{
   ros::init(argc, argv, "my_first_node");
   ros::NodeHandle n("~");
   ros::Subscriber sub = n.subscribe("/camera/color/image_raw", 10, imageCallback);
   brightness_pub = n.advertise<std_msgs::UInt8>("brightness", 1);
   ros::Timer timer = n.createTimer(ros::Duration(5.0), timerCallback);

   ROS_INFO("Node started!");
   ros::spin();
}
The code explained
- Create a timer, which will call the
timer_callbackfunction after counting down 5 seconds.
ros::Timer timer = n.createTimer(ros::Duration(5.0), timerCallback);
- Creating a callback function, which prints a info.
void timerCallback(const ros::TimerEvent&)
{
   ROS_INFO("Timer activate");
}
Task 1
Please build and test above code as in the previous chapter. Now your node should print Timer activate every 5 seconds.
Adding parameters
Our timer works beautifully, however, what if we wanted the action to be performed once every 5s, and another time every 1s. This would require changing the code every time and rebuilding it. However, there is a much better way instead of changing the code, we can add a parameter specifying how often the timer should be executed. In the following, we will modify the node so that it is possible to change the action frequency.
#include <ros/ros.h>
#include <sensor_msgs/Image.h>
#include <std_msgs/UInt8.h>

ros::Publisher brightness_pub;

void imageCallback(const sensor_msgs::ImageConstPtr &image)
{
   long long sum = 0;
   for (int value : image->data)
   {
      sum += value;
   }
   int avg = sum / image->data.size();

   std_msgs::UInt8 brightness_value;
   brightness_value.data = avg;
   brightness_pub.publish(brightness_value);
}

void timerCallback(const ros::TimerEvent&)
{
   ROS_INFO("Timer activate");

   std_srvs::Empty srv;
   client.call(srv);
}

int main(int argc, char **argv)
{
   ros::init(argc, argv, "my_first_node");
   ros::NodeHandle n("~");

   double timer_period_s;
   n.param("timer_period_s", timer_period_s, 5.0);

   ros::Subscriber sub = n.subscribe("/camera/color/image_raw", 10, imageCallback);
   brightness_pub = n.advertise<std_msgs::UInt8>("brightness", 1);
   ros::Timer timer = n.createTimer(ros::Duration(timer_period_s), timerCallback);

   ROS_INFO("Node started!");
   ros::spin();
}
The code explained
- In ROS
parammember function is used to declare a parameter namedtimer_period_swith a default value (if parameter doesn't exist) and assign it todouble timer_period_svariable.
double timer_period_s;
n.param("timer_period_s", timer_period_s, 5.0);
- We use a
timer_period_svariable to specify the frequency of the timer.
ros::Timer timer = n.createTimer(ros::Duration(timer_period_s), timerCallback);
Create launch file
As before, we can use the rosrun command, this time with the additional argument _timer_period_s:=2.0. So the entire command looks like this:
rosrun my_ros_package my_node_executable _timer_period_s:=2.0
However, we can see that slowly writing the command to run the script becomes more and more tedious. So let's do it differently and use the roslaunch command discussed in the first chapter. Select your favorite language and create new new file inside launch directory.
mkdir -p ~/ros_ws/src/tutorial_pkg/launch/
touch ~/ros_ws/src/tutorial_pkg/launch/my_launch_file.launch
Open this file and paste following code:
<launch>
   <node pkg="tutorial_pkg" type="my_first_node" name="my_first_node" output="screen"/>
      <param name="timer_period_s" value="2"/>
   </node>
</launch>
Launch your node
Now we can again build our package and use roslaunch command to run our node.
catkin make
roslaunch tutorial_pkg my_launch_file.launch
Task 2
Change timer_period_s parameter value in launch file and test it. Properly created program should work in an intuitive way without rebuilding your code (launch files doesn't require building after changing content).
Create client
As you can see, creating a timer with parameters is relatively simple. In addition, we already know how services work, let's create a node that will save us one camera frame every certain number of seconds. So let's use the created timer to start the service and save the photo from the camera.
#include <ros/ros.h>
#include <sensor_msgs/Image.h>
#include <std_msgs/UInt8.h>
#include <std_srvs/Empty.h>

ros::Publisher brightness_pub;
ros::ServiceClient client;

void imageCallback(const sensor_msgs::ImageConstPtr &image)
{
   long long sum = 0;
   for (int value : image->data)
   {
      sum += value;
   }
   int avg = sum / image->data.size();

   std_msgs::UInt8 brightness_value;
   brightness_value.data = avg;
   brightness_pub.publish(brightness_value);
}

void timerCallback(const ros::TimerEvent&)
{
   ROS_INFO("Timer activate");

   std_srvs::Empty srv;
   client.call(srv);
}

int main(int argc, char **argv)
{
   ros::init(argc, argv, "my_first_node");
   ros::NodeHandle n("~");

   double timer_period_s;
   n.param("timer_period_s", timer_period_s, 5.0);

   ros::Subscriber sub = n.subscribe("/camera/color/image_raw", 10, imageCallback);
   brightness_pub = n.advertise<std_msgs::UInt8>("brightness", 1);
   ros::Timer timer = n.createTimer(ros::Duration(timer_period_s), timerCallback);
   client = n.serviceClient<std_srvs::Empty>("/image_saver/save");

   ROS_INFO("Node started!");
   ros::spin();
}
The code explained
- Begin with importing required header for
std_srvs/Emptymessage type. This type of message has no field and can not carry any data, it can be used only for invoking action in another node and getting reply when its done.
#include <std_srvs/Empty.h>
- Declare publisher object.
ros::ServiceClient client;
- Next, define a client on your system to call a
std_srvs::srv::Emptyservice named/save.
ros::Timer timer = n.createTimer(ros::Duration(timer_period_s), timerCallback);
- Send
std_srvs::Emptyservice.
std_srvs::Empty srv;
client.call(srv);
Building configuration
To build project you need to add the new std_srvs dependency to the CMakeList.txt.
cmake_minimum_required(VERSION 2.8.3)
project(tutorial_pkg)

add_compile_options(-std=c++11)

find_package(catkin REQUIRED COMPONENTS
  roscpp
  sensor_msgs
  std_msg
  std_srvs
)

catkin_package(
  CATKIN_DEPENDS
)

include_directories(${catkin_INCLUDE_DIRS})

add_executable(my_first_node src/my_first_node.cpp)

target_link_libraries(my_first_node
  ${catkin_LIBRARIES}
Create launch file
To test the node, we can use the rosrun command again. However, it would require that in addition to my_first_node, you also run the image_saver node. Instead, we can add an additional node to our launch file.
Open this file and paste following code:
<launch>

   <node pkg="tutorial_pkg" type="my_first_node" name="my_first_node" output="screen"/>
      <param name="timer_period_s" value="2"/>
   </node>

   <node pkg="image_view" type="image_saver" name="image_saver" output="screen">
      <remap from="/image" to="/camera/color/image_raw"/>
      <remap from="/camera_info" to="/camera/color/camera_info"/>
      <param name="save_all_image" value="false" />
   </node>

</launch>
Build your code and run it. After running this file, you may notice that a new save_images folder has been created in your current directory. On the side of this folder you can see how frames are written to it.
Create service
The final modification in the node will be the provision of service. Service will return information regarding how many images were saved.
#include <ros/ros.h>
#include <sensor_msgs/Image.h>
#include <std_msgs/UInt8.h>
#include <std_srvs/Empty.h>
#include <std_srvs/Trigger.h>

uint saved_imgs = 0;

ros::Publisher brightness_pub;
ros::ServiceClient client;

void imageCallback(const sensor_msgs::ImageConstPtr &image)
{
   long long sum = 0;
   for (int value : image->data)
   {
      sum += value;
   }
   int avg = sum / image->data.size();

   std_msgs::UInt8 brightness_value;
   brightness_value.data = avg;
   brightness_pub.publish(brightness_value);
}

void timerCallback(const ros::TimerEvent&)
{
   ROS_INFO("Timer activate");

   std_srvs::Empty srv;
   client.call(srv);
   saved_imgs++;
}

bool saved_img(std_srvs::Trigger::Request &req, std_srvs::Trigger::Response &res)
{
   res.success = 1;
   res.message = "Saved images: " + std::to_string(saved_imgs);
   return true;
}

int main(int argc, char **argv)
{
   ros::init(argc, argv, "my_first_node");
   ros::NodeHandle n("~");

   double timer_period_s;
   n.param("timer_period_s", timer_period_s, 5.0);

   ros::Subscriber sub = n.subscribe("/camera/color/image_raw", 10, imageCallback);
   brightness_pub = n.advertise<std_msgs::UInt8>("brightness", 1);
   ros::Timer timer = n.createTimer(ros::Duration(timer_period_s), timerCallback);
   client = n.serviceClient<std_srvs::Empty>("/image_saver/save");
   ros::ServiceServer service = n.advertiseService("image_counter", saved_img);

   ROS_INFO("Node started!");
   ros::spin();
}
The code explained
- Begin with including required header for
std_srvs/Triggermessage type. It has no field for request and two fields for response:bool successandstring message
#include <std_srvs/Trigger.h>
- Define variable for storing number of saved images.
uint saved_imgs = 0;
- Next, define a server on your system to providing the
std_srvs::srv::Triggerservice named/image_counter. Functionstd::bindlike in subscriber points to callback.
ros::ServiceServer service = n.advertiseService("image_counter", saved_img);
- Increment image counter after saving frame.
saved_imgs++;
- Callback function to execute when service is called. Inside the function, we set up the response fields according to the std_srvs/Trigger service.
bool saved_img(std_srvs::Trigger::Request &req, std_srvs::Trigger::Response &res)
{
   res.success = 1;
   res.message = "Saved images: " + std::to_string(saved_imgs);
   return true;
}
Create launch file
The last thing which we can add to launch is running astra camera or Gazebo simulator depend on the launch argument use_sim. Let's change launch file for the last one.
Open this file and paste following code:
<launch>

   <arg name="use_gazebo" default="false"/>

   <include unless="$(arg use_gazebo)" file="$(find astra_camera)/launch/astra.launch"/>
   <include if="$(arg use_gazebo)" file="$(find rosbot_bringup)/launch/rosbot_tutorial.launch"/>

   <node pkg="tutorial_pkg" type="my_first_node" name="my_first_node" output="screen"/>
      <param name="timer_period_s" value="2"/>
   </node>

   <node pkg="image_view" type="image_saver" name="image_saver" output="screen">
      <remap from="/image" to="/camera/color/image_raw"/>
      <remap from="/camera_info" to="/camera/color/camera_info"/>
      <param name="save_all_image" value="false" />
   </node>

</launch>
Running your code
Build your node and execute launch file.
- ROSbot
- Gazebo simulator
docker compose up -d rosbot ros-master
roslaunch tutorial_pkg my_launch_file.launch
roslaunch tutorial_pkg my_launch_file.launch use_gazebo:=true
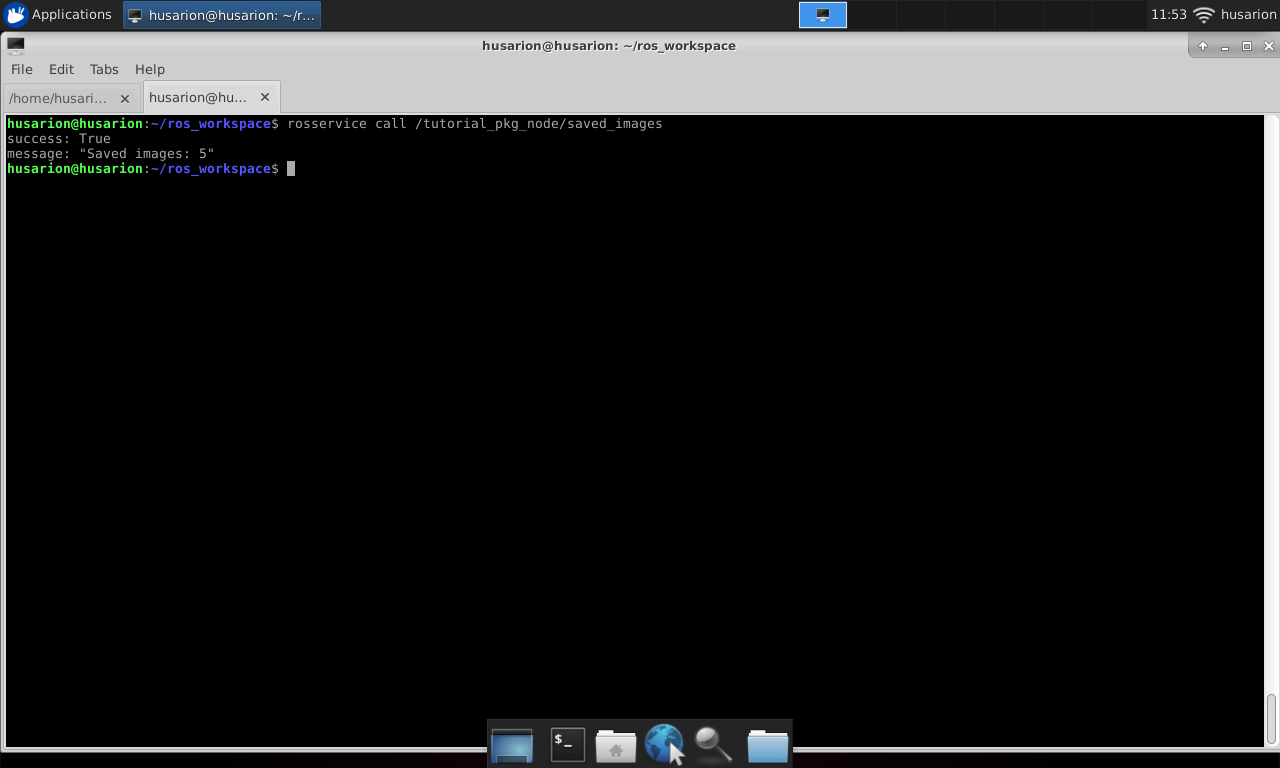
Then call service using rosservice call command.
rosservice call /my_first_node/image_counter
As a response you should get something like this:
Summary
Congratulations! You understand the basics of using the basic communication interfaces in ROS. From now on you should have no problems writing your own node code, adding parameters, build it and run it with either rosrun or roslaunch. By now, you should be familiar with the following concepts in ROS (Robot Operating System):
- running ROSbot/Gazebo simulator
- subscription to published topics
- publish new topic
- create timer
- provide service
- call to provided service
by Łukasz Mitka & Rafał Górecki, Husarion
Need help with this article or experiencing issues with software or hardware? 🤔
- Feel free to share your thoughts and questions on our Community Forum. 💬
- To contact service support, please use our dedicated Issue Form. 📝
- Alternatively, you can also contact our support team directly at: support@husarion.com. 📧