Creating Nodes - Messages
Chapter description
In this chapter, you'll make your first ROS program. You'll apply what you've learned in the previous chapter about starting the camera. You'll start by creating a workspace, then make your first node, and discover how to build and run it. Your initial code will teach you how to send information between nodes using messages, which involves creating something called a publisher and a subscriber.
You can run this tutorial on:
Repository containing the final effect after doing all the ROS Tutorials you can find here.
Workspace setup
To begin developing your own nodes in ROS, you need to do some workspace configuration first. A workspace is a place where all your source files, libraries, and compiled nodes will be stored.
First, you need to create a folder where your workspace will be located. It is recommended to add _ws to the end of the workspace name. All of the packages with source files should be stored inside the workspace in the src folder. Let's create our workspace named ros_ws and src inside it.
mkdir -p ~/ros_ws/src
Creating a new package
In ROS, nodes are organized into packages, so in order to create a node, you need to create a package. Packages are created using the catkin_create_pkg command and it must be executed in the src folder of your workspace. The syntax of catkin_create_pkg is:
catkin_create_pkg package_name <required packages>
where package_name is desired package name and argument required packages is optional and contain names of packages that are used by newly created packages. For our tutorial, we will create a package named tutorial_pkg that depends on the package roscpp. Package roscpp is the ROS library for C++.
cd ~/ros_ws/src
catkin_create_pkg tutorial_pkg roscpp
After running this command, you will create a folder named tutorial_pkg and some files in it. Your workspace file structure should now look like this:
ros_ws/
   └── src/
      └── tutorial_pkg/
        ├── CMakeLists.txt
        ├── include/
        │   └── tutorial_pkg
        ├── package.xml
        └── src/
The basic package contains:
CMakeLists.txt: This is the build instructions for your nodes. You need to edit this file if you want to compile any node. We will do it later.include: This is folder where you put header files. Header files contain declarations of functions, classes, or other code elements that are used in your source code but are defined in other source files. They act as a way for your code to communicate with other parts of your program.package.xml: This file contains package metadata such as author, description, version, or required packages. The package can be built without changing this file, but you should adjust it if you want to distribute your package to others.src: This is folder where you put the source code files for your project. It typically contains the actual code files you write for your software, such as C++ or Python source code files.
Write your first node
Now you have a workspace created and your own package inside that workspace. You are ready to create your first ROS node.
Code of your first node
Let’s create a C++ file for your node and name it my_first_node.cpp. Place it in the src folder inside tutorial_pkg:
touch ~/ros_ws/src/tutorial_pkg/src/my_first_node.cpp
Open the file in your favorite text editor and paste the following code:
#include <ros/ros.h>

int main(int argc, char **argv)
{
    ros::init(argc, argv, "my_node");
    ros::NodeHandle n("~");

    ROS_INFO("Node started!");
    ros::spin();
}
The code explained
-
Add the header file for the basic ROS library.
#include <ros/ros.h> -
Beginning of node main function.
int main(int argc, char **argv) { -
Initialization of ROS node, this function contacts with ROS master and registers node in the system.
ros::init(argc, argv, "my_node"); -
Get the handle for node, this handle is required for interactions with system e.g. subscribing to topic.
ros::NodeHandle n("~"); -
Use
ROS_INFOto print message.ROS_INFOand similar logging functions are replacement forprintf/coutfunction. It's part ofrosconsole, which supports hierarchical loggers and verbosity levels.ROS_INFO("Node started!"); -
Enters a loop where it "spins" or checks for incoming messages and events.
ros::spin();
Remember to save the C++ file.
Building configuration
Before you build the node, you need to edit the CMakeLists.txt file in the tutorial_pkg directory. Open the file in your favorite text editor and paste the following content:
cmake_minimum_required(VERSION 2.8.3)
project(tutorial_pkg)

add_compile_options(-std=c++11)

find_package(catkin REQUIRED COMPONENTS
  roscpp
)

catkin_package(
  CATKIN_DEPENDS
)

include_directories(${catkin_INCLUDE_DIRS})

add_executable(my_first_node src/my_first_node.cpp)

target_link_libraries(my_first_node
  ${catkin_LIBRARIES}
)
The code explained
- Specify the minimum version of CMake required to build this package.
cmake_minimum_required(VERSION 2.8.3)
- Define the name of the CMake project.
project(tutorial_pkg)
- Set the C++ standard to C++11.
add_compile_options(-std=c++11)
- Tell CMake to find the ROS package named
roscppand make it available for this package. It's required for building ROS C++ code.
find_package(catkin REQUIRED COMPONENTS roscpp)
- Specify the dependencies of the current package on other ROS packages.
catkin_package(CATKIN_DEPENDS)
- Include the directories specified by catkin_INCLUDE_DIRS in the package's build process. These directories contain header files that may be needed by the code in this package.
include_directories(${catkin_INCLUDE_DIRS})
- Instruct CMake to build an executable named
my_first_nodefrom the source filemy_first_node.cpplocated in thesrcdirectory of this package.
add_executable(my_first_node src/my_first_node.cpp)
- Link the
my_first_nodeexecutable with the libraries specified in${catkin_LIBRARIES}, which typically includes ROS libraries required for building ROS nodes.
target_link_libraries(my_first_node ${catkin_LIBRARIES})
Save the changes and close the editor. Now, you are ready to proceed with the ROS build process for your workspace.
Build code
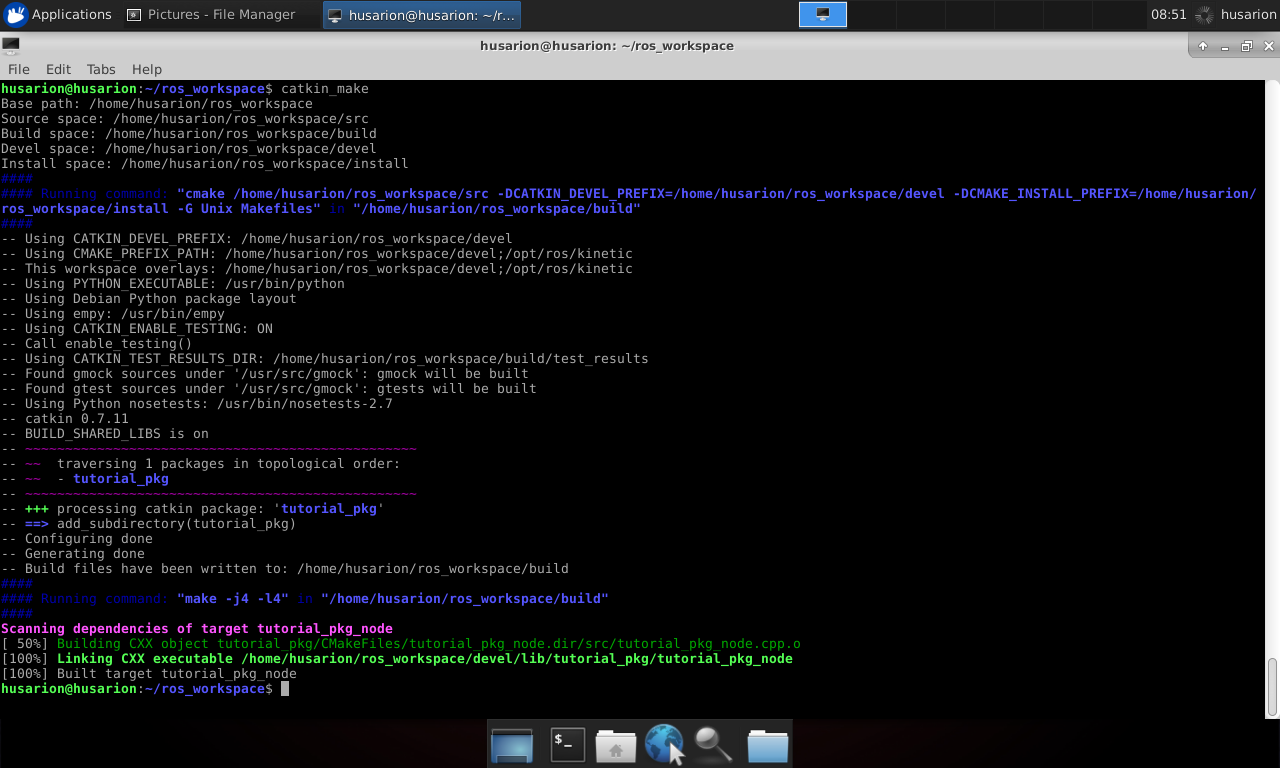
When the building configuration is finished, you can navigate to your workspace main directory and build your project using the catkin_make command:
cd ~/ros_ws
catkin_make
After executing this command, you should see the build output similar to the one shown below and
two new folders will be created inside your ros_ws:
buildfor storing intermediate build files,installfolder for storing the output files.
After this operation you should have two new folders in your workspace:
buildfor storing files that are used during compilation,develfor storing output binary files.
Remember to build your package every time you make changes to your code.
Run node
Sourcing files
Before running your node, you need to source the appropriate environment setup files. Open a terminal and navigate to your workspace main directory, then run the following command to source the setup files:
source ~/ros_ws/devel/setup.bash
These environment variables enable you to run your node from any directory. To avoid manually sourcing the setup files every time you open a new terminal, you can add the following line to your .bashrc file to automatically source your ROS workspace:
echo 'source ~/ros_ws/devel/setup.bash' >> ~/.bashrc
Task 1 - Running the node
Run your node using the rosrun command. Then use the rosnode list command to examine the system and check if your node is visible.
Hint
In the previous chapter you learned the rosrun and roslaunch commands to run code. In this case it is necessary to execute the rosrun command because we do not have a launch file created. As a reminder, running the rosrun command looks like this.
rosrun package_name executable_name [options]
After a successful startup, you should see the text Node started! and you should be able to see the new node named my_node using the rosnode list command.
Creating a subscriber
As you can see, your first node is pretty boring. It does nothing but output one line of text to the terminal. Let's modify the previous code. We will use our camera to calculate the average brightness of the received image. To subscribe image from /image topic we will use the following code.
Open again the previous my_first_node.cpp
#include <ros/ros.h>
#include <sensor_msgs/Image.h>

void imageCallback(const sensor_msgs::ImageConstPtr &image)
{
    long long sum = 0;
    for (int value : image->data)
    {
        sum += value;
    }
    int avg = sum / image->data.size();
    ROS_INFO("Brightness: %d", avg);
}

int main(int argc, char **argv)
{
   ros::init(argc, argv, "my_first_node");
   ros::NodeHandle n("~");
   ros::Subscriber sub = n.subscribe("/camera/color/image_raw", 10, imageCallback);

   ROS_INFO("Node started!");
   ros::spin();
}
The code explained
- To process messages received from the camera, you need to include the header file for the
Imagemessage type. The message fields can be found here:
#include <sensor_msgs/Image.h>
- Then you need a function for processing received message (argument is pointer to incoming message).
void imageCallback(const sensor_msgs::ImageConstPtr &image)
{
   ...
}
- Variable for storing sum of all pixel values.
long long sum = 0;
- Iteration through every pixel and colour and add current pixel value to sum.
for (int value : image->data)
{
   sum += value;
}
- Creating variable and iterating through each pixel value in the
datafield of theimagemessage and adding it to thesum.
long long sum = 0;
for (uint8_t value : image->data)
{
   sum += value;
}
- Calculating the average value by dividing the sum by the total number of pixels and printing the brightness value.
int avg = sum / image->data.size();
RCLCPP_INFO(get_logger(), "Brightness: %d", avg);
- Last thing is defining subscriber.
ros::Subscriber sub = n.subscribe("/camera/color/image_raw", 10, imageCallback);
Here we use method subscribe of NodeHandle object. Arguments of method are:
/camera/color/image_raw- name of topic to subscribe.10- message queue size. Messages are processed in order they come in. In the case that node receives, in short time, more messages than this value, excessive messages will be dropped.imageCallback- function to process incoming messages.
Building configuration
Before running the code, we need to find and link the new sensor_msgs dependency to the CMakeList.txt. Please add highlighted changes:
cmake_minimum_required(VERSION 2.8.3)
project(tutorial_pkg)

add_compile_options(-std=c++11)

find_package(catkin REQUIRED COMPONENTS
  roscpp
  sensor_msgs
)

catkin_package(
  CATKIN_DEPENDS
)

include_directories(${catkin_INCLUDE_DIRS})

add_executable(my_first_node src/my_first_node.cpp)

target_link_libraries(my_first_node
  ${catkin_LIBRARIES}
)
Build & run your code
Now you can build and run this node along with camera. To run the camera, run the RObot or Gazebo simulator as shown in the previous chapter.
- ROSbot
- Gazebo simulator
roslaunch astra_camera astra.launch
roslaunch rosbot_bringup rosbot_tutorial.launch
rosrun tutorial_pkg my_first_node
After running this launcher in the terminal, you should see the brightness information.
Creating a publisher
Now let's modify the node to publish brightness value to a new topic instead of logging info into the terminal. For this purpose, we will use message type std_msgs/UInt8.
#include <ros/ros.h>
#include <sensor_msgs/Image.h>
#include <std_msgs/UInt8.h>

ros::Publisher brightness_pub;

void imageCallback(const sensor_msgs::ImageConstPtr &image)
{
   long long sum = 0;
   for (int value : image->data)
   {
      sum += value;
   }
   int avg = sum / image->data.size();

   std_msgs::UInt8 brightness_value;
   brightness_value.data = avg;
   brightness_pub.publish(brightness_value);
}

int main(int argc, char **argv)
{
   ros::init(argc, argv, "my_first_node");
   ros::NodeHandle n("~");
   ros::Subscriber sub = n.subscribe("/camera/color/image_raw", 10, imageCallback);
   brightness_pub = n.advertise<std_msgs::UInt8>("brightness", 1);

   ROS_INFO("Node started!");
   ros::spin();
}
The code explained
- Add header file to obtain new msg type
std_msgs/UInt8.
#include <std_msgs/UInt8.h>
Message std_msgs/UInt8 is object with only one field uint8_t data (contain value from 0 to 255).
- Next define publisher object with global scope.
ros::Publisher brightness_pub;
- Configuration and linking the publisher to the selected topic.
brightness_pub = n.advertise<std_msgs::UInt8>("brightness", 1);
Here we use method advertise of NodeHandle object. Arguments of method are:
brightness- topic name.1- message queue size.
- Declare the type of message which will be published (
brightness_msg), put some data into the message, and send it whenever we calculate a mean brightness.
std_msgs::msg::UInt8 brightness_msg;
brightness_msg.data = avg;
publisher_->publish(brightness_msg);
Building configuration
As before we should add the new std_msgs dependency to the CMakeList.txt. However, this is not necessary because std_msgs messages are automatically linked with the messages sensor_msgs. For didactic purposes, we add a new dependency.
cmake_minimum_required(VERSION 2.8.3)
project(tutorial_pkg)

add_compile_options(-std=c++11)

find_package(catkin REQUIRED COMPONENTS
  roscpp
  sensor_msgs
  std_msgs
)

catkin_package(
  CATKIN_DEPENDS
)

include_directories(${catkin_INCLUDE_DIRS})

add_executable(my_first_node src/my_first_node.cpp)

target_link_libraries(my_first_node
  ${catkin_LIBRARIES}
Build & run your code
To build and run your code. You can use the same command as before. Make sure your camera or simulator is working.
rosrun tutorial_pkg my_first_node
Task 2 - Examining topics
Use rostopic echo to read the brightness of the image from the /my_node/brightness topic.
Hint
As a reminder, you should type:
rostopic echo [topic_name]
Message types
ROS packages, apart from the functionality itself, provide various types of messages. Some of the most common packages used are:
std_msgs- messages with basic data types like integer or floatgeometry_msgs- for handling information regarding object position, orientation, velocity or acceleration, also for defining points or polygonsnav_msgs- for handling maps or robot localization datasensor_msgs- for handling data from sensors
Each of these packages contains many types of messages, which have their uses in different applications. When creating nodes for mobile robots, you'll likely encounter some of these messages:
geometry_msgs/Twist- message for defining linear and angular object velocity. Could be also used for setting desired velocities.nav_msgs/OccupancyGrid- message for handling flat occupancy grid based maps.nav_msgs/Odometry- message for defining robot position and orientation based on odometry measurements.nav_msgs/Path- message for defining robot path as a set of positionssensor_msgs/JointState- it has fields for determining position, velocity and effort for a set of joints.sensor_msgs/LaserScan- message for handling scans of planar laser scanners like RpLidar or Hokuyo.sensor_msgs/Range- message for one dimensional distance measurement
It is also possible to implement user-defined messages if existing ones are not sufficient.
Summary
After completing this tutorial you should know how to:
- create a workspace,
- create your custom nodes, that can send and receive messages,
- build code and configure building process,
- run and examine the system.
In the next tutorial, we will continue this topic. You will learn about another method of communication which are services. See you there!
by Łukasz Mitka & Rafał Górecki, Husarion
Need help with this article or experiencing issues with software or hardware? 🤔
- Feel free to share your thoughts and questions on our Community Forum. 💬
- To contact service support, please use our dedicated Issue Form. 📝
- Alternatively, you can also contact our support team directly at: support@husarion.com. 📧