Running Foxglove on ROSbot XL
Introduction
Foxglove Studio is an open source visualization platform, designed for working with robotics and sensor data. Foxglove can visualize live or previously recorded data, allowing users to easily inspect sensor inputs such as images, point clouds, and time series data. Thanks to our ready-made Docker images, Foxglove can be deployed on all Husarion robots in just a few clicks.
In this article you will learn:
- How to run the Foxglove.
- What types of panels and how to use them.
- How to add Foxglove to a Docker container.
- How to run a demo for ROSbot XL with Husarnet VPN connection.
First Steps in Foxglove
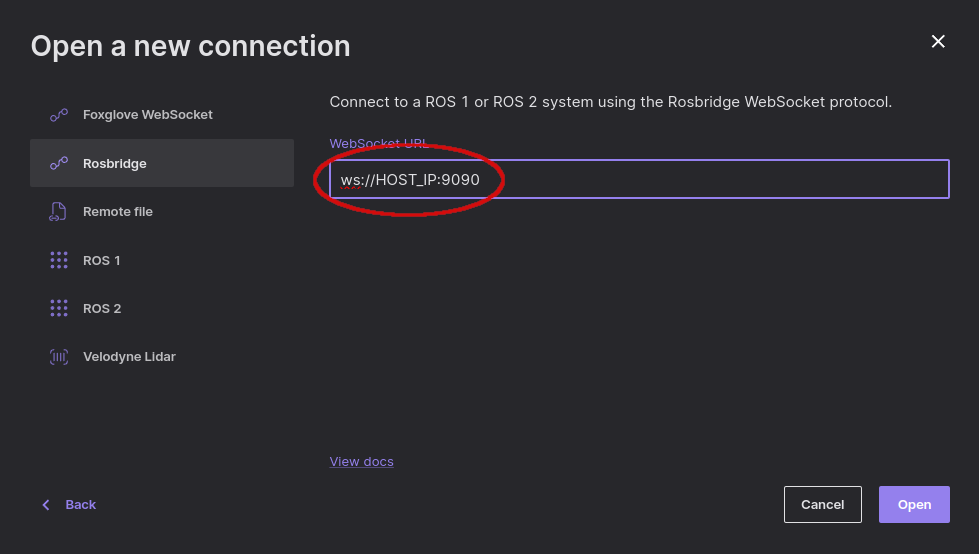
To start using foxglove with ROS2, you have to option:
- Using Foxglove WebSocket.
- Using Rosbridge.
Both of these options are fine, using Foxglove WebSocket is faster compared to Rosbridge, however using Rosbridge is more robust in the Dockerization process. For this reason, we will use the second option.
Quick Guide
You should use Chrome/Chromium browser when using Foxglove.
1. Install rosbridge
sudo apt update
sudo apt install ros-$ROS_DISTRO-rosbridge-server
2. Launch rosbridge
ros2 launch rosbridge_server rosbridge_websocket_launch.xml
3. Run talker
ros2 run demo_nodes_cpp talker
You can run any node here, but for simplicity we use talker node.
4. Open Foxglove Studio
Open browser and go to https://studio.foxglove.dev/.
- 1. Select Data Source
- 2. Open Connection
- 3. Select topic
- 4. Result
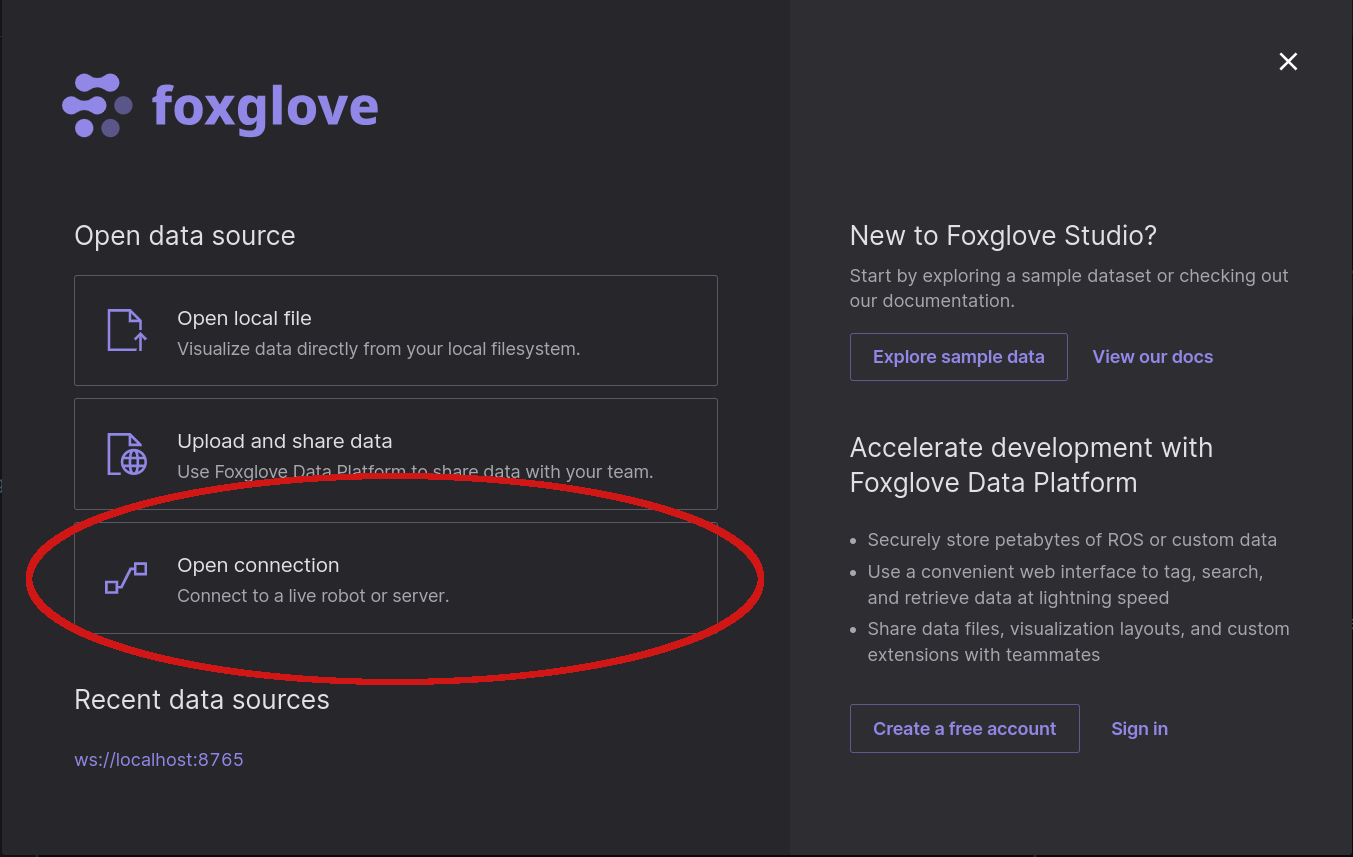


To remotely access the Foxglove, in second step Open connection modify localhost to the IP address of the device running rosbridge-server.
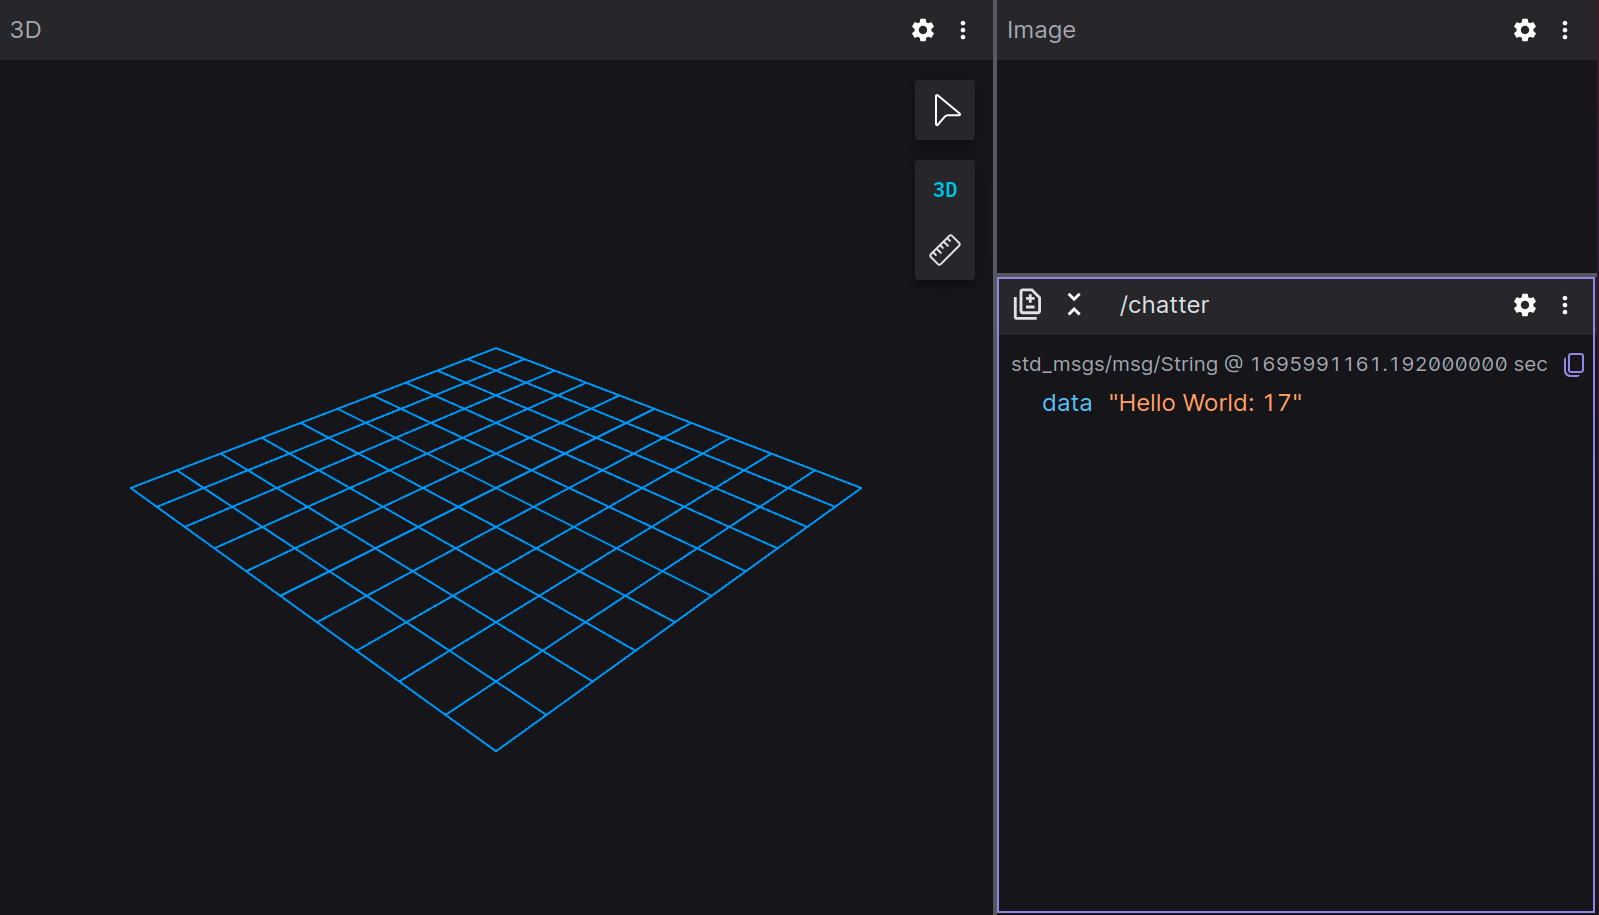
Foxglove Panels
By default, Foxglove includes many useful panels for visualizing measurement data. There you will find panels such as: counter, image, history, map and teleop. There is also a 3D Panel known from RViz, which allows you to display PointCloud, Robot Model, Transformation and other topics.
Panels Customization
The process of creating your own graphical interface is very intuitive and comes down to finding the right panel and configuring it, which usually consists of:
- choosing the right topic,
- customizing the display
- configuration of additional parameters specific to a given panel.
Task 1
Using your own ROSbot, try setting up the GUI in Foxglove. For example, try adding and configuring:
- LiDAR data,
- a gauge or plot showing
/battery.voltagetopic, - teleop panel enabling remote control of the ROSbot robot.
Dockerization
To speed up the process of implementing the Foxglove GUI for robotics projects, you can use our Docker images, and thanks to Husarnet VPN you can access data from any device connected to the network. All you need to do is:
- Create a new
compose.yamlwith the following content.
services:
  rosbridge:
    image: husarion/rosbridge-server:humble
    ports:
      - 9090:9090
    command: ros2 launch rosbridge_server rosbridge_websocket_launch.xml

  foxglove:
    image: husarion/foxglove:1.72.0
    ports:
      - 8080:8080
    environment:
      - DS_TYPE=rosbridge-websocket
      - DS_PORT=9090
      - UI_PORT=8080
| Environment Variable | Default Value | Description |
|---|---|---|
DS_TYPE | rosbridge-websocket | Data source type. Possible values: rosbridge-websocket or foxglove-websocket |
DS_PORT | 9090 | Data source port |
UI_PORT | 8080 | User interface port |
To load your custom layout as default, add volume to foxglove container.
volumes:
  - /path/to/your/foxglove-layout.json:/foxglove/default-layout.json
- Run
compose.yaml.
docker compose up
Husarnet VPN Access
To access Foxglove on any device, use Husarnet VPN. If you don't know how to establish a connection between devices, check Husarnet VPN Access.
If you have devices available in one network and docker containers running, all you need to do is enter the browser and use the correct device name and port.
For example, if you ran compose.yaml on ROSbot and its name in app.husarnet.com is rosbot, you should type rosbot:8080/ui into the browser to run visualization.
ROSbot Demo
This demo allows you to control the ROSbot and analyze the transmitted data, such as the battery charge status.
- ROSbot
- Simulation
1. Connect to your ROSbot via ssh.
ssh husarion@<ROSBOT_IP/HUSARNET_NAME>
2. Clone the repository to your ROSbot.
git clone https://github.com/husarion/rosbot-xl-sensors
cd rosbot-xl-sensors
3. Flash firmware.
docker stop rosbot-xl microros || true && \
docker run --rm -it --privileged \
--mount type=bind,source=/dev/ttyUSBDB,target=/dev/ttyUSBDB \
husarion/rosbot-xl:humble-0.8.2-20230913 \
flash-firmware.py -p /dev/ttyUSBDB
4. Run Docker Compose.
docker compose up
5. Open the Foxglove application in a browser.
To access Foxglove, input the following in your browser's search bar:
http://<localhost>:8080/ui- if you work locally,http://<ROSBOT_IP>:8080/ui- if you want to connect to a device connected to the same LAN,http://<HUSARNET_NAME>:8080/ui- if you want to connect to the device using Husarnet VPN.
1. Run simulation.
If you don't know how to run Simulator check out Simulations article.
2. Clone the repository on your Laptop.
git clone https://github.com/husarion/rosbot-xl-sensors
cd rosbot-xl-sensors
This repository is dedicated for ROSbot XL. If you would like to run Foxglove on ROSbot 2R or PRO, please use rosbot-sensors repository.
3. Run Docker Compose.
docker compose up rosbridge foxglove
4. Open the Foxglove application in a browser.
To open Foxglove type http://localhost:8080/ui in your browser search bar.
Result
The final result looks like this:

Conclusion
That's it! Now you can use the Foxglove application to analyze every type of message you received and visualize it in many different ways. For this purpose, you can use interactive plots, gauges, display images, or visualize maps. You can also send data like control signal. Foxglove allows you to monitor and manage data from your ROSbot easily and efficiently through a simple visual interface, without the need to install ROS on your computer.
by Rafał Górecki, Husarion
Need help with this article or experiencing issues with software or hardware? 🤔
- Feel free to share your thoughts and questions on our Community Forum. 💬
- To contact service support, please use our dedicated Issue Form. 📝
- Alternatively, you can also contact our support team directly at: support@husarion.com. 📧