Using Cyclone DDS with Husarnet on ROS2
Using Eclipse Cyclone DDS with Husarnet VPN
Both ROS1 and ROS2 allows you to run nodes on different physical machines as long as they are in the same LAN network. To run ROS on robotic system distributed among multiple networks VPN needs to be used. Husarnet is a peer-to-peer, low-latency and lightweight VPN dedicated for robotics applications. In this short guide we will show you how to configure ROS2 using Eclipse Cyclone DDS together with Husarnet VPN client.
Let's do it:
We assume that you have Ubuntu 18.04 with ROS2 Dashing installed. Open linux terminal application and follow these steps.
Husarnet
Install Husarnet:
Execute this command on each physical device you need to connect.
curl https://install.husarnet.com/install.sh | sudo bash
Remember to run sudo systemctl restart husarnet after installation process is finished.
Configure husarnet network:
Add your physical devices to the same Husarnet network, by executing following commands on each of them:
husarnet join <your-join-code> <mydevice-hostname>
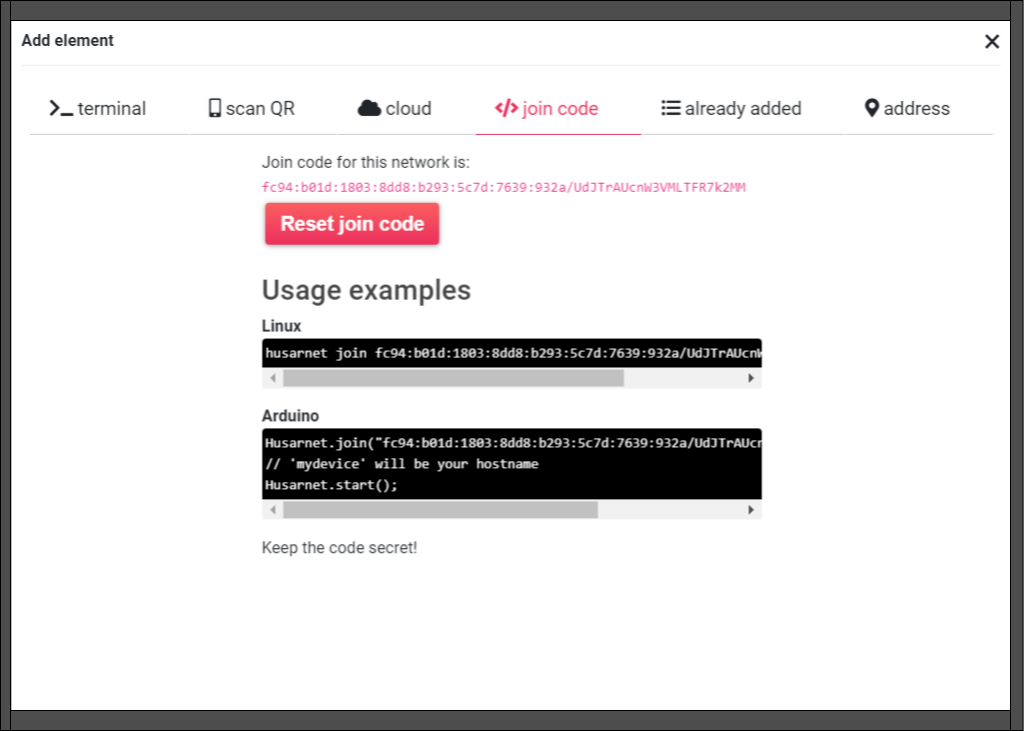
More information at: Husarnet
Cyclone DDS
Install Cyclone DDS middleware:
Default DDS implementation used in ROS2 Dashing is RMW FastRTPS. We will replace that by Eclipse Cyclone DDS, by executing the following commands in the terminal:
cd ros2_ws/src
git clone https://github.com/ros2/rmw_cyclonedds
git clone https://github.com/eclipse-cyclonedds/cyclonedds
cd ..
rosdep install --from src -i
colcon build
export RMW_IMPLEMENTATION=rmw_cyclonedds_cpp
Configure Cyclone DDS:
Create communication settings file under this path ~/ros2_ws/src/cyclonedds/cyclonedds.xml
To make communication work you have to set some params as follows:
<?xml version="1.0" encoding="UTF-8" ?>
<CycloneDDS xmlns="https://cdds.io/config" xmlns:xsi="http://www.w3.org/2001/XMLSchema-instance" xsi:schemaLocation="https://cdds.io/config https://raw.githubusercontent.com/eclipse-cyclonedds/cyclonedds/master/etc/cyclonedds.xsd">
    <Domain id="any">
        <General>
            <NetworkInterfaceAddress>auto</NetworkInterfaceAddress>
            <AllowMulticast>false</AllowMulticast>
            <MaxMessageSize>65500B</MaxMessageSize>
        <FragmentSize>4000B</FragmentSize>
        <Transport>udp6</Transport>
        </General>
    <Discovery>
        <Peers>
            <Peer address="[IPV6-address]"/>
            <Peer address="[IPV6-address]"/>
        </Peers>
        <ParticipantIndex>auto</ParticipantIndex>
    </Discovery>
        <Internal>
            <Watermarks>
                <WhcHigh>500kB</WhcHigh>
            </Watermarks>
        </Internal>
        <Tracing>
            <Verbosity>severe</Verbosity>
            <OutputFile>stdout</OutputFile>
        </Tracing>
    </Domain>
</CycloneDDS>
Important fields:
- Multicast
<AllowMulticast>false</AllowMulticast>
At the time of writing this file multicast is not supported by Husarnet so it's necessary to disable this. Multicast feature will be added soon.
- Transport Protocol
<Transport>udp6</Transport>
It's necessary to use IPv6 but Cyclone don't allow to mix IPv4 with IPv6 so every node must communicate over IPv6.
- IPV6-address
<Peers><Peer address="IPV6-address"/></Peers>
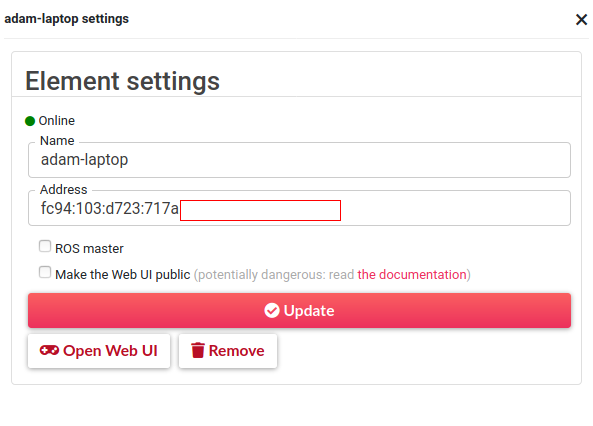
Here appropriate IP addresses should be filled, you can take this address form Husarnet WebUI. Safe method is to provide address of local IPv6 and remote machines.
If you need information about params check cyclonedds-manual
Source changes:
Add changes to .bashrc file to use that configuration every time you boot your system. Open a new terminal and execute:
echo "export RMW_IMPLEMENTATION=rmw_cyclonedds_cpp" >> ~/.bashrc
echo "export CYCLONEDDS_URI=file:///home/$USER/ros2_ws/src/cyclonedds/cyclonedds.xml" >> ~/.bashrc
source ~/.bashrc
Verify installation:
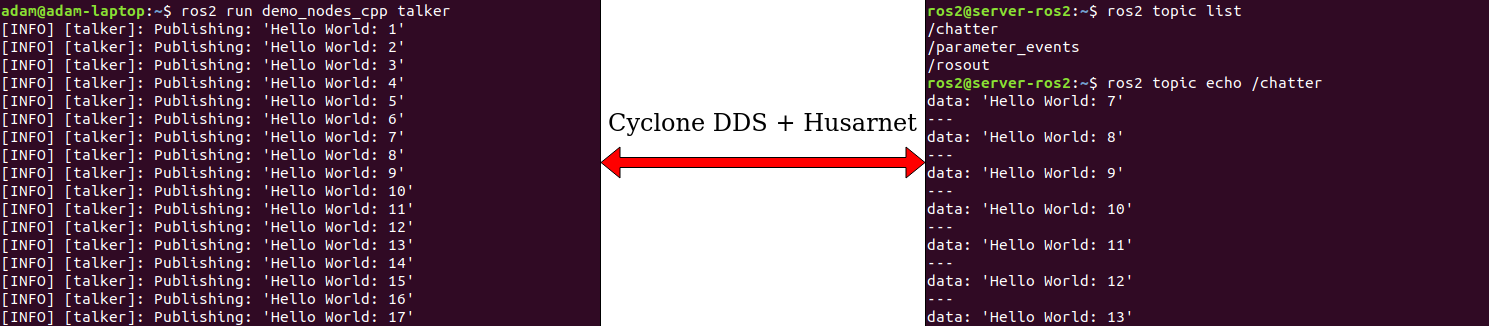
Run demo publisher and subscriber:
At the first physical machine execute in the terminal:
ros2 run demo_nodes_cpp talker
And this command at the second:
ros2 topic echo /chatter