Franka Robotics - Franka Research 3
Franka Research 3 by Franka Robotics is a robotic arm with 7 degrees of freedom.

Getting Started
To run the device, you must first meet the following requirements:
Franka Research 3 Setup
Before integrating Franka Research 3 (FR3) with the Husarion UGV, it is required that you have read through its Quick Start Guide and Manual. Both of these documents can be found on the Franka download page.
During the initial setup and configuration of the robotic arm, you'll need to set the IP address of the control box. We recommend setting it to 10.15.20.4.
If your FR3 IP address differs, you will have to adjust the .env file accordingly.
Software
Hardware
- x86 User Computer
- Both the User Computer and the Franka Control Box connected to the UGV's internal router
- Client PC (your computer)
Demo
In this demo, we will operate the FR3 directly from MoveIt via the Franka Control Interface (FCI).
Lenovo Legion laptop running Ubuntu 22.04 with ROS 2 Humble natively installed.
Panther UGV with Intel NUC as the User Computer.
Quick Start Guide
This demo requires configuration on both computers inside the robot, as well as configuration on the client PC.
Built-in Computer Configuration
- Connect to the UGV's Wi-Fi and SSH into the Built-in Computer:
ssh husarion@10.15.20.2
2. Edit the configuration file
nano config/husarion_ugv_description/config/components.yaml
3. Replace the content of components.yaml as follows
# By default Husarion UGV is loaded without any components.
components:
  - type: DEV04L
4. Press ctrl + o and then ctrl + x to save and quit
5. Restart the driver
docker compose restart
6. Exit SSH session
exit
User Computer Setup
1. Connect to the UGV's Wi-Fi and SSH into the User Computer
ssh husarion@10.15.20.3
2. Install the Real-time Kernel
On the User Computer, follow the real-time kernel installation instructions from Franka's documentation. Follow all guidelines, up to the section Allow a user to set real-time permissions for its processes. The build process may take considerable time.
The process may fail at this step:
make -j$(nproc) deb-pkg
with the error: error: creating source package requires git repository.
If this happens, please use the alternative build command:
make -j$(nproc) bindeb-pkg
Without a real-time kernel, the Franka driver won't start.
Allow a user to set real-time permissions for its processes
After the PREEMPT_RT kernel is installed and running, add a group named realtime and add the user controlling your robot to this group:
sudo addgroup realtime
sudo usermod -a -G realtime $(whoami)
Afterwards, add the following limits to the realtime group in /etc/security/limits.conf:
@realtime soft rtprio 99
@realtime soft priority 99
@realtime soft memlock unlimited
@realtime hard rtprio 99
@realtime hard priority 99
@realtime hard memlock unlimited
This file differs from the one specified in the FR3 docs.
The limits will be applied after you log out and in again.
3. Clone the Demo Repository
After verifying you're running the PREEMPT RT kernel, clone the repository:
git clone https://github.com/husarion/husarion-ugv-franka-manipulator.git
cd husarion-ugv-franka-manipulator
4. Adjust the configuration
If needed, edit the .env file:
nano .env
ROS_DOMAIN_ID=${ROS_DOMAIN_ID:-0}
RMW_IMPLEMENTATION=rmw_cyclonedds_cpp
ROBOT_MODEL_NAME=panther
ROBOT_IP=10.15.20.4 #Franka Research 3 IP
Press ctrl + o and then ctrl + x to save and quit.
5. Enable FCI in WebUI
Your Franka Research 3 arm should be reachable via:
(The address might differ based on your configuration.)
When operating the arm, always follow the safety measures and be aware of potential dangers described in the FR3 Product Manual.
In the Franka WebUI:
- Open Desk, unlock the safety locks, and wait until the arm initializes.
- Switch the operation mode to Execution.
- Expand the System menu from the header, and activate FCI by pressing the Activate FCI button.
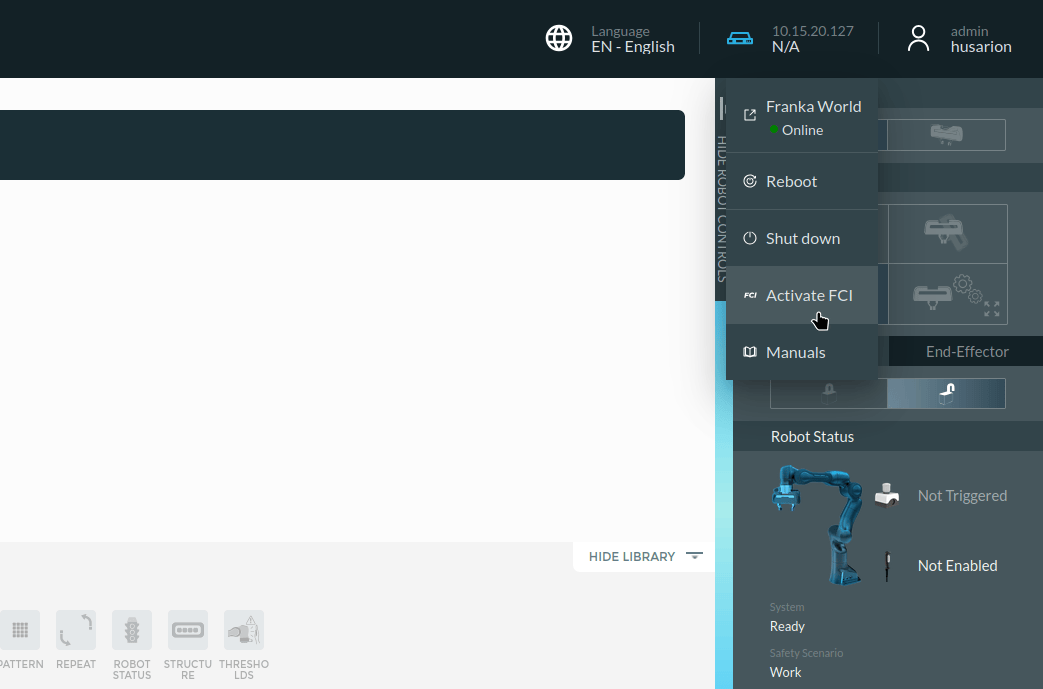
If safety brakes trigger, reset them via the WebUI. After each restart of FR3, you must enable FCI again following the same steps.
6. Run Docker Compose
docker compose up
If you encounter errors, refer to the troubleshooting page.
Client PC Setup
These steps are executed on your computer, connected via Wi-Fi or Husarnet to the same network as UGV’s computers:
1. Clone the repository on your PC
git clone https://github.com/husarion/husarion-ugv-franka-manipulator.git
cd husarion-ugv-franka-manipulator
2. Run RViz Docker Compose
xhost local:docker
docker compose -f compose.rviz.yaml up
Result
After completing these steps, you should see an RViz window displaying the FR3 manipulator on the Husarion UGV.
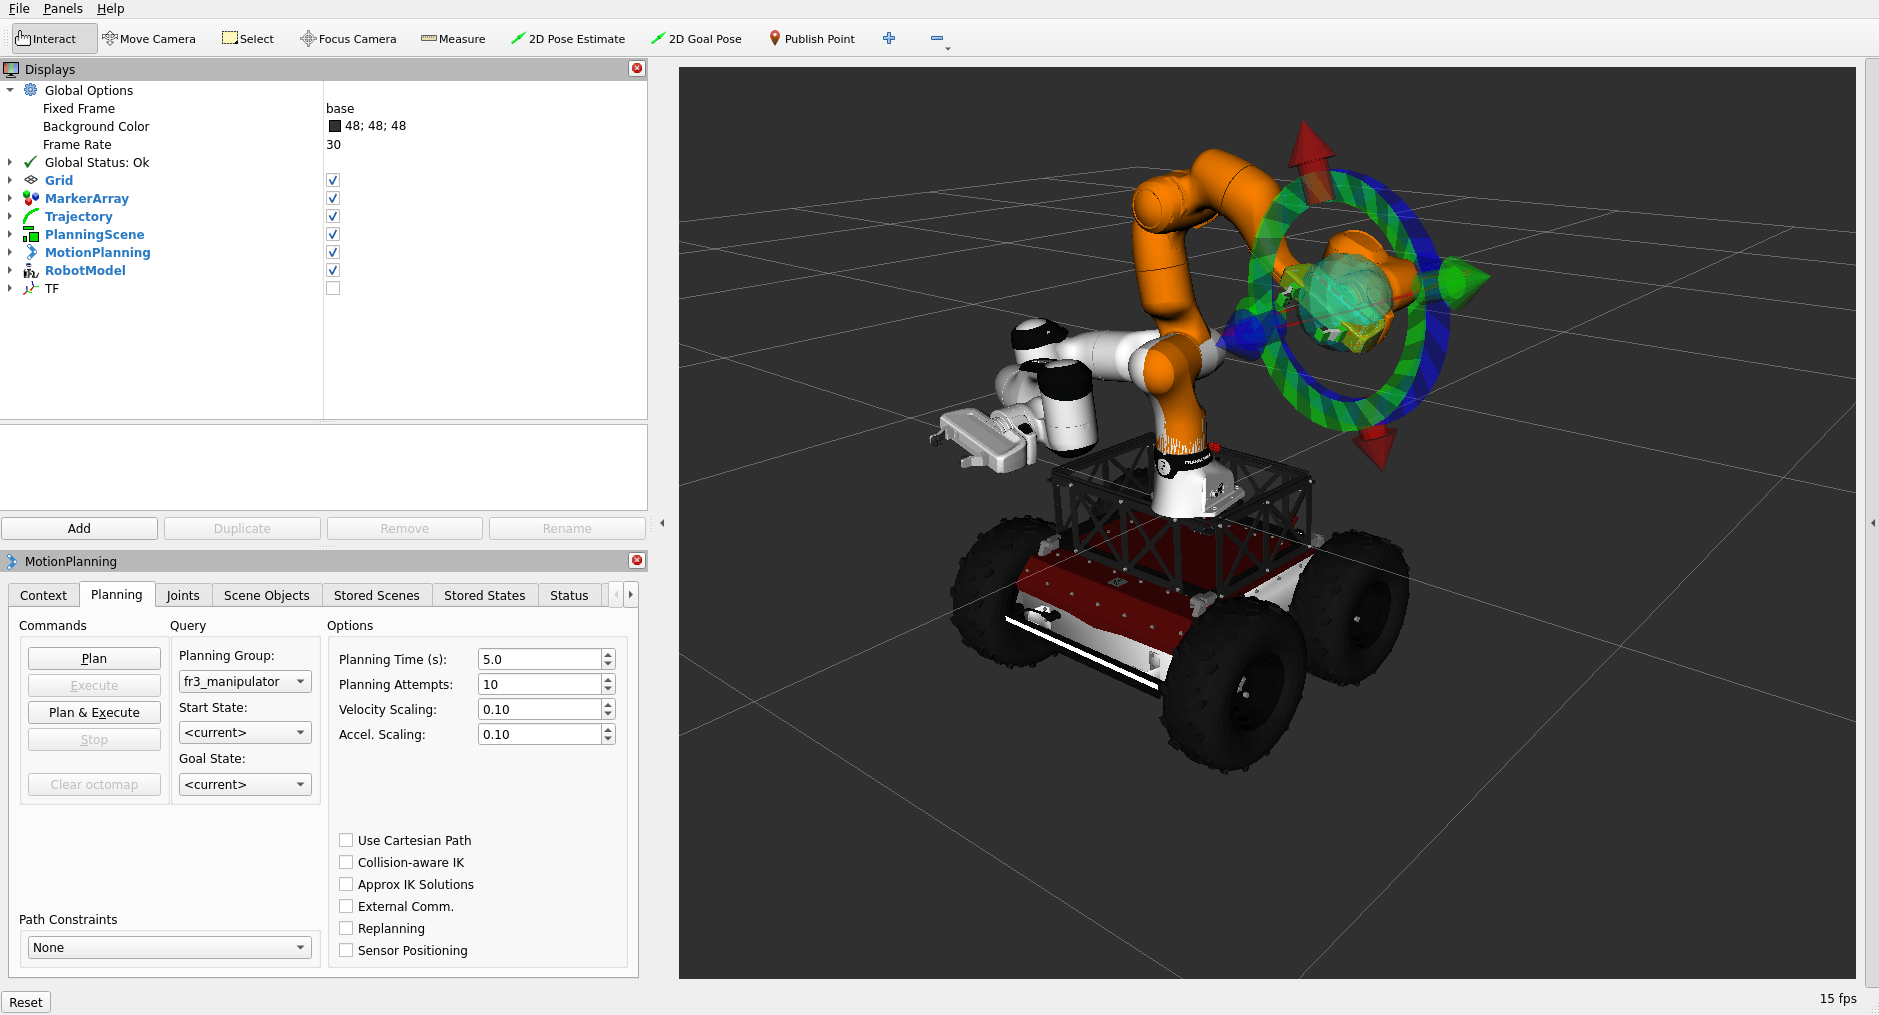
You can now use MoveIt's motion planning plugin to move the robotic arm.
Always follow the official Franka manual and safety guidelines for robotic arm operations, especially in human environments.
Summary
This guide walked you through the initial setup of the Franka Research 3 manipulator with Husarion Panther UGVs. For more details, please refer to the official FR3 documentation and also the MoveIt2 docs.
Need help with this article or experiencing issues with software or hardware? 🤔
- Feel free to share your thoughts and questions on our Community Forum. 💬
- To contact service support, please use our dedicated Issue Form. 📝
- Alternatively, you can also contact our support team directly at: support@husarion.com. 📧