Operating System Reinstallation
System Reinstallation
In some cases, you will need to restore your Panther system to its default settings:
- in case of accidental damage to the system
- to update the OS
- to clear all user changes and restore factory settings
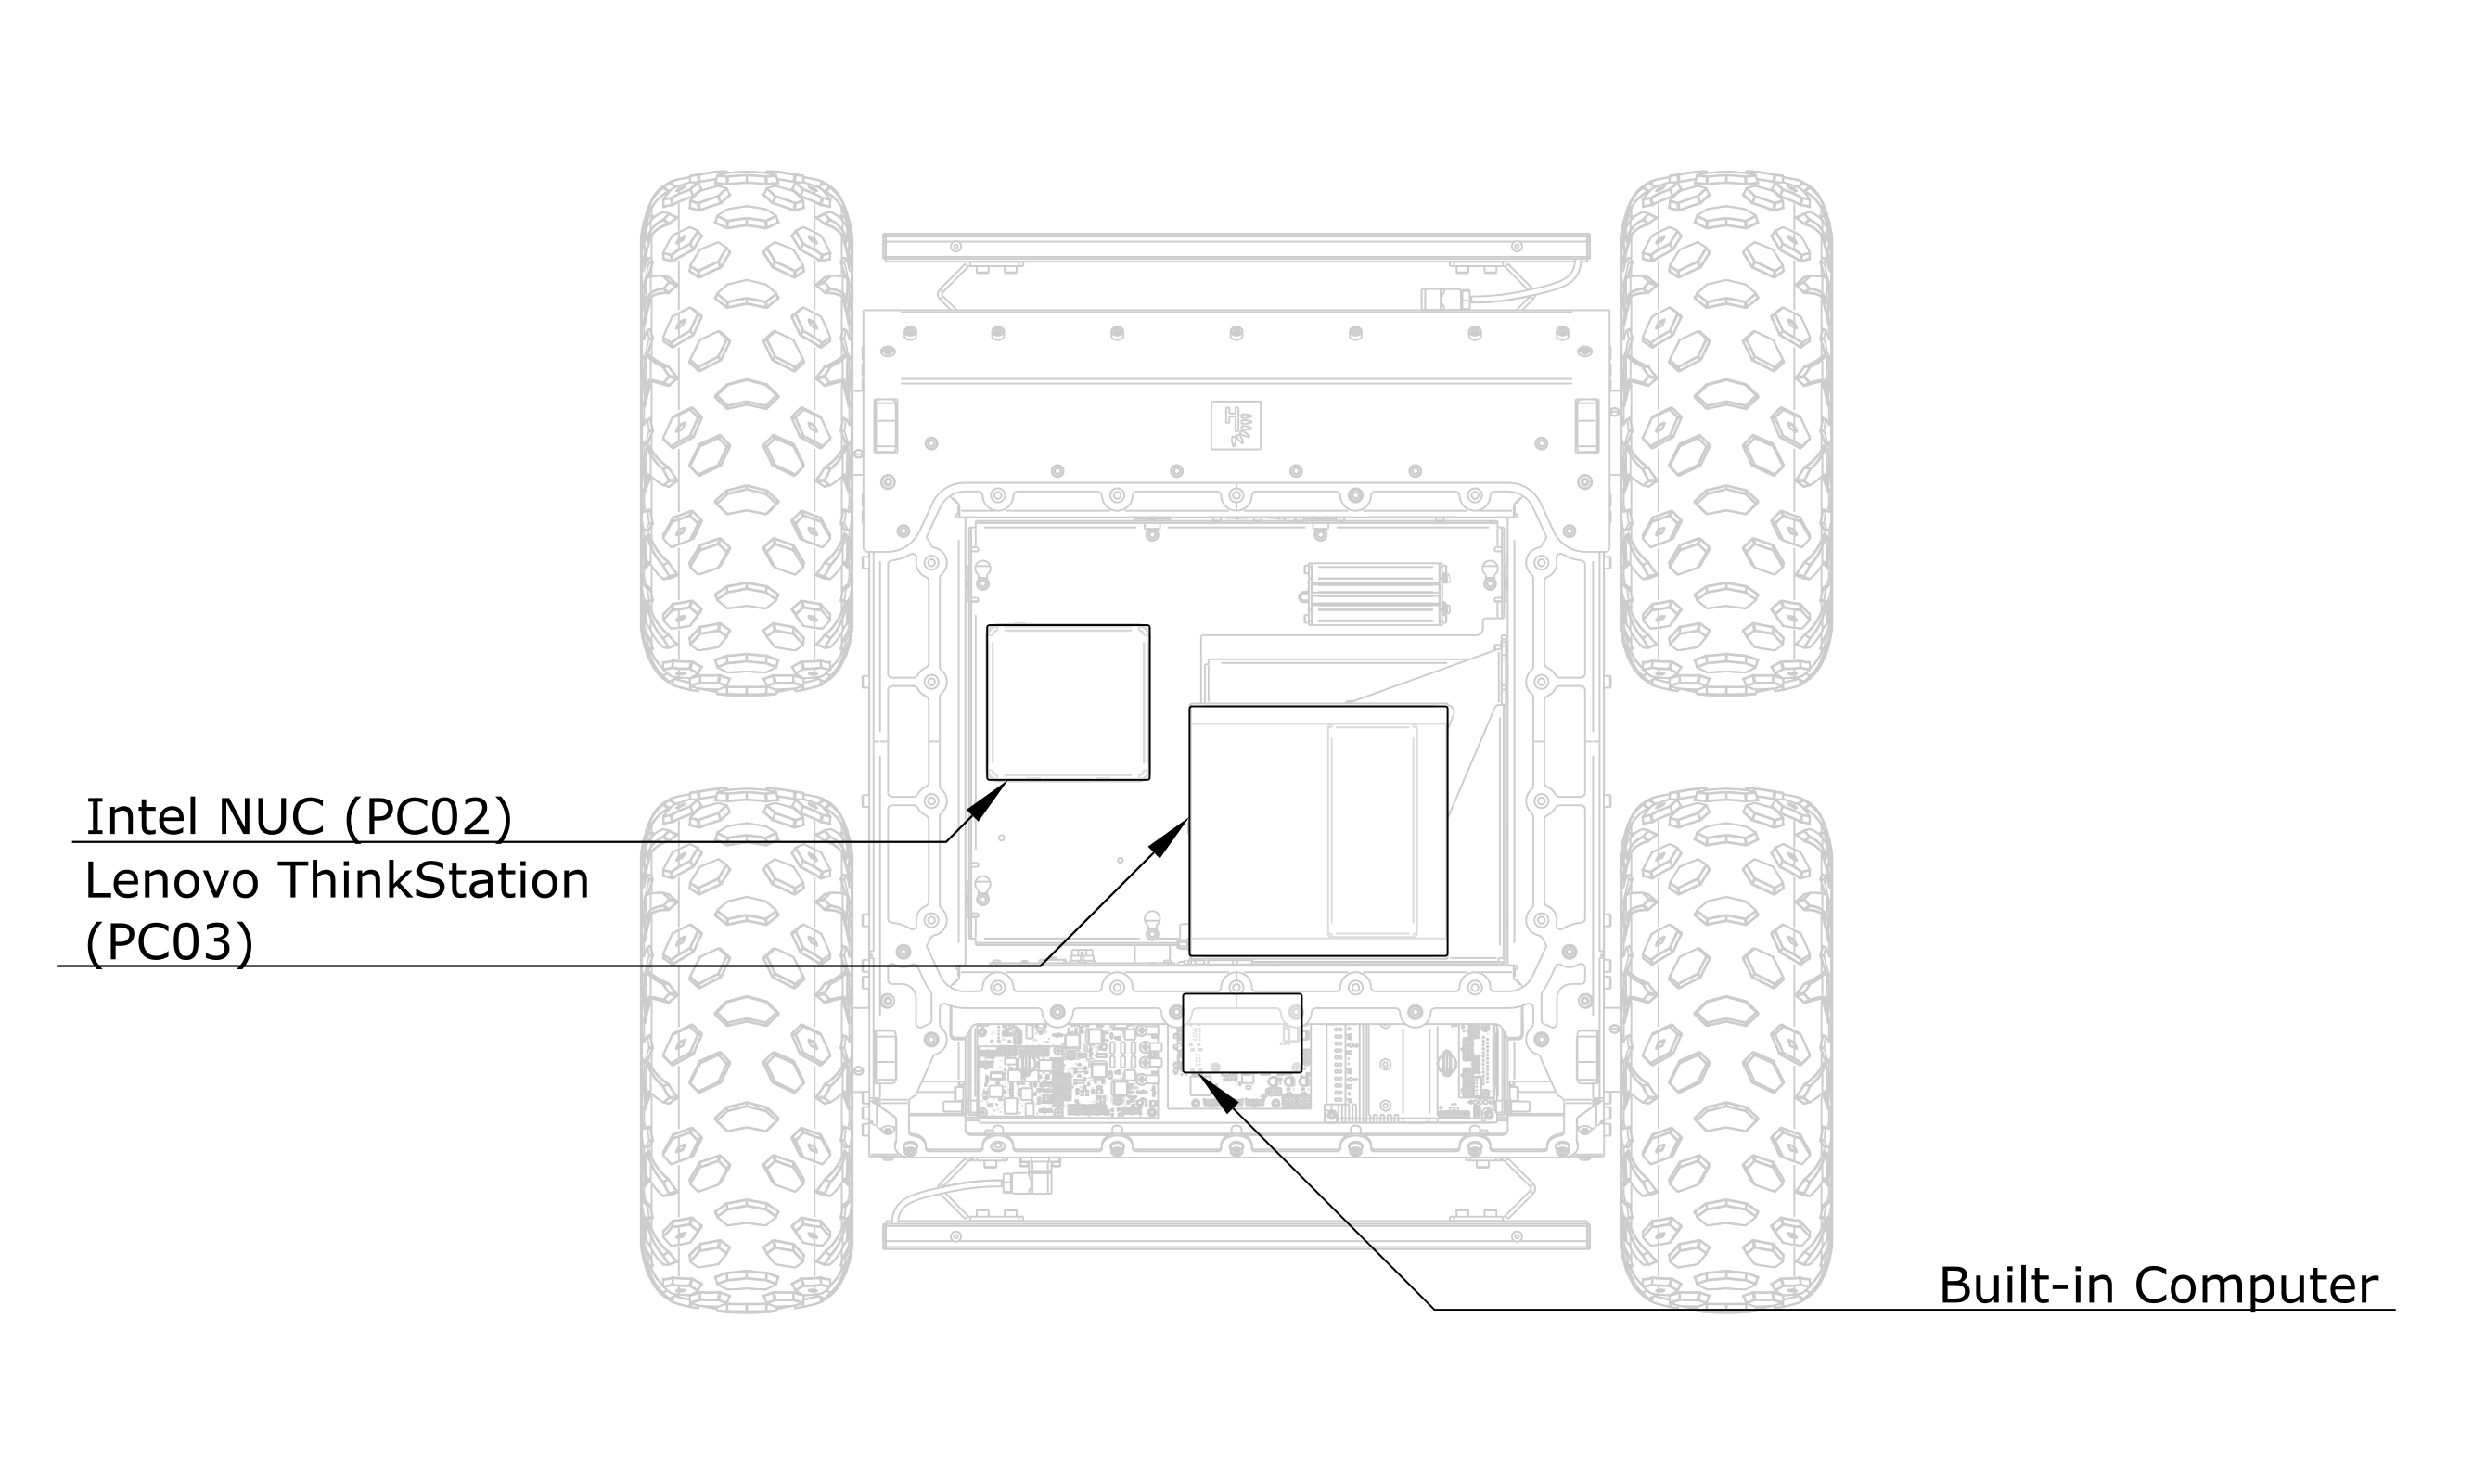
User Computer
This process varies depending on your computer model. Please select your User Computer model and follow the instruction.
- Intel NUC (PC02)
- Lenovo ThinkStation (PC03)
Intel NUC is compatible with the Husarion OS image. To install Husarion OS, please follow this guide.
In the case of a User Computer, you should install the same distribution of ROS that is on the Build in Computer.
Lenovo ThinkStation is compatible with the Husarion OS image. To install Husarion OS, please follow this guide.
In the case of a User Computer, you should install the same distribution of ROS that is on the Build in Computer.
NVIDIA GPU drivers are not pre-configured. If you intend to use it, it is necessary to properly configure the required software.
Motor Drivers
This step is needed only when switching between ROS and ROS2. If you're updating to the latest version or resetting to default settings, you can skip it.
To configure motor drivers, a Windows computer with Roborun+ PC Utility v3.0 beta software installed is needed.
- ROS
- ROS 2
-
Follow the Service Space Manual to open both (front and rear) service spaces.
-
Follow the Roboteq Driver Setup guide, to update motor drivers configuration.
-
Follow the Service Space Manual to open both (front and rear) service spaces.
-
Follow the Roboteq Driver Setup guide, to update motor drivers configuration.
Built-in Computer
This computer is used to manage all the basic functions of a mobile platform. The reinstallation procedure for the Built-in Computer is as follows:
- ROS
- ROS 2
- ROS 2 - using USB drive
-
To access it, follow the instructions in the section - Service Spaces. Depending on the Panther platform version, the location of the computer varies:
- the rear Service Space for version 1.2 and above,
- the front Service Space for older versions.
-
Extract the SD card from the Built-in Computer by carefully pulling it out.
REPLACING THE SD CARDIf you want to use your own SD card, make sure it has at least 32 GB of capacity and 10 Speed Class.
-
Download our custom OS image for the Built-in Computer.
-
Flash the image onto an SD card (For this process, we recommend using Balena Etcher, steps may vary depending on the software used for flashing):
- Download Balena Etcher and install it.
- Plug the SD card into an SD card reader.
- Open Etcher and select from your hard drive the .img.xz file.
- Select the SD card you wish to write your image to.
- Click Flash! to begin writing data to the SD card.
- Wait for the flashing and validation steps to finish.
-
Insert the SD card back into the Built-in Computer.
-
Access the Built-in Computer (remember, you must be connected to the Panther hotspot):
user@mylaptop:~$ssh husarion@10.15.20.2 -
In order to complete system reinstallation your robot will need Internet connection. If your robot is not yet connected to the Internet please follow: Connecting Panther to Your WiFi Network
-
Launch the software:
husarion@10.15.20.2:~$docker compose pull
docker compose up -d
The last available OS for Panther 1.06 is ROS 2 Humble
-
The robot Built-in Computer is located in the Service Space. To access it, follow the instructions in the section - Service Spaces.
-
Extract the SD card from the Built-in Computer by carefully pulling it out.
REPLACING THE SD CARDIf you want to use your own SD card, make sure it has at least 32 GB of capacity and 10 Speed Class.
-
Download our custom OS image for the Built-in Computer.
-
Flash the image onto an SD card (For this process, we recommend using Balena Etcher, steps may vary depending on the software used for flashing):
- Download Balena Etcher and install it.
- Plug the SD card into an SD card reader.
- Open Etcher and select from your hard drive the .img.xz file.
- Select the SD card you wish to write your image to.
- Click Flash! to begin writing data to the SD card.
- Wait for the flashing and validation steps to finish.
-
Insert the SD card back into the Built-in Computer. Turn the robot on.
noteFirst boot of the robot after system reinstallation may take a bit longer than usual.
-
Access the Built-in Computer (remember, you must be connected to the Panther hotspot):
user@mylaptop:~$ssh husarion@10.15.20.2 -
In order to complete system reinstallation your robot will need Internet connection. If your robot is not yet connected to the Internet please follow: Connecting Panther to Your WiFi Network
-
Launch the software:
husarion@10.15.20.2:~$first_boot_install.sh
Support for USB system installation was introduced for Panther robots delivered after July 18, 2024. If you have an older robot, you need to perform a one-time update for the Built-in computer's internal EEPROM. To do so, please refer to the Bootable USB Drive Not Working.
The last available OS for Panther 1.06 is ROS 2 Humble
-
Download our custom OS image for the Built-in Computer.
-
Follow instructions on using HOFI to flash new image: Husarion OS Flasher Image
-
Turn off the robot, remove the USB drive, then turn on the robot.
-
Access the Built-in Computer (remember, you must be connected to the Panther hotspot):
user@mylaptop:~$ssh husarion@10.15.20.2 -
In order to complete system reinstallation your robot will need Internet connection. If your robot is not yet connected to the Internet please follow: Connecting Panther to Your WiFi Network
-
Launch the software:
husarion@10.15.20.2:~$first_boot_install.sh
All recent OS images use X-Input. If you're upgrading from an older image, you may need to switch your gamepad to X‑Input mode.
Next steps
- After reinstalling the system for Built-in Computer, it is recommended to update the SSH key on the RUTX11 router. Instructions can be found here.
- You can go through the Quick Start to check if everything is behaving correctly.
RUTX11 Router
To restore RUTX11 router to its default settings:
-
Access the Built-in Computer (remember, you must be connected to the Panther hotspot):
user@mylaptop:~$ssh husarion@10.15.20.2 -
Restore the default settings with the command:
husarion@10.15.20.2:~$rutx11_manager --restore-defaultYou will be asked to provide:
- username: admin
- password: Husarion1! (For older robot versions password may be Husarion1)
- robot model: PTH
- robot serial number: The serial number of your robot, e.g., r2d2
The script will reset the RUTX11 router to its default settings. Wait for the router to restart and reconnect to the robot. This process will remove all saved WiFi networks, so it will be necessary to reconnect it to the Internet.