Security guard robot using YOLO and Wi-Fi sensor network
Introduction
Patrol area is a task for robot defined in 4 points.
- Having information about plausible threats
- Checking area by robot
- Classifying threads
- Informing owner when it's real threat
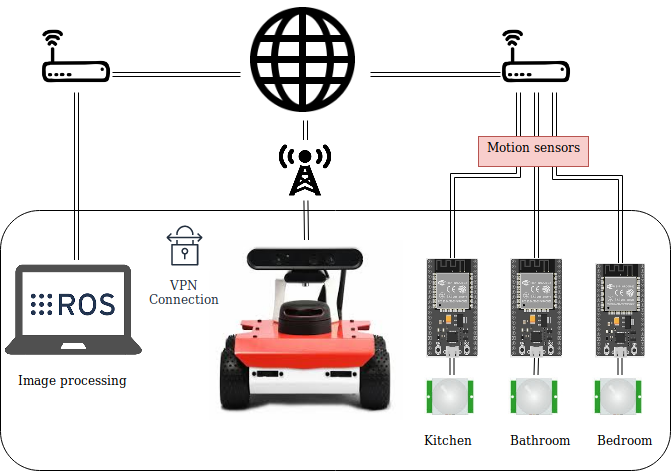
This project is focused on maintaining your house/office secure when no one is inside and provide that by following rosbot task. We will use rosbot platform with astra camera, ESP-32 microchips with motion sensor (RPI HC-SR501) and external computer taking care of image processing.
Because project covers many fields it will be shown and explained how to configure everything properly. Project was also divided into simulation part and real robot part, this should give a clear view about whole project.
Run on virtual environment
NOTE: You can run the following project in a virtual environment and get all the code and documentation by clicking on the ROSDS button

Preparation
-
It is assumed that you have ros already installed - because rosbot currently works on ros melodic it's necessary to have this version, in case you don't have that check official docs : ROS melodic installation.
-
It is also assumed that you have your ros workspace configured with tutorial_pkg cloned to your workspace tutorial_pkg because some files from this repository will be used. In case you don't just go to your workspace this should be something like this cd
<ros_workspace>/src, next step is to clone whole pkg:git clone https://github.com/husarion/tutorial_pkg.git`It is also necessary to have cloned rosbot description to do, so use this command:
git clone https://github.com/husarion/rosbot_description.git` -
For image processing advice is to use nvidia card with CUDA enabled (It won't be shown how to do that because it's not the point).
-
You can download complete package from github:
a) simulation
git clone https://github.com/adamkrawczyk/rosbot_patrol_simulation.gitb) real_robot
git clone https://github.com/adamkrawczyk/rosbot_patrol.git
Starting project step by step
What to install
-
Mailbox (setup this on robot also):
- chose internet setup set remaining parts as default during installation and setup
sudo apt install postfixsudo service postfix reloadsudo apt install mailutilssudo apt-get install sendmailsudo dpkg-reconfigure postfixsudo /etc/init.d/postfix reload -
YAML parser This can be installed anywhere eg.
Downloadsor inros_ws/src. Go to desired directory and paste:git clone https://github.com/jbeder/yaml-cpp.gitcd yaml-cppmkdir buildcd buildcmake .. -
CNN (convolutional neural network) for image processing darknet ros will be used (install this in ~/ros_workspace/src)
To make it download you have to follow this instruction:
- Setup your ssh key follow this instruction to do, so - setup ssh key
git clone --recursive git@github.com:leggedrobotics/darknet_ros.gitcd ../catkin_make -DCMAKE_BUILD_TYPE=Release
-
Install this packages on rosbot and on computer (if you are going to use it to this project)
sudo apt install ros-melodic-grid-map*
Create your packages
Go to your workspace it should be something like:
cd ~/ros_workspace/src
Now create pkgs
For simulation:
catkin_create_pkg rosbot_patrol_simulation roscpp
For real robot:
catkin_create_pkg rosbot_patrol roscpp
It is highly recommended to use this names because it will not be necessary to change names in almost every following file.
Simulation part
For the first make whole simulation then test guard algorithm and finally implement that to real robot. Let's get this project rolling!
Go to your pkg
cd rosbot_patrol_simulation
World model is already prepared, so you have to download that. Let's prepare file for that.
mkdir worlds
cd worlds
touch model.world
Then copy whole data inside this file from repository file, in directory named worlds there is file named model.world copy that and paste to model.world file.
model world - enough is just copy whole file and paste in your repository
In case you have never made any of ros_tutorials from husarion website here is whole package - just clone it to workspace tutorial_pkg
After that first launch file for our robot - gmapping can be created.
roscd rosbot_patrol_simulation
mkdir launch
cd launch
touch gmapping_only.launch
Then open that file with your favorite editor and paste following code:
<launch>

  <node pkg="gmapping" type="slam_gmapping" name="slam_gmapping" output="screen">
    <remap from="/base_scan" to="/scan"/>

    <param name="base_frame" value="base_link"/>
    <param name="map_frame" value="map"/>
    <param name="odom_frame" value="odom"/>

    <param name="map_update_interval" value="5.0"/>
    <param name="maxUrange" value="16.0"/>
    <param name="sigma" value="0.05"/>
    <param name="kernelSize" value="1"/>
    <param name="lstep" value="0.05"/>
    <param name="astep" value="0.05"/>
    <param name="iterations" value="5"/>
    <param name="lsigma" value="0.075"/>
    <param name="ogain" value="3.0"/>
    <param name="lskip" value="0"/>
    <param name="srr" value="0.1"/>
    <param name="srt" value="0.2"/>
    <param name="str" value="0.1"/>
    <param name="stt" value="0.2"/>
    <param name="linearUpdate" value="0.05"/>
    <param name="angularUpdate" value="0.05"/>
    <param name="temporalUpdate" value="0.5"/>
    <param name="resampleThreshold" value="0.5"/>
    <param name="particles" value="30"/>
    <param name="xmin" value="-50.0"/>
    <param name="ymin" value="-50.0"/>
    <param name="xmax" value="50.0"/>
    <param name="ymax" value="50.0"/>
    <param name="delta" value="0.05"/>
    <param name="llsamplerange" value="0.01"/>
    <param name="llsamplestep" value="0.01"/>
    <param name="lasamplerange" value="0.005"/>
    <param name="lasamplestep" value="0.005"/>
  </node>

</launch>
Make move_base launch, so type in console:
touch move_base_only.launch
Open this file and paste following code:
<launch>

    <node pkg="move_base" type="move_base" name="move_base" output="log">
      <param name="controller_frequency" value="25.0"/>
        <rosparam file="$(find tutorial_pkg)/config/costmap_common_params.yaml" command="load" ns="global_costmap" />
        <rosparam file="$(find tutorial_pkg)/config/costmap_common_params.yaml" command="load" ns="local_costmap" />
        <rosparam file="$(find tutorial_pkg)/config/local_costmap_params.yaml" command="load" />
        <rosparam file="$(find tutorial_pkg)/config/trajectory_planner.yaml" command="load" />

        <rosparam file="$(find rosbot_patrol_simulation)/config/global_costmap_params.yaml" command="load" />
    </node>

</launch>

```bash
Notice that one file should be in rosbot_patrol_simulation pkg - it's required to create that file because slightly different params will be used.

To create this file follow instruction:

```bash
roscd rosbot_patrol_simulation
cd config
touch global_costmap_params.yaml
In this file paste following code:
global_costmap:
  update_frequency: 0.5
  publish_frequency: 0.5
  transform_tolerance: 0.5
  width: 35
  height: 35
  static_map: false
  rolling_window: true
  inflation_radius: 2.5
  resolution: 0.01
It is no need to make rest of this files, they are in tutorial_pkg so you can copy them from tutorial_pkg or preferred way - have this pkg cloned to workspace. tutorial_pkg
roscd rosbot_patrol_simulation
mkdir config
cd config
Here paste those files.
Then make simulation for robot
touch simulation_gmapping.launch
Then open that file with your favorite editor and paste following code:
<?xml version="1.0" encoding="UTF-8"?>
<launch>
    <param name="use_sim_time" value="true"/>
    <arg name="world" default="empty"/>
    <arg name="paused" default="false"/>
    <arg name="use_sim_time" default="true"/>
    <arg name="gui" default="true"/>
    <arg name="headless" default="false"/>
    <arg name="debug" default="false"/>

    <include file="$(find gazebo_ros)/launch/empty_world.launch">
        <arg name="world_name" value="$(find rosbot_patrol_simulation)/worlds/model.world"/>
    </include>
    <include file="$(find rosbot_description)/launch/rosbot_gazebo.launch"/>
    <include file="$(find rosbot_patrol_simulation)/launch/gmapping_only.launch" />
    <include file="$(find rosbot_patrol_simulation)/launch/move_base_only.launch" />

    <node pkg="tf" type="static_transform_publisher" name="laser_broadcaster" args="0 0 0 3.14 0 0 base_link laser_frame 100" />
    <node name="teleop_twist_keyboard" pkg="teleop_twist_keyboard" type="teleop_twist_keyboard.py" output="screen"/>

</launch>
This launch gives ability to explore this world. To do that use following command
roslaunch rosbot_patrol_simulation simulation_gmapping.launch
If only everything is configured properly there should be simulation of house-like world model. Robot should be able controllable from keyboard or from rviz setting goals. Next step is to map whole world, so drive rosbot to every room and check on rviz if everything is done correctly after that save map.
Save map
Open another terminal and go to our project then in simulation make directory for maps.
mkdir maps
cd maps
There map should be saved - do that with following command:
rosrun map_server map_saver -f rosbot_map
After that there should be map in folder maps
AMCL
Once the map is already saved we need to create launch for amcl to make the robot find it's location on that map. In launch directory make new file called amcl_only.launch
roscd rosbot_patrol_simulation
cd launch
touch amcl_only.launch
Inside of this file paste following code, it's also in tutorial pkg :
<launch>
    <node pkg="amcl" type="amcl" name="amcl" output="screen">
    <remap from="scan" to="/scan"/>
    <param name="odom_frame_id" value="odom"/>
    <param name="odom_model_type" value="diff-corrected"/>
    <param name="base_frame_id" value="base_link"/>
    <param name="update_min_d" value="0.5"/>
    <param name="update_min_a" value="1.0"/>
    </node>

</launch>
Final launch for world
In launch directory create launch for whole world with map.
roscd simulation
cd launch
touch simulation_world.launch
Inside of this file paste following code:
<?xml version="1.0" encoding="UTF-8"?>
<launch>
    <param name="use_sim_time" value="true"/>
    <arg name="world" default="empty"/>
    <arg name="paused" default="false"/>
    <arg name="use_sim_time" default="true"/>
    <arg name="gui" default="true"/>
    <arg name="headless" default="false"/>
    <arg name="debug" default="false"/>

    <include file="$(find gazebo_ros)/launch/empty_world.launch">
      <arg name="world_name" value="$(find rosbot_patrol_simulation)/worlds/model.world"/>
    </include>
    <include file="$(find rosbot_description)/launch/rosbot_gazebo.launch"/>
    <include file="$(find rosbot_patrol_simulation)/launch/move_base_only.launch" />
    <include file="$(find rosbot_patrol_simulation)/launch/amcl_only.launch"/>

    <node pkg="tf" type="static_transform_publisher" name="laser_broadcaster"   args="0 0 0 3.14 0 0 base_link laser_frame 100" />
    <node name="teleop_twist_keyboard" pkg="teleop_twist_keyboard" type="teleop_twist_keyboard.py" output="screen"/>

    <!--map server with simul map-->
    <arg name="map_file" default="$(find rosbot_patrol_simulation)/maps/rosbot_map.yaml"/>
    <node name="map_server" pkg="map_server" type="map_server" args="$(arg map_file)" respawn="false" />

</launch>
Main code
Our custom message for esp
It is needed to define new type of message for motion sensor - real microcontrollers won't be used in simulation, but message will be the same as in real robot part. Create folder called msg and inside make file called EspTrigger.msg
roscd rosbot_patrol_simulation
mkdir msg
cd msg
touch EspTrigger.msg
Inside of this file there will be only two lines:
uint8 id
bool move
id - number of room where sensor is placed
move - value informing if there is move detected
Class files
In include folder create file called PatrolManager.h
roscd rosbot_patrol_simulation
cd include
touch PatrolManager.h
In this file put following code:
#include <iostream>
#include <ros/ros.h>
#include <string.h>
#include <tf/transform_listener.h>
#include <actionlib/client/simple_action_client.h>
#include <actionlib/client/terminal_state.h>
#include <geometry_msgs/PoseStamped.h>
#include <geometry_msgs/Quaternion.h>
#include <geometry_msgs/Vector3.h>
#include <geometry_msgs/Twist.h>
#include <move_base_msgs/MoveBaseAction.h>
#include <move_base_msgs/MoveBaseGoal.h>
#include <vector>

using namespace std;
class PatrolManager
{
public:
    PatrolManager(ros::NodeHandle &nh);
    ~PatrolManager();
    bool moveToGoal(std::string name, float x, float y, float theta);
    bool makeSpin(double radians, bool clockwise = 1);

private:
    std::vector<double> quaternion_from_euler(double yaw, double pitch, double roll);
    std::vector<double> quaternion;
    ros::NodeHandle nh_;             //The node handle we'll be using
    ros::Publisher cmd_vel_pub_;     //We will be publishing to the "cmd_vel" topic to issue commands
    tf::TransformListener listener_; //We will be listening to TF transforms
};
This class has many libraries included it's because we will be sending goals to action server.
Inicializer takes one argument - pointer for node handle, this is because method for making spins require publishing to cmd_vel topic.
Other public methods are made for driving to destination described in yaml file and making spin as "scanning".
Once .h file is created let's go create .cpp file, change folder to src and inside it make new file.
cd .. && cd src
touch PatrolManager.cpp
Inside paste this code:
#include <PatrolManager.h>

using namespace std;

PatrolManager::PatrolManager(ros::NodeHandle &nh)
{
    nh_ = nh;
    cmd_vel_pub_ = nh_.advertise<geometry_msgs::Twist>("cmd_vel", 1);
}

PatrolManager::~PatrolManager() {}

bool PatrolManager::makeSpin(double radians, bool clockwise)
{

    while (radians < 0)
        radians += 2 * M_PI;
    while (radians > 2 * M_PI)
        radians -= 2 * M_PI;

    listener_.waitForTransform(
        "/base_link", "/odom", ros::Time(0),
        ros::Duration(1.0)); // wait for the listener to get the first message

    tf::StampedTransform start_transform;
    tf::StampedTransform current_transform;
    listener_.lookupTransform("/base_link", "/odom", ros::Time(0), start_transform);

    geometry_msgs::Twist base_cmd;
    base_cmd.linear.x = base_cmd.linear.y = 0.0;
    base_cmd.angular.z = 0.75; // set apropirate velocity for robot
    if (clockwise)
        base_cmd.angular.z = -base_cmd.angular.z;

    tf::Vector3 desired_turn_axis(0, 0, 1); // the axis we want to be rotating by
    if (!clockwise)
        desired_turn_axis = -desired_turn_axis;

    ros::Rate rate(5.0);
    bool done = false;

    while (!done && nh_.ok())
    {
        cmd_vel_pub_.publish(base_cmd);
        rate.sleep();

        try
        {
            listener_.lookupTransform("/base_link", "/odom", ros::Time(0),
                                      current_transform);
        }
        catch (tf::TransformException ex)
        {
            ROS_ERROR("%s", ex.what());
            break;
        }
        // see how far we've traveled
        tf::Transform relative_transform =
            start_transform.inverse() * current_transform;
        tf::Vector3 actual_turn_axis = relative_transform.getRotation().getAxis();
        double angle_turned = relative_transform.getRotation().getAngle();
        if (fabs(angle_turned) < 1.0e-2) //to make less computation if there is not much rotation made
        {
            continue;
        }

        if (actual_turn_axis.dot(desired_turn_axis) < 0)
        {
            angle_turned = 2 * M_PI - angle_turned;
        }
        if (angle_turned > radians)
        {
            done = true;
        }
    }
    if (done)
    {
        return true;
    }
    else
    {
        return false;
    }
}

bool PatrolManager::moveToGoal(std::string the_name, float the_x, float the_y,
                               float the_theta)
{
    actionlib::SimpleActionClient<move_base_msgs::MoveBaseAction> ac("move_base",
                                                                     true);

    while (!ac.waitForServer(ros::Duration(5.0)))
    {
        ROS_INFO("Waiting for the move_base action server to come up");
    }

    move_base_msgs::MoveBaseGoal goal;

    goal.target_pose.header.frame_id = "map";
    goal.target_pose.header.stamp = ros::Time::now();
    goal.target_pose.pose.position.x = the_x;
    goal.target_pose.pose.position.y = the_y;
    quaternion = quaternion_from_euler(0.0, 0.0, the_theta);
    goal.target_pose.pose.orientation.x = quaternion[0];
    goal.target_pose.pose.orientation.y = quaternion[1];
    goal.target_pose.pose.orientation.z = quaternion[2];
    goal.target_pose.pose.orientation.w = quaternion[3];

    ROS_INFO("Sending goal location :");
    printf("x: %f ,y: %f ,th: %f ", the_x, the_y, the_theta);
    ac.sendGoal(goal);
    ac.waitForResult(); //wait until the result is given

    if (ac.getState() == actionlib::SimpleClientGoalState::SUCCEEDED)
    {
        ROS_INFO("Robot reached it's destination and started scanning area");
        return true;
    }
    else
    {
        ROS_INFO("The robot failed to reach the destination check that");
        return false;
    }
}

std::vector<double>
PatrolManager::quaternion_from_euler(double roll, double pitch, double yaw) //method just to convert quaternion from euler - to give user clearance
{

    std::vector<double> quat;

    // Abbreviations for the various angular functions
    double cy = cos(yaw * 0.5);
    double sy = sin(yaw * 0.5);
    double cp = cos(pitch * 0.5);
    double sp = sin(pitch * 0.5);
    double cr = cos(roll * 0.5);
    double sr = sin(roll * 0.5);

    quat.push_back(cy * cp * sr - sy * sp * cr); // x
    quat.push_back(sy * cp * sr + cy * sp * cr); // y
    quat.push_back(sy * cp * cr - cy * sp * sr); // z
    quat.push_back(cy * cp * cr + sy * sp * sr); // w

    return quat;
}
Main file
In src directory create another file called patrol_robot_simulation.cpp
touch patrol_robot_simulation.cpp
In this file paste following code:
#include <PatrolManager.h>
#include <darknet_ros_msgs/BoundingBoxes.h>
#include <ros/ros.h>
#include <rosbot_patrol_simulation/EspTrigger.h>
#include <std_msgs/Bool.h>
#include <stdio.h>
#include <vector>
#include <yaml-cpp/yaml.h>

using namespace std;

string params_path, email_from, email_to;
bool room_reached = {0};
bool starting_poit_reached = {0};
ros::Time last_email_sent;
ros::NodeHandle *nh_ptr;

vector<string> room_names{}; //initialization of vectors for our destination points
vector<double> x_coordinates{};
vector<double> y_coordinates{};
vector<double> th_coordinates{};

void sendMail(const char *to, const char *from, const char *subject,
              const char *message)
{
    ROS_INFO("Sending mail!!!");
    // int retval = -1;
    FILE *mailpipe = popen("/usr/lib/sendmail -t", "w");
    if (mailpipe != NULL)
    {
        fprintf(mailpipe, "To: %s\n", to);
        fprintf(mailpipe, "From: %s\n", from);
        fprintf(mailpipe, "Subject: %s\n\n", subject);
        fwrite(message, 1, strlen(message), mailpipe);
        fwrite(".\n", 1, 2, mailpipe);
        pclose(mailpipe);
        // retval = 0;
    }
    else
    {
        perror("Failed to invoke sendmail");
    }
    // return retval;
}

void saveConfigFiles(string path)
{
    ROS_INFO("path is : %s", path.c_str());
    YAML::Node conf_file = YAML::LoadFile(path.c_str());
    for (int i = 0; i < conf_file["rooms_num"].as<int>(); i++)
    {
        x_coordinates.push_back(
            conf_file["rooms"]["room" + to_string(i)]["x"].as<double>());
        y_coordinates.push_back(
            conf_file["rooms"]["room" + to_string(i)]["y"].as<double>());
        th_coordinates.push_back(
            conf_file["rooms"]["room" + to_string(i)]["angle"].as<double>());
        room_names.push_back(
            conf_file["rooms"]["room" + to_string(i)]["name"].as<std::string>());
    }
}

void darknetCallback(const darknet_ros_msgs::BoundingBoxes &bb_msg)
{

    int size =
        bb_msg.bounding_boxes.size(); // ros msgs are mapped onto std::vector
    for (int i = 0; i < size; i++)
    {
        // ROS_INFO("checking for obj");
        if ((bb_msg.bounding_boxes[i].Class == "fire hydrant") or
            (bb_msg.bounding_boxes[i].Class == "person"))
        {
            ROS_INFO("Found fire hydrant or person/people");

            ros::Time time_now = ros::Time::now();
            if (time_now - last_email_sent >= ros::Duration(10))
            {
                sendMail(email_to.c_str(), email_from.c_str(), "rosbot patrol node", "I have found something strange it could be invader");
                last_email_sent = time_now;
            }
        }
    }
}

void espCallback(const rosbot_patrol_simulation::EspTrigger &trigger_msg)
{
    bool spin_made;

    if (trigger_msg.move == 1)
    {
        int esp_id = trigger_msg.id;
        PatrolManager pn(*nh_ptr);

        room_reached = pn.moveToGoal(room_names[esp_id], x_coordinates[esp_id],
                                     y_coordinates[esp_id], th_coordinates[esp_id]);
        if (room_reached)
        {
            ROS_INFO("I've reached destination");
        }

        spin_made = pn.makeSpin(M_PI , 0);
        spin_made = pn.makeSpin(M_PI , 0);
        if (spin_made)
        {
            ROS_INFO("I've just scanned room");
        }

        starting_poit_reached = pn.moveToGoal(room_names[0], x_coordinates[0],
                                              y_coordinates[0], th_coordinates[0]);
        if (starting_poit_reached)
        {
            ROS_INFO("I've reached starting_poit_reached");
        }
    }
}

int main(int argc, char *argv[])
{
    ros::init(argc, argv, "patrol_robot_simulation");
    ros::NodeHandle nh("~");
    nh_ptr = &nh;
    nh.getParam("path_to_params", params_path);
    nh.getParam("email_to", email_to);
    nh.getParam("email_from", email_from);
    printf("path : %s", params_path.c_str());
    saveConfigFiles(params_path);

    ros::Subscriber sub_esp = nh.subscribe("/motion_trigger", 1, espCallback);
    ros::Subscriber sub_darknet =
        nh.subscribe("/darknet_ros/bounding_boxes", 10, darknetCallback);

    ros::Rate loop_rate(50);
    last_email_sent = ros::Time::now();
    while (ros::ok)
    {

        ros::spinOnce();
        loop_rate.sleep();
    }

    return 0;
}
remember to change permission for file by running following command:
chmod +x patrol_robot_simulation.cpp
chmod +x PatrolManager.cpp
CMakeLists and package
In CMakeLists.txt paste following code:
cmake_minimum_required(VERSION 2.8.3)
project(rosbot_patrol_simulation)

add_compile_options(-std=c++11)

find_package(catkin REQUIRED COMPONENTS
  message_generation
  geometry_msgs
  gmapping
  move_base
  roscpp
  rospy
  tf
  darknet_ros
)

find_package( OpenCV REQUIRED )

add_message_files(FILES
  EspTrigger.msg
)

generate_messages(DEPENDENCIES
  std_msgs
)

catkin_package(
  CATKIN_DEPENDS
  message_runtime
)

include_directories(
  include ${catkin_INCLUDE_DIRS}
  ${catkin_INCLUDE_DIRS}
  ${OpenCV_INCLUDE_DIRS}
)

add_executable(patrol_robot_simulation src/patrol_robot_simulation.cpp src/PatrolManager.cpp)
add_dependencies(patrol_robot_simulation ${${PROJECT_NAME}_EXPORTED_TARGETS} ${catkin_EXPORTED_TARGETS})
target_link_libraries(patrol_robot_simulation
  ${catkin_LIBRARIES} yaml-cpp
)
To file package.xml paste following code:
<?xml version="1.0"?>
<package format="2">
  <name>rosbot_patrol_simulation</name>
  <version>0.0.0</version>
  <description>The rosbot_patrol_simulation package</description>

  <maintainer email="adam-krawczyk@outlook.com">adam</maintainer>

  <license>TODO</license>

  <buildtool_depend>catkin</buildtool_depend>
  <build_depend>roscpp</build_depend>
  <build_depend>rospy</build_depend>
  <build_export_depend>roscpp</build_export_depend>
  <build_export_depend>rospy</build_export_depend>
  <exec_depend>roscpp</exec_depend>
  <exec_depend>rospy</exec_depend>

  <!-- The export tag contains other, unspecified, tags -->
  <export>
    <!-- Other tools can request additional information be placed here -->

  </export>
<build_depend>message_generation</build_depend>
<build_export_depend>message_generation</build_export_depend>
<exec_depend>message_runtime</exec_depend>
<build_depend> darknet_ros </build_depend>
<build_depend>common_rosdeps</build_depend>
<exec_depend>common_rosdeps</exec_depend>
</package>
Create room points
Next step is to create points to where robot must drive when motion sensor detect movement. The construct have very nice method to have these points so follow him with this tutorial.
how to get goal points start at 30:00.

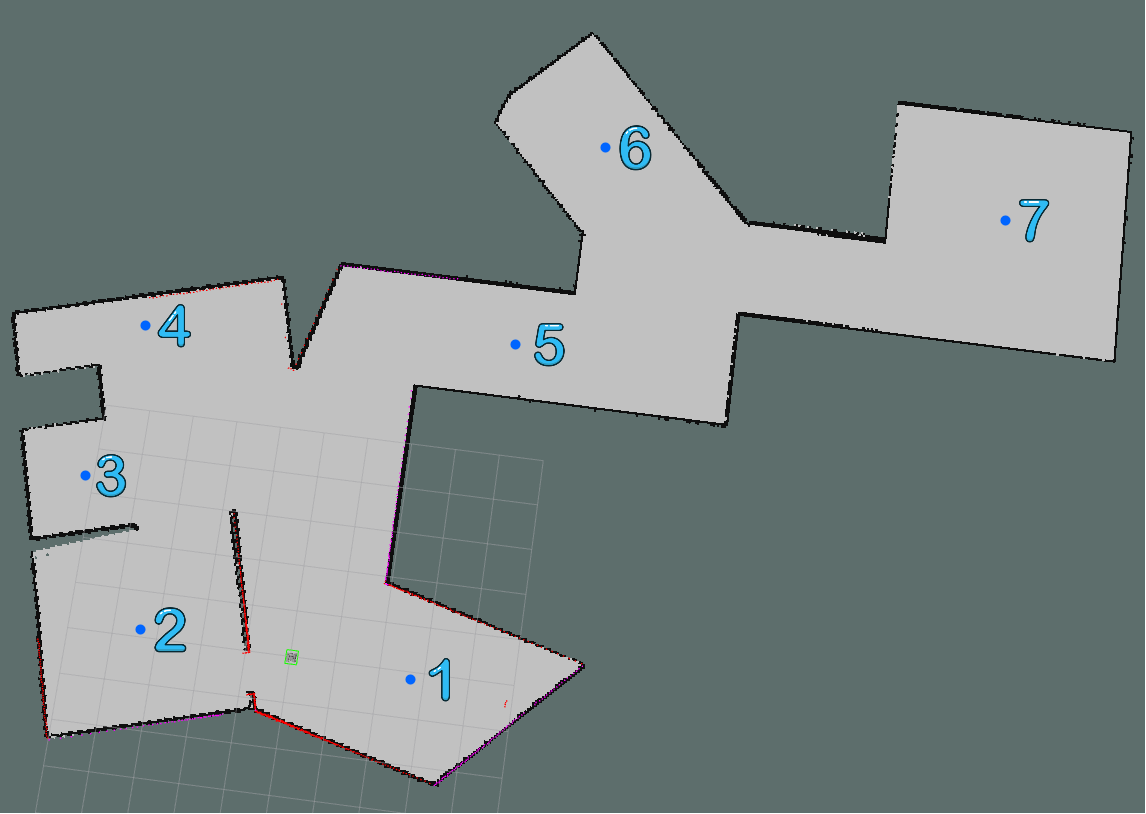
So in this case to get this points it is recommended to start gmapping, drive robot to desired point and get coordinates of this point from Rviz.
roslaunch rosbot_patrol_simulation simulation_gmapping.launch
On the other terminal launch rviz:
rviz
Once points are known lets create yaml file with those points. In rosbot_patrol_simulation pkg create new folder called params
cd ..
mkdir params
cd params && touch room_points.yaml
In room_points.yaml file place found points with following convention:
#name rooms must be numerated consequently as room<num>

rooms_num: 11   #remember that is enumerated from 0
rooms:
  room0:
    name: "base/return point" #if it's set to 0,0,0 robot will go back to start point
    x:      0
    y:      0
    angle:  0

  room1:
    name: "room1-name"
    x:      2.819
    y:      -0.175
    angle:  0

  room2:
    name: "room2-name"
    x:      -3.489
    y:      0.306
    angle:  0

  room3:
    name: "room3-name"
    x:      -4.786
    y:      3.412
    angle:  0

  room4:
    name: "room4-name"
    x:      -3.848
    y:      6.496
    angle:  0

  room5:
    name: "room5-name"
    x:      2.682
    y:      7.352
    angle:  0

  room6:
    name: "room6-name"
    x:      5.651
    y:      12.038
    angle:  0

  room7:
    name: "room7-name"
    x:      14.750
    y:      11.480
    angle:  0

  room8:
    name: "room8 - name"
    x:      0.21
    y:      0.5942
    angle:  0


  room9:
    name: "room8 - name"
    x:      -0.01
    y:      0.542
    angle:  45


  room10:
    name: "room8 - name"
    x:      -0.21
    y:      -0.42
    angle:  180
This are points for model.world world remember to set point0 to all zeroes - it's point to where robot will be coming back after patrolling room.
Yolo setup
Next we need to setup neural network - for that we will use pre-trained model. In config directory we create for this purpose config file.
roscd rosbot_patrol_simulation
cd config
touch darknet_config_simulation.yaml
In darknet_config_simulation.yaml:
subscribers:

  camera_reading:
    topic: /camera/rgb/image_raw
    queue_size: 1

actions:

  camera_reading:
    name: /darknet_ros/check_for_objects

publishers:

  object_detector:
    topic: /darknet_ros/found_object
    queue_size: 1
    latch: false

  bounding_boxes:
    topic: /darknet_ros/bounding_boxes
    queue_size: 1
    latch: false

  detection_image:
    topic: /darknet_ros/detection_image
    queue_size: 1
    latch: true

image_view:

  enable_opencv: true
  wait_key_delay: 1
  enable_console_output: true
And that's all - it isn't necessary to change anything else, now create launch file for neural network. In launch directory create new file called darknet_yolo_simulation_only.launch
roscd rosbot_patrol_simulation
cd launch
touch darknet_yolo_simulation_only.launch
Inside paste following code:
<launch>

  <!-- Console launch prefix -->
  <arg name="launch_prefix" default=""/>

  <!-- Config and weights folder. -->
  <arg name="yolo_weights_path"          default="$(find darknet_ros)/yolo_network_config/weights"/>
  <arg name="yolo_config_path"           default="$(find darknet_ros)/yolo_network_config/cfg"/>

  <!-- ROS and network parameter files -->
  <arg name="ros_param_file"             default="$(find rosbot_patrol_simulation)/config/darknet_config_simulation.yaml"/>
  <arg name="network_param_file"         default="$(find darknet_ros)/config/yolov2-tiny.yaml"/>

  <!-- Load parameters -->
  <rosparam command="load" ns="darknet_ros" file="$(arg ros_param_file)"/>
  <rosparam command="load" ns="darknet_ros" file="$(arg network_param_file)"/>

  <!-- Start darknet and ros wrapper -->
  <node pkg="darknet_ros" type="darknet_ros" name="darknet_ros" output="screen" launch-prefix="$(arg launch_prefix)">
    <param name="weights_path"          value="$(arg yolo_weights_path)" />
    <param name="config_path"           value="$(arg yolo_config_path)" />
  </node>

</launch>
At the end we have to wrap whole things to one launch file, create rosbot_patrol.launch
touch rosbot_patrol.launch
And paste following launch file:
<?xml version="1.0" encoding="UTF-8"?>
<launch>

    <include file="$(find rosbot_patrol_simulation)/launch/darknet_yolo_simulation_only.launch"/>

    <include file="$(find rosbot_patrol_simulation)/launch/simulation_world.launch"/>

                        <!-- patrol node -->
    <node pkg="rosbot_patrol_simulation" type="patrol_robot_simulation" name="patrolling_node" output="screen" respawn="true">

                        <!-- path to file  with  params of points -->
    <param name="path_to_params" type="string" value="$(find rosbot_patrol_simulation)/params/room_points.yaml" />
    <param name="email_to" type="string" value="*****@****.***" />  <!-- setup first mailbox on your device!!!!!! -->
    <param name="email_from" type="string" value="*****@****.***" />
    </node>

</launch>
Test this algorithm
To make it run simply paste in your terminal this command:
roslaunch rosbot_patrol_simulation rosbot_patrol.launch
To start robot running in desired point just publish to the topic robot is listening for move:
rostopic pub /motion_trigger rosbot_patrol_simulation/EspTrigger "id: 1
move: 1"
with appropriate id number.

Real robot part
Once simulation is made and our algorithm works now we can implement it to real rosbot
Introduction
On robot we also have to install all packages form introduction so in case you haven't just install that on your rosbot. There are currently new firmware for rosbot because of that in hardware launch is option to chose which version you have.
Let's create our package if you haven't done that before.
catkin_create_pkg rosbot_patrol roscpp
In real robot part some cool features will be needed, like information about move, image processing, path planning. Because current version of rosbot has not enough computing power (nether rosbot 2.0 nor rosbot PRO), so it is necessary to outsource image processing, and this require to implement compressed image transport what will be done. There are many things to do so hold on and stick to instructions.
Main code
Let's get this rolling!
roscd rosbot_patrol
Include
In this directory create new file called PatrolManager.h
cd include
touch PatrolManager.h
Paste there following code:
#include <iostream>
#include <ros/ros.h>
#include <string.h>
#include <tf/transform_listener.h>
#include <actionlib/client/simple_action_client.h>
#include <actionlib/client/terminal_state.h>
#include <geometry_msgs/PoseStamped.h>
#include <geometry_msgs/Quaternion.h>
#include <geometry_msgs/Vector3.h>
#include <geometry_msgs/Twist.h>
#include <move_base_msgs/MoveBaseAction.h>
#include <move_base_msgs/MoveBaseGoal.h>
#include <vector>

using namespace std;
class PatrolManager
{
public:
    PatrolManager(ros::NodeHandle &nh);
    ~PatrolManager();
    bool moveToGoal(std::string name, float x, float y, float theta);
    bool makeSpin(double radians, bool clockwise = 1);

private:
    std::vector<double> quaternion_from_euler(double yaw, double pitch, double roll);
    std::vector<double> quaternion;
    ros::NodeHandle nh_;             //The node handle we'll be using
    ros::Publisher cmd_vel_pub_;     //We will be publishing to the "cmd_vel" topic to issue commands
    tf::TransformListener listener_; //We will be listening to TF transforms
};
Src
Now we should create two files in src directory PatrolManager.cpp and patrol_robot.cpp .
roscd rosbot_patrol
cd src
touch PatrolManager.cpp
touch patrol_robot.cpp
In PatrolManager.cpp paste following code:
#include <PatrolManager.h>

using namespace std;

PatrolManager::PatrolManager(ros::NodeHandle &nh)
{
    nh_ = nh;
    cmd_vel_pub_ = nh_.advertise<geometry_msgs::Twist>("cmd_vel", 1);
}

PatrolManager::~PatrolManager() {}

bool PatrolManager::makeSpin(double radians, bool clockwise)
{

    while (radians < 0)
        radians += 2 * M_PI; // to perform rotation for more than 360 /-360
    while (radians > 2 * M_PI)
        radians -= 2 * M_PI;

    listener_.waitForTransform(
        "/base_link", "/odom", ros::Time(0),
        ros::Duration(1.0)); // wait for the listener to get the first message

    tf::StampedTransform start_transform;
    tf::StampedTransform current_transform;
    listener_.lookupTransform("/base_link", "/odom", ros::Time(0), start_transform);

    geometry_msgs::Twist base_cmd;
    base_cmd.linear.x = base_cmd.linear.y = 0.0;
    base_cmd.angular.z = 0.75; // set apropirate velocity for robot
    if (clockwise)
        base_cmd.angular.z = -base_cmd.angular.z;

    tf::Vector3 desired_turn_axis(0, 0, 1); // the axis we want to be rotating by
    if (!clockwise)
        desired_turn_axis = -desired_turn_axis;

    ros::Rate rate(5.0);
    bool done = false;
    // bool spin_done = false;

    while (!done && nh_.ok())
    {
        cmd_vel_pub_.publish(base_cmd);
        rate.sleep();

        try
        {
            listener_.lookupTransform("/base_link", "/odom", ros::Time(0),
                                      current_transform);
        }
        catch (tf::TransformException ex)
        {
            ROS_ERROR("%s", ex.what());
            break;
        }
        // see how far we've traveled
        tf::Transform relative_transform =
            start_transform.inverse() * current_transform;
        tf::Vector3 actual_turn_axis = relative_transform.getRotation().getAxis();
        double angle_turned = relative_transform.getRotation().getAngle();
        if (fabs(angle_turned) < 1.0e-2)
        {
            continue;
        }

        if (actual_turn_axis.dot(desired_turn_axis) < 0)
        {
            angle_turned = 2 * M_PI - angle_turned;
        }
        if (angle_turned > radians)
        {
            done = true;
        }
    }
    if (done)
    {
        return true;
    }
    else
    {
        return false;
    }
}

bool PatrolManager::moveToGoal(std::string the_name, float the_x, float the_y,
                               float the_theta)
{
    actionlib::SimpleActionClient<move_base_msgs::MoveBaseAction> ac("move_base",
                                                                     true);

    while (!ac.waitForServer(ros::Duration(5.0)))
    {
        ROS_INFO("Waiting for the move_base action server to come up");
    }

    move_base_msgs::MoveBaseGoal goal;

    goal.target_pose.header.frame_id = "map";
    goal.target_pose.header.stamp = ros::Time::now();
    goal.target_pose.pose.position.x = the_x;
    goal.target_pose.pose.position.y = the_y;
    quaternion = quaternion_from_euler(0.0, 0.0, the_theta);
    goal.target_pose.pose.orientation.x = quaternion[0];
    goal.target_pose.pose.orientation.y = quaternion[1];
    goal.target_pose.pose.orientation.z = quaternion[2];
    goal.target_pose.pose.orientation.w = quaternion[3];

    ROS_INFO("Sending goal location :");
    printf("x: %f ,y: %f ,th: %f ", the_x, the_y, the_theta);
    ac.sendGoal(goal);
    ac.waitForResult();

    if (ac.getState() == actionlib::SimpleClientGoalState::SUCCEEDED)
    {
        ROS_INFO("Robot reached it's destination and started scanning area");
        return true;
    }
    else
    {
        ROS_INFO("The robot failed to reach the destination check that");
        return false;
    }
}

std::vector<double>
PatrolManager::quaternion_from_euler(double roll, double pitch, double yaw)
{

    std::vector<double> quat;

    // Abbreviations for the various angular functions
    double cy = cos(yaw * 0.5);
    double sy = sin(yaw * 0.5);
    double cp = cos(pitch * 0.5);
    double sp = sin(pitch * 0.5);
    double cr = cos(roll * 0.5);
    double sr = sin(roll * 0.5);

    quat.push_back(cy * cp * sr - sy * sp * cr); // x
    quat.push_back(sy * cp * sr + cy * sp * cr); // y
    quat.push_back(sy * cp * cr - cy * sp * sr); // z
    quat.push_back(cy * cp * cr + sy * sp * sr); // w

    return quat;
}
Then paste following code to patrol_robot.cpp :
#include <PatrolManager.h>
#include <darknet_ros_msgs/BoundingBoxes.h>
#include <ros/ros.h>
#include <rosbot_patrol/EspTrigger.h>
#include <std_msgs/Bool.h>
#include <stdio.h>
#include <vector>
#include <yaml-cpp/yaml.h>

using namespace std;

string params_path, email_from, email_to;
bool room_reached = {0};
bool starting_poit_reached = {0};
ros::Time last_email_sent;
ros::NodeHandle *nh_ptr;

vector<string> room_names{};
vector<double> x_coordinates{};
vector<double> y_coordinates{};
vector<double> th_coordinates{};

void sendMail(const char *to, const char *from, const char *subject,
              const char *message)
{
    // int retval = -1;
    FILE *mailpipe = popen("/usr/lib/sendmail -t", "w");
    if (mailpipe != NULL)
    {
        fprintf(mailpipe, "To: %s\n", to);
        fprintf(mailpipe, "From: %s\n", from);
        fprintf(mailpipe, "Subject: %s\n\n", subject);
        fwrite(message, 1, strlen(message), mailpipe);
        fwrite(".\n", 1, 2, mailpipe);
        pclose(mailpipe);
        // retval = 0;
    }
    else
    {
        perror("Failed to invoke sendmail");
    }
    // return retval;
}

void saveConfigFiles(string path)
{
    ROS_INFO("path is : %s", path.c_str());
    YAML::Node conf_file = YAML::LoadFile(path.c_str());
    for (int i = 0; i < conf_file["rooms_num"].as<int>(); i++)
    {
        x_coordinates.push_back(
            conf_file["rooms"]["room" + to_string(i)]["x"].as<double>());
        y_coordinates.push_back(
            conf_file["rooms"]["room" + to_string(i)]["y"].as<double>());
        th_coordinates.push_back(
            conf_file["rooms"]["room" + to_string(i)]["angle"].as<double>());
        room_names.push_back(
            conf_file["rooms"]["room" + to_string(i)]["name"].as<std::string>());
    }
}

void darknetCallback(const darknet_ros_msgs::BoundingBoxes &bb_msg)
{

    int size =
        bb_msg.bounding_boxes.size(); // ros msgs are mapped onto std::vector
    for (int i = 0; i < size; i++)
    {
        // ROS_INFO("checking for obj");
        if ((bb_msg.bounding_boxes[i].Class == "fire hydrant") or
            (bb_msg.bounding_boxes[i].Class == "person"))
        {
            ROS_INFO("Found fire hydrant or person/people");

            ros::Time time_now = ros::Time::now();
            if (time_now - last_email_sent >= ros::Duration(10))
            {
                sendMail(email_to.c_str(), email_from.c_str(), "rosbot patrol node",
                         "I have found something strange it could be invader");
                last_email_sent = time_now;
            }
        }
    }
}

void espCallback(const rosbot_patrol::EspTrigger &trigger_msg)
{
    bool spin_made;

    // const char[] command = "mail -s \"test\" " + email_addr + " <<< \"im in
    // espCallback\" ";
    // auto response = system("mail -s \"test\" " + email_addr + " <<< \"im in
    // espCallback\" ") ; // <--- place all this to darknetCb
    // ROS_INFO("im in espCallback");

    if (trigger_msg.move == 1)
    {
        int esp_id = trigger_msg.id;
        PatrolManager pn(*nh_ptr);

        room_reached = pn.moveToGoal(room_names[esp_id], x_coordinates[esp_id],
                                     y_coordinates[esp_id], th_coordinates[esp_id]);
        if (room_reached)
        {
            ROS_INFO("I've reached destination");
        }

        spin_made = pn.makeSpin(M_PI , 0);
        spin_made = pn.makeSpin(M_PI , 0);
        if (spin_made)
        {
            ROS_INFO("I've just scanned room");
        }

        starting_poit_reached = pn.moveToGoal(room_names[0], x_coordinates[0],
                                              y_coordinates[0], th_coordinates[0]);
        if (starting_poit_reached)
        {
            ROS_INFO("I've reached starting_poit_reached");
        }
    }
}

int main(int argc, char *argv[])
{
    ros::init(argc, argv, "patrol_robot_node");
    ros::NodeHandle nh("~");
    nh_ptr = &nh;
    nh.getParam("path_to_params", params_path);
    nh.getParam("email_to", email_to);
    nh.getParam("email_from", email_from);
    printf("path : %s", params_path.c_str());
    saveConfigFiles(params_path);

    ros::Subscriber sub_esp = nh.subscribe("/motion_trigger", 1, espCallback);
    ros::Subscriber sub_darknet =
        nh.subscribe("/darknet_ros/bounding_boxes", 100, darknetCallback);

    ros::Rate loop_rate(50);
    last_email_sent = ros::Time::now();
    while (ros::ok)
    {

        ros::spinOnce();
        loop_rate.sleep();
    }

    return 0;
}
remember to change permission for file by running following command:
chmod +x patrol_robot.cpp
chmod +x PatrolManager.cpp
Hardware launches
For this task is required to launch some things, all of them should be wrapped up as rosbot_all_hardware.launch In here there is option to change launch varing of rosbot firmware version.
- camera
- connection to core2 - controller for motors
- transform publishers for our sensor
- lidar
Create in launch directory file called rosbot_all_hardware.launch
roscd rosbot_patrol
mkdir launch
cd launch && touch rosbot_all_hardware.launch
In this new file paste following code:
REMEMBER TO SET CORRECT PART FOR YOUR FIRMWARE AND ROSBOT VERSION!!!
<?xml version="1.0" encoding="UTF-8"?>
<launch>

    <arg name="rosbot_version" default="$(optenv ROSBOT_VER)"/>

    <include file="$(find astra_camera)/launch/astra.launch"/>

    <include file="$(find rplidar_ros)/launch/rplidar.launch"/>

    <node pkg="tf" type="static_transform_publisher" name="laser_publisher" args="0 0 0.058 3.14159 0 0 base_link laser 100" />

    <node pkg="tf" type="static_transform_publisher" name="imu_publisher" args="0 0 0.02 0 0 0 base_link imu_link 100" />

    <node pkg="tf" type="static_transform_publisher" name="camera_publisher" args="-0.03 0 0.18 0 0 0 base_link camera_link 100" />

<!-- here you have to chose appropirate launch depending on your rosbot firmware - I'm strongly recommend to install new firmware it has some utilities including Extended Kalman Filter -->


    <!-- NEW FIRMWARE -->
    <include file="$(find rosbot_ekf)/launch/all.launch"/>

    <!-- OLD FIRMWARE -->
   <!--
    <node pkg="tutorial_pkg" type="drive_controller_node" name="drive_controller"/>
    <node pkg="tutorial_pkg" type="serial_bridge.sh" name="serial_bridge"   />
    -->

</launch>
You have to specify which rosbot firmware are you using - since new version is fresh it's very likely that you're using old version
NOTE: Remember about rosbot_ekf package.
You can upgrade it using this instruction rosbot new firmware
Now we need to focus about algorithm.
We need launches for:
- move base
- gmapping
- AMCL
Move base
In launch folder create new file called move_base_only.launch and paste following code inside.
touch move_base_only.launch
<launch>

    <node pkg="move_base" type="move_base" name="move_base" output="log">
        <param name="controller_frequency" value="10.0"/>
        <rosparam file="$(find tutorial_pkg)/config/costmap_common_params.yaml" command="load" ns="global_costmap" />
        <rosparam file="$(find tutorial_pkg)/config/costmap_common_params.yaml" command="load" ns="local_costmap" />
        <rosparam file="$(find tutorial_pkg)/config/local_costmap_params.yaml" command="load" />
        <rosparam file="$(find tutorial_pkg)/config/global_costmap_params.yaml" command="load" />
        <rosparam file="$(find tutorial_pkg)/config/trajectory_planner.yaml" command="load" />
    </node>

</launch>
AMCL
In launch folder create new file called amcl_only.launch
touch amcl_only.launch
Paste there following code:
<launch>

    <node pkg="amcl" type="amcl" name="amcl" output="screen">
        <remap from="scan" to="/scan"/>
        <param name="odom_frame_id" value="odom"/>
        <param name="odom_model_type" value="diff-corrected"/>
        <param name="base_frame_id" value="base_link"/>
        <param name="update_min_d" value="0.1"/>
        <param name="update_min_a" value="0.2"/>
        <param name="min_particles" value="500"/>
        <param name="global_frame_id" value="map"/>
        <param name="tf_broadcast" value="true" />

    </node>

</launch>
Gmapping
touch gmapping_only.launch
Paste this code inside:
<launch>

  <node pkg="gmapping" type="slam_gmapping" name="slam_gmapping" output="screen">
    <remap from="/base_scan" to="/scan"/>

    <param name="base_frame" value="base_link"/>
    <param name="map_frame" value="map"/>
    <param name="odom_frame" value="odom"/>

    <param name="map_update_interval" value="5.0"/>
    <param name="maxUrange" value="16.0"/>
    <param name="sigma" value="0.05"/>
    <param name="kernelSize" value="1"/>
    <param name="lstep" value="0.05"/>
    <param name="astep" value="0.05"/>
    <param name="iterations" value="5"/>
    <param name="lsigma" value="0.075"/>
    <param name="ogain" value="3.0"/>
    <param name="lskip" value="0"/>
    <param name="srr" value="0.1"/>
    <param name="srt" value="0.2"/>
    <param name="str" value="0.1"/>
    <param name="stt" value="0.2"/>
    <param name="linearUpdate" value="0.05"/>
    <param name="angularUpdate" value="0.05"/>
    <param name="temporalUpdate" value="0.5"/>
    <param name="resampleThreshold" value="0.5"/>
    <param name="particles" value="30"/>
    <param name="xmin" value="-50.0"/>
    <param name="ymin" value="-50.0"/>
    <param name="xmax" value="50.0"/>
    <param name="ymax" value="50.0"/>
    <param name="delta" value="0.05"/>
    <param name="llsamplerange" value="0.01"/>
    <param name="llsamplestep" value="0.01"/>
    <param name="lasamplerange" value="0.005"/>
    <param name="lasamplestep" value="0.005"/>
  </node>

</launch>
Now create launch for mapping.
In launch directory create file rosbot_gmapping.launch and paste following code:
touch rosbot_gmapping.launch
<?xml version="1.0" encoding="UTF-8"?>
<launch>

    <include file="$(find rosbot_patrol)/launch/rosbot_all_hardware.launch"/>
    <include file="$(find rosbot_patrol)/launch/move_base_only.launch"/>
    <node pkg="teleop_twist_keyboard" type="teleop_twist_keyboard.py" name="teleop_twist_keyboard" output="screen"/>
    <include file="$(find rosbot_patrol)/launch/gmapping_only.launch" />

</launch>
To start mapping run following command:
catkin_make
roslaunch rosbot_patrol rosbot_gmapping.launch
Then in different terminal launch:
rviz
You should be able to see how robot is mapping. After that open another terminal and save map:
roscd rosbot_patrol
mkdir maps && cd maps
rosrun map_server map_saver -f rosbot_map
Find coordinates for move sensor
If we already are able to drive on this map we have to find coordinates to where robot should drive. There is still the same method as during simulation so use Ricardo's method :
how to get goal points start at 30:00.
Once we have points lets create yaml file with those points. In rosbot_patrol pkg create new folder called params
mkdir params
cd params && touch room_points.yaml
Put appropriate data, if you have less sensors just remove unnecessary room names if you have more rooms simply add more and change rooms_num to appropriate for your new room number. In room_points.yaml file place your points with following convention:
#name rooms must be numerated consequently as room<num>

rooms_num: 8   #remember that is enumerated from 0
rooms:
  room0:
    name: "base/return point" #if it's set to 0,0,0 robot will go back to start point
    x:    0
    y:    0
    angle: 0

  room1:
    name: "room1-name"
    x:    2.819
    y:    -0.175
    angle: 0

  room2:
    name: "room2-name"
    x:    -3.489
    y:    0.306
    angle: 0

  room3:
    name: "room3-name"
    x:    -4.786
    y:    3.412
    angle: 0

  room4:
    name: "room4-name"
    x:    -3.848
    y:    6.496
    angle: 0

  room5:
    name: "room5-name"
    x:    2.682
    y:    7.352
    angle: 0

  room6:
    name: "room6-name"
    x:    5.651
    y:    12.038
    angle: 0

  room7:
    name: "room7-name"
    x:    14.750
    y:    11.480
    angle: 0
This are points for model.world world remember to set point0 to all zeroes - it's point to where robot will be coming back after patrolling room.
Setup ESP32
To make ESP32 work it's needed to make some steps. First of them is to proper setup environment, I will not be explaining because here is link to my project showing how to make that properly it is also basic usage:
Remember to set it up on your computer!
Once it is working working we need to setup rosserial to works with husarnet - this will give ability to use ESP32 microcontrollers for sending information about potential movement. To make it works it's needed to remove current version of rosserial and install the one made for husarnet
sudo apt-get remove ros-melodic-rosserial*
Then go to my github and clone to workspace repository from ipv6-husarnet branch ipv6-husarnet or use following command:
cd ~/ros_workspace/src
git clone --single-branch --branch ipv6-husarnet https://github.com/adamkrawczyk/rosserial.git
Next thing is to make custom message to do, so it is required to make directory called msg and inside there create new file called EspTrigger.msg
roscd rosbot_patrol
mkdir msg
cd msg
touch EspTrigger.msg
Inside of this file there will be only two lines:
uint8 id
bool move
id - number of room where sensor is placed
move - value informing if there is move detected
CMakeList and package
after this let's update CMakeList and package.xml:
paste following code inside of CMakeList.txt:
cmake_minimum_required(VERSION 2.8.3)
project(rosbot_patrol)

add_compile_options(-std=c++11)

find_package(catkin REQUIRED COMPONENTS
  message_generation
  geometry_msgs
  gmapping
  move_base
  roscpp
  rospy
  tf
  darknet_ros
)

find_package( OpenCV REQUIRED )


add_message_files(FILES
  EspTrigger.msg
)


generate_messages(DEPENDENCIES
  std_msgs
)

catkin_package(
  CATKIN_DEPENDS
  message_runtime
)


include_directories(
  include ${catkin_INCLUDE_DIRS}
  ${catkin_INCLUDE_DIRS}
  ${OpenCV_INCLUDE_DIRS}
)


add_executable(patrol_robot src/patrol_robot.cpp src/PatrolManager.cpp)
add_dependencies(patrol_robot ${${PROJECT_NAME}_EXPORTED_TARGETS} ${catkin_EXPORTED_TARGETS})
target_link_libraries(patrol_robot
  ${catkin_LIBRARIES} yaml-cpp
)
In package.xml paste:
<?xml version="1.0"?>
<package format="2">
  <name>rosbot_patrol</name>
  <version>0.0.0</version>
  <description>The rosbot_patrol package</description>

  <maintainer email="adam-krawczyk@outlook.com">adam</maintainer>

  <license>TODO</license>

  <buildtool_depend>catkin</buildtool_depend>
  <build_depend>roscpp</build_depend>
  <build_depend>rospy</build_depend>
  <build_export_depend>roscpp</build_export_depend>
  <build_export_depend>rospy</build_export_depend>
  <exec_depend>roscpp</exec_depend>
  <exec_depend>rospy</exec_depend>


  <!-- The export tag contains other, unspecified, tags -->
  <export>
    <!-- Other tools can request additional information be placed here -->

  </export>
<build_depend>message_generation</build_depend>
<build_export_depend>message_generation</build_export_depend>
<exec_depend>message_runtime</exec_depend>
<build_depend> darknet_ros </build_depend>
<build_depend>common_rosdeps</build_depend>
<exec_depend>common_rosdeps</exec_depend>
</package>
Build this with catkin_make install . After that it is possible to setup arduino IDE, to do that follow official instructions:
!! Start at point 2.2 setup arduino IDE
If we have husarnet set up we can create new sketch for our arduino project:
- In your sketchbook create new directory called esp_husarnet
- In this folder create file called esp_husarnet.ino
- Paste following code:
#include <ros.h>
#include <std_msgs/String.h>
#include <WiFi.h>
#include <Husarnet.h>
#include <rosbot_patrol/EspTrigger.h>
#include <WiFiMulti.h>

#define PUB_FREQ 2 // frequency of publishing data - it don't have to be large num
#define ID 2       // number of device - pair this with number of your room

uint16_t port = 11411; //this must be set the same as tcp_port in launch file (esp_connect.launch)

const int motionSensor = 27; // pin number for motion sensor

// Timer: Auxiliary variables
unsigned long now = millis();
unsigned long lastTrigger = 0;

// Husarnet credentials
const char *hostName0 = "******";   //this will be the name of the 1st ESP32 device at https://app.husarnet.com
const char *hostName1 = "********"; //this will be the name of the host/rosmaster device at https://app.husarnet.com

/* to get your join code go to https://app.husarnet.com
-> select network
-> click "Add element"
-> select "join code" tab
Keep it secret!
*/
const char *husarnetJoinCode = "**********";

// WiFi credentials
#define NUM_NETWORKS 2 //number of Wi-Fi network credentials saved

const char *ssidTab[NUM_NETWORKS] = {
    "****",
    "***",
};

const char *passwordTab[NUM_NETWORKS] = {
    "******",
    "********",
};

WiFiMulti wifiMulti;
HusarnetClient client;

class WiFiHardware
{

public:
    WiFiHardware(){};

    void init()
    {
        // do your initialization here. this probably includes TCP server/client setup
        Serial.printf("WiFiHardware: init, hostname = %s, port = %d\r\n", hostName1, port);
        while (!client.connect(hostName1, port))
        {
            Serial.printf("Waiting for connection\r\n");
            delay(500);
        }
    }

    // read a byte from the serial port. -1 = failure
    int read()
    {
        // implement this method so that it reads a byte from the TCP connection and returns it
        // you may return -1 is there is an error; for example if the TCP connection is not open
        return client.read(); //will return -1 when it will works
    }

    // write data to the connection to ROS
    void write(uint8_t *data, int length)
    {
        // implement this so that it takes the arguments and writes or prints them to the TCP connection
        for (int i = 0; i < length; i++)
        {
            client.write(data[i]);
        }
    }

    // returns milliseconds since start of program
    unsigned long time()
    {
        return millis(); // easy; did this one for you
    }
};

ros::NodeHandle_<WiFiHardware> nh;

rosbot_patrol::EspTrigger esp_msg;

ros::Publisher motion_trigger("motion_trigger", &esp_msg);
volatile bool move = 0;

void IRAM_ATTR detectsMovement()
{
    Serial.println("MOTION DETECTED!!!");
    ::move = 1;
}

void taskWifi(void *parameter);

void setup()
{
    for (int i = 0; i < NUM_NETWORKS; i++)
    {
        String ssid = ssidTab[i];
        String pass = passwordTab[i];
        wifiMulti.addAP(ssid.c_str(), pass.c_str());

        Serial.printf("WiFi %d: SSID: \"%s\" ; PASS: \"%s\"\r\n", i, ssid.c_str(), pass.c_str());
    }

    xTaskCreate(
        taskWifi,   /* Task function. */
        "taskWifi", /* String with name of task. */
        10000,      /* Stack size in bytes. */
        NULL,       /* Parameter passed as input of the task */
        1,          /* Priority of the task. */
        NULL);      /* Task handle. */

    Serial.begin(115200);
    nh.initNode();
    nh.advertise(motion_trigger);

    pinMode(motionSensor, INPUT_PULLUP);
    attachInterrupt(digitalPinToInterrupt(motionSensor), detectsMovement, RISING);
}

void loop()
{
    now = millis();
    if ((now - lastTrigger) > (1000 / PUB_FREQ))
    {
        if (client.connected())
        {
            Serial.println("Looking for move!!!");
            esp_msg.move = ::move;
            esp_msg.id = ID;
            motion_trigger.publish(&esp_msg);
            ::move = 0;
            lastTrigger = millis();
            nh.spinOnce();
        }
        else
        {
            while (!client.connect(hostName1, port))
            {
                Serial.printf("Waiting for connection\r\n");
                delay(500);
            }
        }
    }
}

void taskWifi(void *parameter)
{
    while (1)
    {
        uint8_t stat = wifiMulti.run();
        if (stat == WL_CONNECTED)
        {
            Serial.println("");
            Serial.println("WiFi connected");
            Serial.println("IP address: ");
            Serial.println(WiFi.localIP());

            Husarnet.join(husarnetJoinCode, hostName0);
            Husarnet.start();

            while (WiFi.status() == WL_CONNECTED)
            {
                delay(500);
            }
        }
        else
        {
            Serial.printf("WiFi error: %d\r\n", (int)stat);
            delay(500);
        }
    }
}
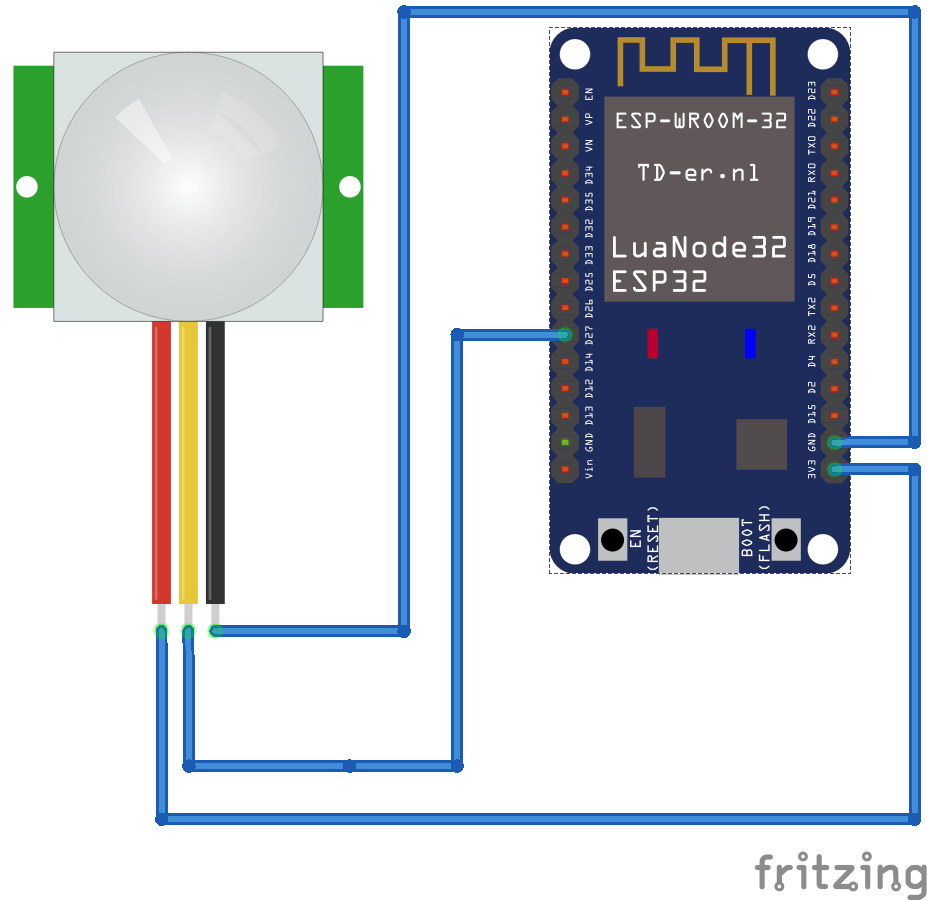
At the end connect motion sensor to ESP32:
At the end we have to create launch for esp enabling us to read data it sends, to do, so follow this instruction:
roscd rosbot_patrol
cd launch
touch esp_connector.launch
In this file paste following launch: Only what you have to take care of is to set appropriate port for each device I suggest to use 11411, 11412 and so on remember to it the same as in esp code.
<launch >

<node pkg="rosserial_python" type="serial_node.py" name="esp_client1"  respawn="true">
<param name="port" value="tcp"/>
<param name="tcp_port" value="11411"/>
</node>

<node pkg="rosserial_python" type="serial_node.py" name="esp_client2"  respawn="true">
<param name="port" value="tcp"/>
<param name="tcp_port" value="11412"/>
</node>

<node pkg="rosserial_python" type="serial_node.py" name="esp_client3"  respawn="true">
<param name="port" value="tcp"/>
<param name="tcp_port" value="11413"/>
</node>

</launch>
If you need more clients just add it if less you should remove unused or comment it.
Darknet YOLO
We only will be launching image processing on computer but if you want to clone whole repository to your robot you can so don't be afraid of that.
I'm assuming that you already have in your workspace darknet_ros package next thing is to create our config file and launch file for darknet:
roscd rosbot patrol
cd launch
touch darknet_yolo_only.launch
In this file paste following code:
<launch>

  <!-- Console launch prefix -->
  <arg name="launch_prefix" default=""/>

  <!-- Config and weights folder -->
  <arg name="yolo_weights_path"          default="$(find darknet_ros)/yolo_network_config/weights"/>
  <arg name="yolo_config_path"           default="$(find darknet_ros)/yolo_network_config/cfg"/>

  <!-- ROS and network parameter files -->
  <arg name="ros_param_file"             default="$(find rosbot_patrol)/config/darknet_config.yaml"/>
  <arg name="network_param_file"         default="$(find darknet_ros)/config/yolov2-tiny.yaml"/>

  <!-- Load parameters -->
  <rosparam command="load" ns="darknet_ros" file="$(arg ros_param_file)"/>
  <rosparam command="load" ns="darknet_ros" file="$(arg network_param_file)"/>

  <!-- Start darknet and ros wrapper -->
  <node pkg="darknet_ros" type="darknet_ros" name="darknet_ros" output="screen" launch-prefix="$(arg launch_prefix)">
    <param name="weights_path"          value="$(arg yolo_weights_path)" />
    <param name="config_path"           value="$(arg yolo_config_path)" />
  </node>

</launch>
Next we need to setup our neural network - for that we will use pre-trained model. In config directory we create for this purpose config file.
roscd rosbot_patrol
mkdir config
cd config
touch darknet_config.yaml
In darknet_config.yaml:
subscribers:

  camera_reading:
    topic: /rgb_raw
    queue_size: 1

actions:

  camera_reading:
    name: /darknet_ros/check_for_objects

publishers:

  object_detector:
    topic: /darknet_ros/found_object
    queue_size: 1
    latch: false

  bounding_boxes:
    topic: /darknet_ros/bounding_boxes
    queue_size: 1
    latch: false

  detection_image:
    topic: /darknet_ros/detection_image
    queue_size: 1
    latch: true

image_view:

  enable_opencv: true
  wait_key_delay: 1
  enable_console_output: true
And that's all - there is no need to change anything else, now create launch file for our network. In launch directory create new file called darknet_yolo_simulation_only.launch
Final launch files
So if the map is in our workspace and every algorithm configured we now can start our robot to move on map. It's almost end don't give up :)
In launch file create files rosbot_patrol.launch and rosbot_patrol_pc.launch
roscd rosbot_patrol
cd launch
touch rosbot_patrol.launch
touch rosbot_patrol_pc.launch
First launch will be running on rosbot but second is made for pc this is because rosbot has not enough power to process image.
In rosbot_patrol.launch paste this code:
<?xml version="1.0" encoding="UTF-8"?>
<launch>
                                <!-- Image compression -->
    <node pkg="image_transport" type="republish" name="rgb_compress" args="raw in:=/camera/rgb/image_raw compressed out:=/rgb_republish">
        <param name="compressed/mode" value="color"/>
    </node>

    <include file="$(find rosbot_patrol)/launch/rosbot_all_hardware.launch"/>
    <include file="$(find rosbot_patrol)/launch/rosbot_all_algorithms.launch"/>

    <arg name="map_file" default="$(find rosbot_patrol)/maps/rosbot_map.yaml"/>       <!-- map arg -->
    <node name="map_server" pkg="map_server" type="map_server" args="$(arg map_file)" respawn="true" />

  <!-- patrol node -->
<node pkg="rosbot_patrol" type="patrol_robot" name="patrolling_node" output="screen" respawn="true">
        <!-- path to file  with  params of points -->
<param name="path_to_params" type="string" value="$(find rosbot_patrol)/params/room_points.yaml" />
<param name="email_to" type="string" value="*****@**.**" />
<param name="email_from" type="string" value="*****@****.***" />
</node>


</launch>
File rosbot_patrol_pc.launch is made for being launched form your personal computer this is because of the fact that current version of rosbot don't have enough compute power to handle CNN (convolutional neural network) - you can paste this file to simulation pkg also and run this with appropriate launch command, paste this code to launch file:
<?xml version="1.0" encoding="UTF-8"?>
<launch>

    <arg name="use_esp" default="true"/>

    <node pkg="image_transport" type="republish" name="rgb_decompress" args=" compressed in:=/rgb_republish raw out:=/rgb_raw" respawn="true">
        <param name="compressed/mode" value="color"/>
    </node>

    <include file="$(find rosbot_patrol)/launch/darknet_yolo_only.launch"/>

     <include if="$(arg use_esp)" file="$(find rosbot_patrol)/launch/esp_connector.launch"/>

</launch>
Complete code
a) simulation git clone https://github.com/adamkrawczyk/rosbot_patrol_simulation.git
b) real_robot git clone https://github.com/adamkrawczyk/rosbot_patrol.git
Finishing
To launch this I advise you to have the same code in robot and on your computer.
- Add every device to husarnet to the same network
- Set rosmaster to robot - less latency
- Launch robot using
roslaunch rosbot_patrol rosbot_patrol.launch - On computer launch file
roslaunch rosbot_patrol rosbot_patrol_pc.launch
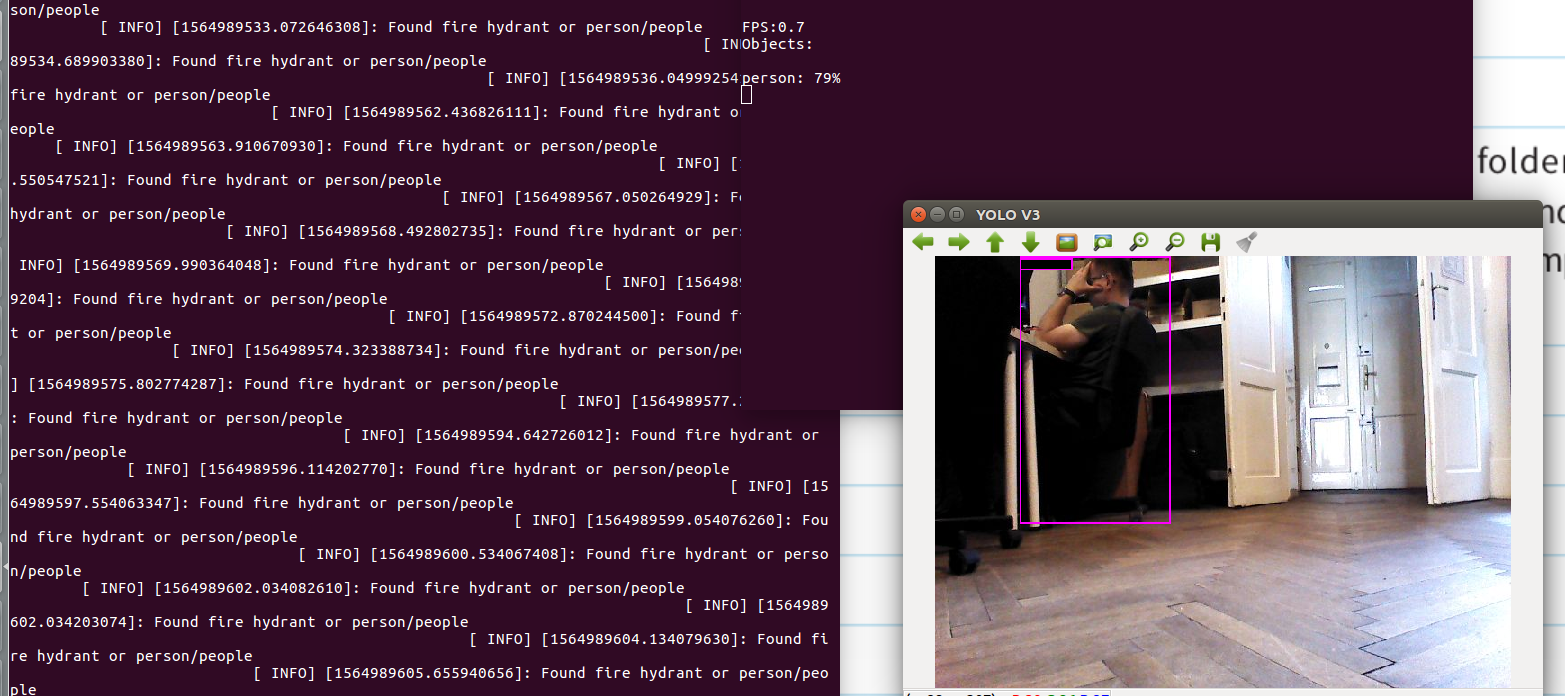
On your computer you should see window with bounding boxes around things that our neural network recognized.
If one of your sensor detect movement robot will go to point assigned to this sensor and look for people, once it detects you should receive mail.
In case you have no motion sensor just publish to the topic robot is listening for move rostopic pub /motion_trigger simulation/EspTrigger "id: 1 move: 1" with appropriate id number.
At the end you should see on your computer something similar to this:
by Adam Krawczyk, Husarion
Need help with this article or experiencing issues with software or hardware? 🤔
- Feel free to share your thoughts and questions on our Community Forum. 💬
- To contact service support, please use our dedicated Issue Form. 📝
- Alternatively, you can also contact our support team directly at: support@husarion.com. 📧