Control robot by voice commands
Abstract
Nowadays growing popularity of IoT causes increasing demand for creating user-friendly interfaces for complicated devices to allow everyone to use them without the knowlagde of how they work. Provided application was developed with an attempt to follow the mentioned principle and make it easier both for developers (by allowing them to write as little code as possible) and potential users (by creating very friendly interfaces).
Description
This project is a platform with a web UI running on Robot Operating System allowing users to control their robot by voice commands with DeepSpeech used as speech-to-text engine. We will show you four possible ways of running this project depending on your preferences:
Using docker image:
- with physical ROSbot
- with ROSbot simulated in Gazebo
Using installation from source:
- with physical ROSbot
- with ROSbot simulated in Gazebo
You can check a demo video showing the outcome of the project with real ROSbot below.
Features and capabilities
- Possibility of defining custom orders
- Recognizing sequences of commands with a separator
- Cancelling and sorting orders that have not been sent yet
- Tracking current/next orders
- Cancelling already sent orders (current and next)
- History of previous orders with their results
- Voice aliases can be written in regex style which allows to use many voice aliases for the same order
Installation using Docker image
The easiest way to test robot voice control is to use a Docker container. To install Docker please refer to Docker installation manual. You should also set permission for docker to avoid additional problems. Official docker manual is available here.
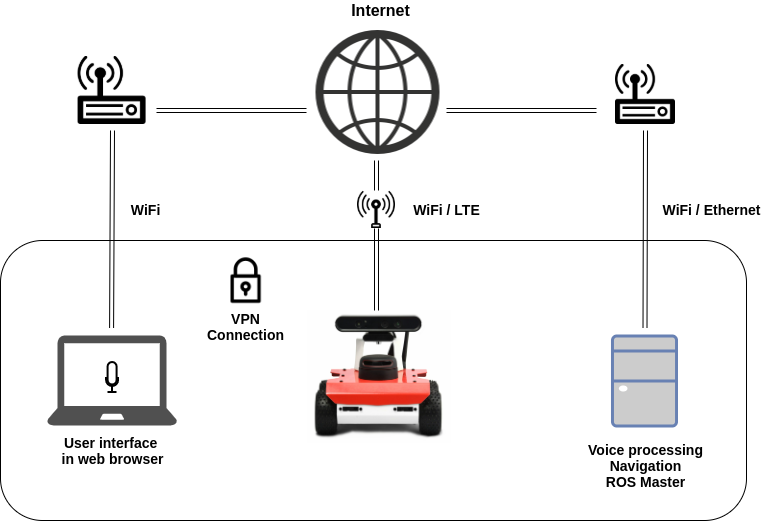
With ROSbot
Voice recognition server must be running on a PC with x86-64 architecture, while rest of the algorithms may be running on ROSbot (with the latest image version running on Ubuntu 18.04 and Mbed firmware). In this tutorial we will connect both devices with a use of Husarnet.
Connecting devices through Husarnet
- Log in or create your (free) account at husarnet.com.
- Create new Husarnet network
- Click Add element button and go to Join Code tab.
- Copy your join code. It should look like this:
fc94:b01d:1803:8dd8:b293:5c7d:7639:932a/XXXXXXXXXXXXXXXXXXXXX - On both your robot and your laptop execute the following commands to connect them to the same Husarnet network:
a) install Husarnet
and then:curl https://install.husarnet.com/install.sh | sudo bashb) connect your robot and computer to the Husarnet network created in the point 2:systemctl restart husarnetsudo husarnet join <PLACE_YOUR_JOINCODE_HERE> <PLACE_YOUR_HOSTNAME_HERE>
For more information visit husarnet.com page.
Voice recognition setup
On the host computer, download and build the docker image:
docker build https://raw.githubusercontent.com/husarion/robot_voice_control/fix_install/Dockerfile -t voice_control
Run docker container:
docker run --net=host -e ROS_MASTER_URI -e ROS_IPV6 -it --name voice_control voice_control
Inside the container configure server:
source ~/ros_ws/devel/setup.sh
python $(rospack find voice_webserver)/src/scripts/vw_config.py --update_hostname $(hostname) --gpu 0
Launch voice control server:
roslaunch voice_control voice_control_standalone.launch
On the ROSbot install the repository and source it:
cd ~/husarion_ws/src
git clone https://github.com/husarion/robot_voice_control.git
cd ~/husarion_ws
catkin_make
source ~/husarion_ws/devel/setup.sh
Launch ROSbot 2.0 controls:
roslaunch voice_control rosbot.launch
or if you are using ROSbot 2.0 PRO:
roslaunch voice_control rosbot_pro.launch
Then open the control panel in Chrome browser by typing address:
https://PC_HOSTNAME:3000
Where PC_HOSTNAME is host PC name defined when connecting through Husarnet.
You may see warning regarding an unsigned certificate. Accept it to proceed.
With Gazebo
Download and build the docker image:
docker build https://raw.githubusercontent.com/husarion/robot_voice_control/fix_install/Dockerfile -t voice_control
Run docker container:
docker run -p 3000:3000 -it -e DISPLAY=$DISPLAY --env="QT_X11_NO_MITSHM=1" --name voice_control -v /tmp/.X11-unix:/tmp/.X11-unix voice_control
Inside container configure server:
source ~/ros_ws/devel/setup.sh
python $(rospack find voice_webserver)/src/scripts/vw_config.py --update_hostname $(hostname -i) --gpu 0
Launch simulation:
roslaunch voice_control voice_control_gazebo.launch
In new terminal window, obtain the container IP address:
docker inspect -f '{{range .NetworkSettings.Networks}}{{.IPAddress}}{{end}}' voice_control
Then open control panel in Chrome browser by typing address:
https://CONTAINER_IP:3000
You may see warning regarding an unsigned certificate. Accept it to proceed.
You can see an example video below:
Installation from source
Installation
Before we run installation script we have to make sure that all needed packages are already installed. Please run in console:
sudo apt install python-pip
We will need also yarn but in Ubuntu 18.04 this pkg comes with cmdtest installed by default. We will have to remove cmdtest first.
sudo apt remove cmdtest
curl -sS https://dl.yarnpkg.com/debian/pubkey.gpg | sudo apt-key add -
echo "deb https://dl.yarnpkg.com/debian/ stable main" | sudo tee /etc/apt/sources.list.d/yarn.list
sudo apt update && sudo apt install yarn
Next step will be upgrading nodejs to version 12:
sudo apt update
sudo apt -y install curl dirmngr apt-transport-https lsb-release ca-certificates
curl -sL https://deb.nodesource.com/setup_12.x | sudo -E bash -
sudo apt -y install nodejs
Then clone this package into your workspace
git clone https://github.com/husarion/robot_voice_control.git
Open you workpace directory and build project:
cd ~/ros_workspace
catkin_make
Go to directory of script install.sh and run it.
Instead {YOURHOSTNAME} paste your hostname in husarnet or your IP in local network
Instead {GPU} place 0 if you want to use Deepspeech with CPU (Recommended), set 1 otherwise
cd ~/ros_workspace/src/robot_voicce_control
./install.sh {YOURHOSTNAME} {GPU}
Installation may take a few minutes, because deepspeech model has to be downloaded. During installation you may be asked for sudo password to install OpenSSL. After this any time that script waits for input just hit ENTER.
Usage
Run the command below to start all internal components
roslaunch voice_control voice_control.launch
Now we must also launch a node from order_executor package. Creating your own nodes will be described in examples. Right now we can use an already created mbgoal_demo, which has plenty of already defined destinations that are reached with Move Base client.
After launching
roslaunch order_executor mbgoal_demo.launch
You should see this outcome
[ INFO] waiting for move_base server to become available
As you would expect it requires move base. To see details about implementation of this executor visit Examples. Now you can launch all necessary nodes for your robot or test how this package works using ROSBot simulation in Gazebo.
To do the latter, if you do not have following packages in your workspace, clone them
cd ~/your_workspace/src/
git clone https://github.com/husarion/tutorial_pkg.git
git clone https://github.com/husarion/rosbot_description.git
And now after building your workspace in separate terminals launch
roslaunch rosbot_description rosbot.launch
roslaunch rosbot_description gmapping.launch
roslaunch tutorial_pkg move_base.launch
Now launch your Chrome browser and go to address
https://{YOURHOSTNAME}:3000
Where {YOURHOSTNAME} is hostname as specified at the beginning of this step.
It is possible that your browser will inform you about a potential risk, but just ignore this and proceed anyway. The reason for this is that browser requires secure connection for audio streaming.
Website works well on Google Chrome, both for mobile and PC versions. For Firefox there is additional step needed- you have to open web developer console and manually click on one of links from socketio that appears in this console, and then accept the risk.
Let's click "Start recording" button and say "turn left then turn right". Two orders should appear
To see all possible orders for this example go to
roscd order_executor/config
and open mbgoal_demo.yaml file
API
Structure of orders
Every order is an action defined in orders_supervisor package with following structure.
#goal
int32 id
string label
string description
geometry_msgs/PoseStamped target_pose
string[] fkeys
float32[] fvals
string[] skeys
string[] svals
---
#result
bool success
---
#feedback
int32 id
string description
float32 distance_linear
float32 distance_angular
string progress
Some fields of this action will be described below, other are self explanatory and intuitive
Goal
- label - entity used by order_executor to recognize a type of action which robot should complete in a particular order.
- target_pose - optional field, PoseStamped of target
- description - entity used to recognize particular order by user - it is displayed on the website
- fkeys, fvals - additional parameters that can be represented as floats (so ints, booleans are also stored here)
- skeys, svals - additional parameters that can be represented as string
Keys and values were attached to limit adding another entities to action message to keep tradeoff between consistency and flexibility. They shall be considered private, because these are filled automatically by text-to-order converter and they can be reached in code by maps described in Structure of executors section
Feedback
- id - internal identifier for each order used for tracking - consider it private
- description - static value displayed on website for user - set in the YAML file - consider it private
- progress - dynamic value displayed on website for user that is being modified during execution
Orders can be defined as YAML files living in order_executor/config folder of order_executor package, so let's move there:
roscd order_executor/config
Now open mbgoal_demo.yaml file in your favourite editor. First line of this file looks like this:
separator: "then"
Separator makes it possible to call sequence of orders at once. By default it is set to "then".
Orders' definitions start in the next line. Lets take a closer look at one of them, i.e. rotation order
  rotation:
    voice_alias: "turn"
    label: "mbgoal"
    frame: "base_link"
    cases:
      left:
        voice_alias: "left"
        yaw: 1.57
      right:
        voice_alias: "right"
        yaw: -1.57
      back:
        voice_alias: "back(ward)?"
        description: "back"
        yaw: 3.14
First two keys, i.e. voice_alias and label are mandatory. Former is an alias which user has to say to trigger particular order, latter was described earlier.
There is an optional parameter - description which was described the moment ago. If this key is absent (like in this example) it is assumed to be equivalent with voice_alias. You could add as many keys in custom order as you need, without any limitations. These would be converted automatically to keys and values in order action message.
As you can see in this example order is divided into few cases, each with its own voice_alias and description. For example if user says
"turn left" then it would be recognized as a order with label mbgoal, frame base_link and case left with field yaw equal to 1.57. On the website it will be shown as goal with description turn left, which is a concatenation of description of order and particular case.
You can add as many keys as you need. These would be stored in action message as keys and values described above, but keys frame, x, y and yaw are an exception. They would be converted to target_pose field of action message.
Of course one could add any case to existing order, which is a very simple operation. Feel free to do so and add e.g. your favourite locations as another cases
It is worth to mention that splitting orders into cases for user-defined orders is optional
To learn about creating your own orders move to Examples
Structure of executors
For each distinct label proper executor must be created. These are defined in order_executor package. To understand their structure let's examine a class that each one have to inherit from.
Move to
roscd order_executor/include
and open Executor.hpp file.
You should see following class
class Executor{
public:
    virtual void execute(const orders_supervisor::OrderGoalConstPtr& goal) = 0;
    void start(SimpleActionServer& as_);
protected:
    strdict get_strdict(const orders_supervisor::OrderGoalConstPtr& goal);
    fdict get_fdict(const orders_supervisor::OrderGoalConstPtr& goal);

    orders_supervisor::OrderFeedback feedback;
    orders_supervisor::OrderResult result;
    SimpleActionServer* as;
};
Nice thing about creating your own executor is that you don't have to bother with internals of this project, only thing you need to do is implement execute method in child of this class and make use of an action server as to set state, send feedback and send result with no limitations of child's components used during execution. start method is called automatically, so you should not bother with it.
Two protected methods get_strdict and get_fdict are wrappers for keys and values discussed earlier. If your order contains any optional parameters they would be stored as key/value pairs in one of these two maps. These methods can be called inside execute method.
Writing your own executor is described in examples
Project structure
Project consists of five ROS packages - voice_control, voice_webserver, txt_to_orders, order_executor, orders_supervisor. Nice thing is that user does not explicitly use vast majority of entities listed below. They are only here for informational purposes.
voice_control
Main package - used only to launch files from packages listed below
voice_webserver
Package that contains react client and nodejs server with rosnodejs and DeepSpeech bindings
| Entity | Name | Type | Description |
|---|---|---|---|
| Node | webserver_node | - | - |
| Publisher | /orders | orders_supervisor/Orders | Publishes orders called by user |
| Subscriber | /orders_feedback | orders_supervisor/OrdersFeedback | Information about previous, current and next orders |
| Subscriber | /txt_to_orders/dictionary | txt_to_orders/Dictionary | List of words used in voice aliases |
| SrvClient | /txt_to_orders/txt_to_orders | txt_to_orders/TxtToOrdersSrv | Returns list of orders given text |
| SrvClient | /orders/cancel_one | orders_supervisor/CancelOrder | Cancel order with specific id |
| SrvClient | /orders/cancel_all | std_srvs/Trigger | Cancel current and all next orders |
txt_to_orders
Provides a service that format raw recognized text to orders and publishes dictionary of words
| Entity | Name | Type | Description |
|---|---|---|---|
| Node | txt_to_orders | - | - |
| Publisher | /txt_to_orders/dictionary | txt_to_orders/Dictionary | List of words used in voice aliases |
| Srv | /txt_to_orders/txt_to_orders | txt_to_orders/TxtToOrdersSrv | Returns list of orders given text |
| Param | /orders | - | list of all possible orders loaded from YAML file |
orders_supervisor
Listens to orders sent by user and publishes feedbacks
| Entity | Name | Type | Description |
|---|---|---|---|
| Node | webserver_node | - | - |
| Subscriber | /orders | orders_supervisor/Orders | Subscribes to orders called by user |
| Publisher | /orders_feedback | orders_supervisor/OrdersFeedback | Information about previous, current and next orders |
| SrvServer | /txt_to_orders/txt_to_orders | txt_to_orders/TxtToOrdersSrv | Returns list of orders given text |
| SrvServer | /orders/cancel_one | orders_supervisor/CancelOrder | Cancel order with specific id |
| SrvServer | /orders/cancel_all | std_srvs/Trigger | Cancel current and all next orders |
order_executor
Bridge between this project and other ROS entities that are necessary during order execution. Executes current goal and sends feedback about it to OrdersSupervisor. This is the only package that user has to expand/modify to define custom orders
| Entity | Name | Type | Description |
|---|---|---|---|
| Node | order_executor | - | - |
| ActionServer | /order | order_executor/Order | Server of action that is responsible for executing current goal |
| Any | Any | Any | Any additional entities that user needs to execute orders |
Examples
Each example assumes knowledge of previous one At a first glance following tutorials could look a bit overwhelming due to its length, but give it a try - everything is described here in very detailed way, but every concept is simple.
Ex.0. Understanding execution of orders
Each order is executed in order_executor package.
Core of this package is ActionSrv entity which wraps SimpleActionServer, hence listens to next order and redirects it to proper executor depending on order's label.
To execute order with particular label proper child of Executor class must be defined.
After this object of created class must be binded to mentioned object of ActionSrv. There is always one object of ActionSrv initialised, to which many Executors can be binded.
In this example, we will examine mbgoal_demo node which contains executor MoveBaseExec that handles orders with mbgoal label. Notice that every order from order_executor/config/mbgoal_demo.yaml has the same label, hence only one executor is required.
Let's move to proper directory
roscd order_executor/nodes
and now open mentioned mbgoal_demo.cpp. You should see something like the following:
#include <ActionSrv.hpp>
#include <MoveBaseExec.hpp>

int main(int argc, char* argv[]){
    ros::init(argc, argv, "order_executor");
    ros::NodeHandle nh;
    ros::Rate r(10);

    //declare executors and their components

    //MoveBaseExec
    std::string odom_frame = "odom";
    ros::Publisher cmd_vel_pub = nh.advertise<geometry_msgs::Twist>("/cmd_vel", 1);
    MoveBaseClient mb_client("/move_base", true);

    ROS_INFO("waiting for move_base server to become available");
    mb_client.waitForServer();
    ROS_INFO("connected with move base action server");

    MoveBaseExec move_base_exec(mb_client, r, cmd_vel_pub, odom_frame);

    ros::Subscriber odom = nh.subscribe("/odom", 1, &MoveBaseExec::update_odom, &move_base_exec);

    //declare ActionSrv class
    ActionSrv order_executor(nh);

    //bind all executors to proper labels
    order_executor.bind_executor("mbgoal", move_base_exec);

    //start action server
    ROS_INFO("starting order execution action server");
    order_executor.start();
    ROS_INFO("server started");

    ros::spin();
}
#include <ActionSrv.hpp>
#include <MoveBaseExec.hpp>
The former header contains declaration of ActionSrv class, which gathers all executors and redirect goals to them.
The latter contains declaration of child of Executor class responsible for executing a goal with mbgoal label. It makes use of target_pose field of order action message to reach demanded pose using Move Base client.
    //declare executors and their components

    //MoveBaseExec
    std::string odom_frame = "odom";
    ros::Publisher cmd_vel_pub = nh.advertise<geometry_msgs::Twist>("/cmd_vel", 1);
    MoveBaseClient mb_client("/move_base", true);

    ROS_INFO("waiting for move_base server to become available");
    mb_client.waitForServer();
    ROS_INFO("connected with move base action server");

    MoveBaseExec move_base_exec(mb_client, r, cmd_vel_pub, odom_frame);

    ros::Subscriber odom = nh.subscribe("/odom", 1, &MoveBaseExec::update_odom, &move_base_exec);
Nice thing is that Executor's structure is arbitrary - you can pass any objects inside them to execute your order.
Last line is very important. It instantiates object of MoveBaseExec class, that is Executor of order with label mbgoal.
    //declare ActionSrv class
    ActionSrv order_executor(nh);
These two lines are self explanatory. ActionSrv takes NodeHandle object in its constructor.
    //bind all executors to proper labels
    order_executor.bind_executor("mbgoal", move_base_exec);
This section is more interesting. We have to bind MoveBaseExec executor to ActionSrv. Now every order with label mbgoal will be forwarded to move_base_exec object.
    //start action server
    ROS_INFO("starting order execution action server");
    order_executor.start();
    ROS_INFO("server started");

    ros::spin();
Here we have to start an action server. It will also invoke start method in all executors binded to this object.
Now we can run all nodes, go to the website and check whether orders defined in order_executor/config/mbdemo_orders.yaml file can be invoked via voice commands.
Ex.1. Defining your own simple order
To define your own order two things has to be done
- Order definition in YAML file
- class responsible for executing order
Whole process was made as simple as possible, so each mentioned stage was reduced to few easy steps.
In this example we will create a "take_photo" order which will save recent photo from camera after a call.
1. Order definition in YAML file
Go to
roscd order_executor/config
and create orders_tutorial.yaml
Paste the following content
orders_list:
  separator: "then"
  orders:
    take_photo:
      voice_alias: "take picture"
      description: "take a photo"
      label: "pic"
defined order is as simple as possible. Creating orders with additional keys will be covered in the next tutorials
Note that every yaml file with orders must live in orders_list namespace
2. Class responsible for executing order
For every order with a new label we have to create proper class responsible for executing it.
We will develop TakePhotoExec class to handle order with label pic
lets create TakePhotoExec.cpp and TakePhotoExec.hpp in src and include folders respectively.
touch $(rospack find order_executor)/src/TakePhotoExec.cpp
touch $(rospack find order_executor)/include/TakePhotoExec.hpp
Following rules described in Structure of executors paste the following content to the latter file
TakePhotoExec.hpp
//external includes
#include <iomanip>
#include <ctime>
#include <sstream>

#include <image_transport/image_transport.h>
#include <cv_bridge/cv_bridge.h>
#include <opencv2/highgui/highgui.hpp>

//internal includes
#include <Executor.hpp>

class TakePhotoExec: public Executor{
public:
    TakePhotoExec(std::string path);
    void execute(const orders_supervisor::OrderGoalConstPtr& goal); //implementation of Executor::execute method
    void image_callback(const sensor_msgs::ImageConstPtr& msg);
private:
    std::string _filename();
    sensor_msgs::ImageConstPtr _last_image;
    std::string _directory;
};
Now let's implement these methods in TakePhotoExec.cpp
#include <TakePhotoExec.hpp>

TakePhotoExec::TakePhotoExec(std::string path){
    _directory = path;
}

void TakePhotoExec::image_callback(const sensor_msgs::ImageConstPtr& msg){
    _last_image = msg;
}

void TakePhotoExec::execute(const orders_supervisor::OrderGoalConstPtr& goal){
    feedback.progress = "started executing";
    result.success = true;

    as->publishFeedback(feedback);

    if (_last_image){
        cv_bridge::CvImageConstPtr img = cv_bridge::toCvShare(_last_image, "bgr8");
        result.success = cv::imwrite(_filename(), img->image);
        if (result.success){
            as->setSucceeded(result, "saved photo");
        }
        else{
            as->setAborted(result, "could not take photo");
        }
    }
    else{
        result.success = false;
         as->setAborted(result, "no image received");
    }

}
std::string TakePhotoExec::_filename(){
    std::ostringstream ss;
    auto t = std::time(nullptr);
    auto tm = *std::localtime(&t);
    ss << std::put_time(&tm, "%d-%m-%H-%M-%S.png");
    return _directory + ss.str();
}
Goal's id and description are already set by OrdersSupervisor so they should be considered private. User can modify and adjust values of other fields, like distances and progress. Check Order action message definition for details
Now there are two possibilities. We could attach all components to existing nodes/mbgoal_demo.cpp file or create our own file. We would choose the second option
touch order_executor/nodes/orders_tutorial.cpp
Following the manners learned in previous tutorial let's paste below to this file
#include <ActionSrv.hpp>
#include <TakePhotoExec.hpp>

int main(int argc, char* argv[]){
    ros::init(argc, argv, "order_executor");
    ros::NodeHandle nh;

    //declare executors and their components
    //TakePhotoExec
    std::string path_to_dir= "your_favourite_dir_followed_by_slash/";
    image_transport::ImageTransport it(nh);

    TakePhotoExec take_photo_exec(path_to_dir);

    image_transport::Subscriber image_subscriber = it.subscribe("camera/rgb/image_raw", 1,
                        boost::bind(&TakePhotoExec::image_callback, &take_photo_exec, _1), ros::VoidPtr(),
                          image_transport::TransportHints("compressed"));

    //declare ActionSrv class
    ActionSrv order_executor(nh);

    //bind all executors to proper labels
    order_executor.bind_executor("pic", take_photo_exec);

    //start action server
    ROS_INFO("starting order execution action server");
    order_executor.start();
    ROS_INFO("server started");

    ros::spin();
}
Last thing to do is to create a launch file to start executor's node
touch order_executor/launch/orders_tutorial.launch
<launch>

  <!-- load orders as ros param -->
  <rosparam file="$(find order_executor/config/orders_tutorial.yaml" command="load" />

  <node name="order_executor" pkg="order_executor" type="orders_tutorial" />

</launch>
Add proper dependencies, libraries and executables to package.xml and CMakeLists.txt following this tutorial (Remember also to link OpenCV libraries and orders_tutorial executable)
Now after building, launch nodes of this package, but instead of launching mbgoal_demo.launch run:
roslaunch order_executor orders_tutorial.launch
And launch all other nodes that are necessary (camera publisher etc)
Now go to the webpage, start recording and say "take picture". New order should appear on the website and after acceptance, photo should be saved in directory of your choice.
Ex.2 - Defining order with additional parameters
Suppose we want to store another parameters in our order. It is reasonable, if for instance we want to have different orders with the same label (i.e. handled by the same executor), which organizes them in clear and human-friendly fashion (already defined local_goal, goal and rotation from mbgoal_demo example are split that way) or if we want to parametrize some values used by executor in a nice way. Knowledge of how to deal with additional parameters would also be crucial in next tutorial about orders with cases.
Let's go back to our order from previous example and add wait key - it would represent the amount of time to wait before taking photo.
  take_photo:
    voice_alias: "take picture"
    label: "pic"
    description: "take a photo"
    wait: 5
The great thing is that the converter deals with additional parameters automatically. Parameters can be reached in executor's class using one of two methods from parent. These methods were described here. In our case we have only one, numeric parameter, hence the usage of get_fdict method.
Let's modify TakePhotoExec.cpp file from the previous example
#include <TakePhotoExec.hpp>

TakePhotoExec::TakePhotoExec(std::string path){
    _directory = path;
}

void TakePhotoExec::image_callback(const sensor_msgs::ImageConstPtr& msg){
    _last_image = msg;
}

void TakePhotoExec::execute(const orders_supervisor::OrderGoalConstPtr& goal){
    result.success = true;

    fdict float_params = get_fdict(goal);

    feedback.progress = "waiting";
    as->publishFeedback(feedback);
    ros::Duration(float_params["wait"]).sleep();

    feedback.progress = "taking picture";
    as->publishFeedback(feedback);

    if (_last_image){
      cv_bridge::CvImageConstPtr img = cv_bridge::toCvShare(_last_image, "bgr8");
      result.success = cv::imwrite(_filename(), img->image);
      if (result.success){
          as->setSucceeded(result, "saved photo");
      }
      else{
          as->setAborted(result, "could not take photo");
      }
    }
    else{
        result.success = false;
        as->setAborted(result, "no image received");
    }
}

std::string TakePhotoExec::_filename(){
    std::ostringstream ss;
    auto t = std::time(nullptr);
    auto tm = *std::localtime(&t);
    ss << std::put_time(&tm, "%d-%m-%H-%M-%S.png");
    return _directory + ss.str();
}
Now each picture will be taken after 5 seconds of sleep
Ex.3. Defining order with cases
Cases are a useful feature which gathers similar orders. With addition to obligatory parameters that were discussed previously an order with cases must also include cases key. Then, every case has only one obligatory field - voice_alias.
To trigger particular case user has to say combination of voice aliases of order and case. Consider following order.
  multiply:
    voice_alias: "multiply"
    label: "mul"
    cases:
      primes:
        voice_alias: "primes"
        description: "prime numbers"
        first: 7
        second: 5

      composites:
        voice_alias: "composites"
        first: 10
        second: 20
To trigger this order with case primes user has to say "multiply primes"
Important thing is that each case should have similar structure.
It is very important because as we will see shortly that executor is not explicitly aware of which case is being executed. It only cares about the values of parameters (in this example description, first and second).
One could now be confused about presence of description key in primes case, because it is absent in second case. This was discussed earlier, as description is a special key which is optional, but always present, because if it is not specified explicitly, then it is assumed to be same as voice_alias.
We can paste this order to previously created orders_tutorial.yaml file
orders_list:
  separator: "then"
  orders:
    take_photo:
      voice_alias: "take picture"
      description: "take a photo"
      label: "pic"
      wait: 1


    multiply:
      voice_alias: "multiply"
      label: "mul"
      cases:
        primes:
          voice_alias: "primes"
          description: "prime numbers"
          first: 7
          second: 5

        composites:
          voice_alias: "composites"
          description: "composites numbers"
          first: 1
          second: 2
Let's create MultiplyExec class in order_executor package responsible for executing the order. This class will be short, so we would declare and define it in .hpp file.
MultiplyExec.hpp
#include <Executor.hpp>

class MultiplyExec: public Executor{
public:
    void execute(const orders_supervisor::OrderGoalConstPtr& goal){
        // feedback description and id are already set
        result.success = true;
        feedback.progress = "calculating";
        fdict float_params = get_fdict(goal);

        as->publishFeedback(feedback);

        float res = float_params["first"] * float_params["second"];
        as->setSucceeded(result, std::to_string(res));
    } //implementation of Executor::execute method
};
As you can see executor does not explicitly know which case is being executed. It only cares about values of first and seconds parameters.
Now we will attach this executor to previously created node file nodes/orders_tutorial.cpp. After modifications it should look like this
#include <ActionSrv.hpp>
#include <TakePhotoExec.hpp>
#include <MultiplyExec.hpp>

int main(int argc, char* argv[]){
    ros::init(argc, argv, "order_executor");
    ros::NodeHandle nh;

    //declare executors and their components
    //TakePhotoExec
    std::string path_to_dir= "your_favourite_dir_followed_by_slash/";
    image_transport::ImageTransport it(nh);

    TakePhotoExec take_photo_exec(path_to_dir);

    image_transport::Subscriber image_subscriber = it.subscribe("camera/rgb/image_raw", 1,
                        boost::bind(&TakePhotoExec::image_callback, &take_photo_exec, _1), ros::VoidPtr(),
                          image_transport::TransportHints("compressed"));

    //MultiplyExec
    MultiplyExec multiply_exec; //there are no arguments

    //declare ActionSrv class
    ActionSrv order_executor(nh);

    //bind all executors to proper labels
    order_executor.bind_executor("pic", take_photo_exec);
    order_executor.bind_executor("mul", multiply_exec);

    //start action server
    ROS_INFO("starting order execution action server");
    order_executor.start();
    ROS_INFO("server started");

    ros::spin();
}
After launching all necessary nodes it should be possible to execute both orders
Ex.4. Using target_pose field
To use this field, which is a convenient representation of pose (geometry_msgs/PoseStamped) let's define an order with cases and all mandatory fields learned from previous examples.
  my_order:
    voice_alias: "something"
    label: "mbgoal"
    frame: "my_favourite_frame"
    cases:
      first:
        voice_alias: "amazing"
        x: 1.
        yaw: 1.57
      second:
        voice_alias: "interesting"
        y: 1.
To make use of target_pose you also have to add frame key before specifying cases.
Now, for each case you can specify x, y and yaw. If any of these is absent it is assumed to be zero.
Mentioned keys would be converted to geometry_msgs/PoseStamped. Of course with addition to these parameters you can add more and reach them in executor as in previous examples (by means of get_strdict and get_fdict)).
Another important fact is that due to implementation of Converter class if you want to use target_pose order must be specified with cases, but of course you can define only one case if it is sufficient.
You don't even have to use predefined "mbgoal" label. You can write your own executor to handle this order.
Summary
After completing this project you should be able to configure robot_voice_control package so that the robot will follow your orders.
by Błażej Fiderek Husarion
Need help with this article or experiencing issues with software or hardware? 🤔
- Feel free to share your thoughts and questions on our Community Forum. 💬
- To contact service support, please use our dedicated Issue Form. 📝
- Alternatively, you can also contact our support team directly at: support@husarion.com. 📧