ROSbot XL with OpenMANIPULATOR-X
About
This article is dedicated to the most interesting configuration of ROSbot XL with OpenMANIPULATOR-X installed. The manipulator and the manipulator are sold in two configurations Manipulation and Manipulation PRO. In this demo, you will learn how to enjoy and control ROSbot and the manipulator. For this purpose, we will use a gamepad and the MotionPlanning RViz plugin. In the clip below, you can see the final result.
Some changes have been added since the recording. First of all, keep in mind that the gamepad must be in X mode and the manipulator deadman switch has been changed from RB -> RT.
Two key components of this setup are ros2_control and MoveIt 2.
- ros2_control is used for controlling Dynamixel servos. It provides a position command interface, with position and velocity feedback, which can be combined with the JointTrajectoryController to execute planned motions.
- MoveIt 2 is responsible for preparing motion plans, based on the desired end effector position. It can be controlled in RViz by simply dragging the marker, with a gamepad using servo mode or through the ROS 2 API.
Assemble the Robot
First you need to mount and connect your manipulator, please refer to our dedicated guide for Manipulation Package or Manipulation Pro Package. The recommended configuration, that is later used in this tutorial, is pictured below.

To improve the range of the manipulator's movements. The robot's URDF has hardcoded that the antenna is set at 90 degrees. It is a good idea to position the antenna in the same way on the physical robot.
Launch ROS Driver
It is necessary to have the rosbot snap installed on your ROSbot XL and specify robot-model and configuration:
snap set rosbot driver.robot-model=rosbot-xl
snap set rosbot driver.configuration=manipulation
After these changes you can launch the driver:
sudo rosbot start
- Before starting driver! Make sure the manipulator is undock, manipulator is away from a collision (does not rest on robot objects) and joints are away from its position limits (e.g. one of the joints is started from extreme position).
- Controlling MoveIt and via the joystick are two independent processes. You should not send commands to both of these services at the same time.
- When the power supply is lost, the robot loses momentum and falls by inertia. Therefore, you should hold the manipulator when the power is cut off, or call the docking node
ros2 launch rosbot_moveit dock.launch.py(passnamespace:=$ROBOT_NAMESPACEwhen the robot was launched in a namespace sodockreaches the namespacedmove_group) or pressRT+Backbuttons on gamepad. The launch wrapper injectsrobot_description_kinematicsetc. so theMoveGroupInterfaceinsidedockdoes not logNo kinematics plugins defined; the executable can still be run bare withros2 run rosbot_moveit dock --ros-args -r __ns:=/$ROBOT_NAMESPACEif you only need a quick test. - The manipulator does not analyze collisions with the antenna, to improve the range of the manipulator's movements. It's good practice to position the antenna horizontally on the physical robot.
- In the event of overload, loss of communication or sudden stopping of the manipulator process (e.g. during reboot), some joints may not receive the command to stop operation. This may prevent re-establishing communication. In such a case, it will be necessary to reset the power supply.
Below is a handful of the most important information for the ROSbot Manipulation/Manipulation PRO package.
Activation
By default, the arm remains in an idle state after the driver is launched. To activate it, execute:
sudo rosbot.arm-activate # if you are using snap
ros2 run rosbot_controller arm_control active # if you are using local build
You can change the driver's default behavior using the arm_activate argument.
Control
After starting, the manipulator should be in the Home position after a few seconds. Now you can control ROSbot XL and OpenMANIPULATOR-X using a gamepad or RViz.
The instructions presented are for the Jazzy version. You can check the difference in versions by changing the branch in the rosbot_ros/MANIPULATOR.MD repository.
Gamepad
After running the ROSbot XL Manipulation Package, you should be able to control the manipulator. The easiest way to move the manipulator is to connect a gamepad and steer the robot. The graphic below shows how to steer the manipulator using a gamepad.
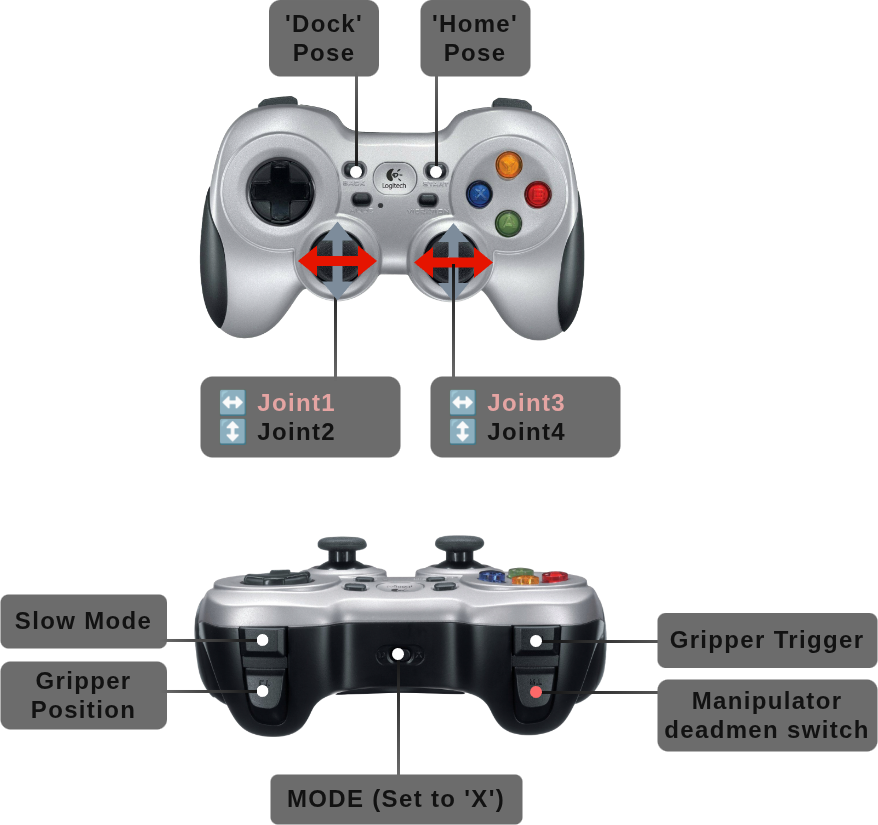
Drive controls (cmd_vel) are configured in rosbot_joy/config/config.yaml. Manipulator gamepad mappings are hardcoded in rosbot_moveit/src/joy2servo.cpp (enum Axis / enum Button).
Everything below runs only while the dead-man trigger RT is held (right trigger ≤ -0.3).
Mode toggle
| Button | Mode | Behaviour |
|---|---|---|
| Y | Cartesian (default) — XYZ in EE frame | joy2servo integrates stick velocity (cartesian_linear_velocity param, default 0.1 m/s) into a target EE pose, runs KDL position-only IK in-process, and publishes the resulting joint velocities as JointJog. The IK is done in joy2servo because moveit_servo's POSE/TWIST paths run a singularity guard on the full 6×N Jacobian which trips on any 4-DoF pose (see moveit_msgs#185); the JointJog path does not run that guard. |
| X | JointSpace — per-joint | Each stick axis drives one joint directly. No IK. Useful as a low-level fallback for joints unreachable in Cartesian (e.g. joint4 wrist when EE is at limit). |
Both modes publish on servo_node/delta_joint_cmds. X / Y are XOR-ed — pressing both at once is a no-op.
JOINT_JOG axis map
| Stick | Joint |
|---|---|
| Left stick X | joint1 |
| Left stick Y | joint2 |
| Right stick X | joint3 |
| Right stick Y | joint4 (inverted: stick up = joint up) |
Cartesian axis map (delta interpreted in EE frame)
Each tick joy2servo reads the current EE pose, adds stick * cartesian_linear_velocity * dt in EE frame, runs KDL position-only IK on the result, and publishes the resulting joint velocities as JointJog. Sign convention: stick up / right = positive.
| Stick | Direction |
|---|---|
| Right stick Y | ±X (stick up = arm extends forward) |
| Right stick X | ±Y (stick right = sideways across the gripper) |
| Left stick Y | ±Z (stick up = perpendicular-up to the gripper) |
| Left stick X | unused |
Releasing the stick zeroes the joint velocities — the arm stops immediately at the current pose. IK failures (out-of-reach targets) are logged and skipped silently.
Combo actions (work in both modes)
| Combo | Action |
|---|---|
RT + Back | Move to Dock pose (gripper Close → arm Dock, planned via OMPL through MoveGroupInterface) |
RT + Start | Move to Home pose (arm Home → gripper Open) |
RT + RB + LT axis | Analogue gripper — LT axis maps to gripper_left_joint position (-0.009 m … +0.015 m) |
Tunable parameters
ros2 run rosbot_moveit joy2servo --ros-args \
  -p cartesian_linear_velocity:=0.2 \
  -p cartesian_step_dt:=0.05 \
  -p cartesian_max_joint_velocity:=1.0
cartesian_linear_velocity(m/s, default0.1) — EE linear speed when a stick is at full deflectioncartesian_step_dt(seconds, default0.05) — per-tick integration step; should be ≥ servo'spublish_periodand ≈ joy autorepeat period (default1/20 Hz = 0.05)cartesian_max_joint_velocity(rad/s, default1.0) — uniform cap on the joint velocities produced by Cartesian-mode IK. Applied as a single scaling factor so the EE direction is preserved (just slower). Bounds how far the arm can travel percollision_check_ratetick — without it, KDL IK "branch jumps" near singularities can produce multi-rad/s spikes that overshootself_collision_proximity_thresholdbefore the collision check updates.
You may have noticed that the movement of the manipulator is slow, and the full capabilities of the manipulator are not fully utilized. This is a safety precaution to ensure that the collision checker effectively prevents the manipulator from bumping into the robot. The dynamic limits of the manipulator have been tuned in order to provide a reliable collision prevention mechanism. While this setup should cover most situations, there is still a possibility of accidental contact with the robot or its sensors. Therefore, we advise you to remain aware of this potential risk when operating the manipulator.
RViz Moveit
To move the manipulator using RViz, you need to build the code first. Then run:
ros2 launch rosbot_moveit rviz.launch.py
After that, RViz with the Moveit configuration will appear.
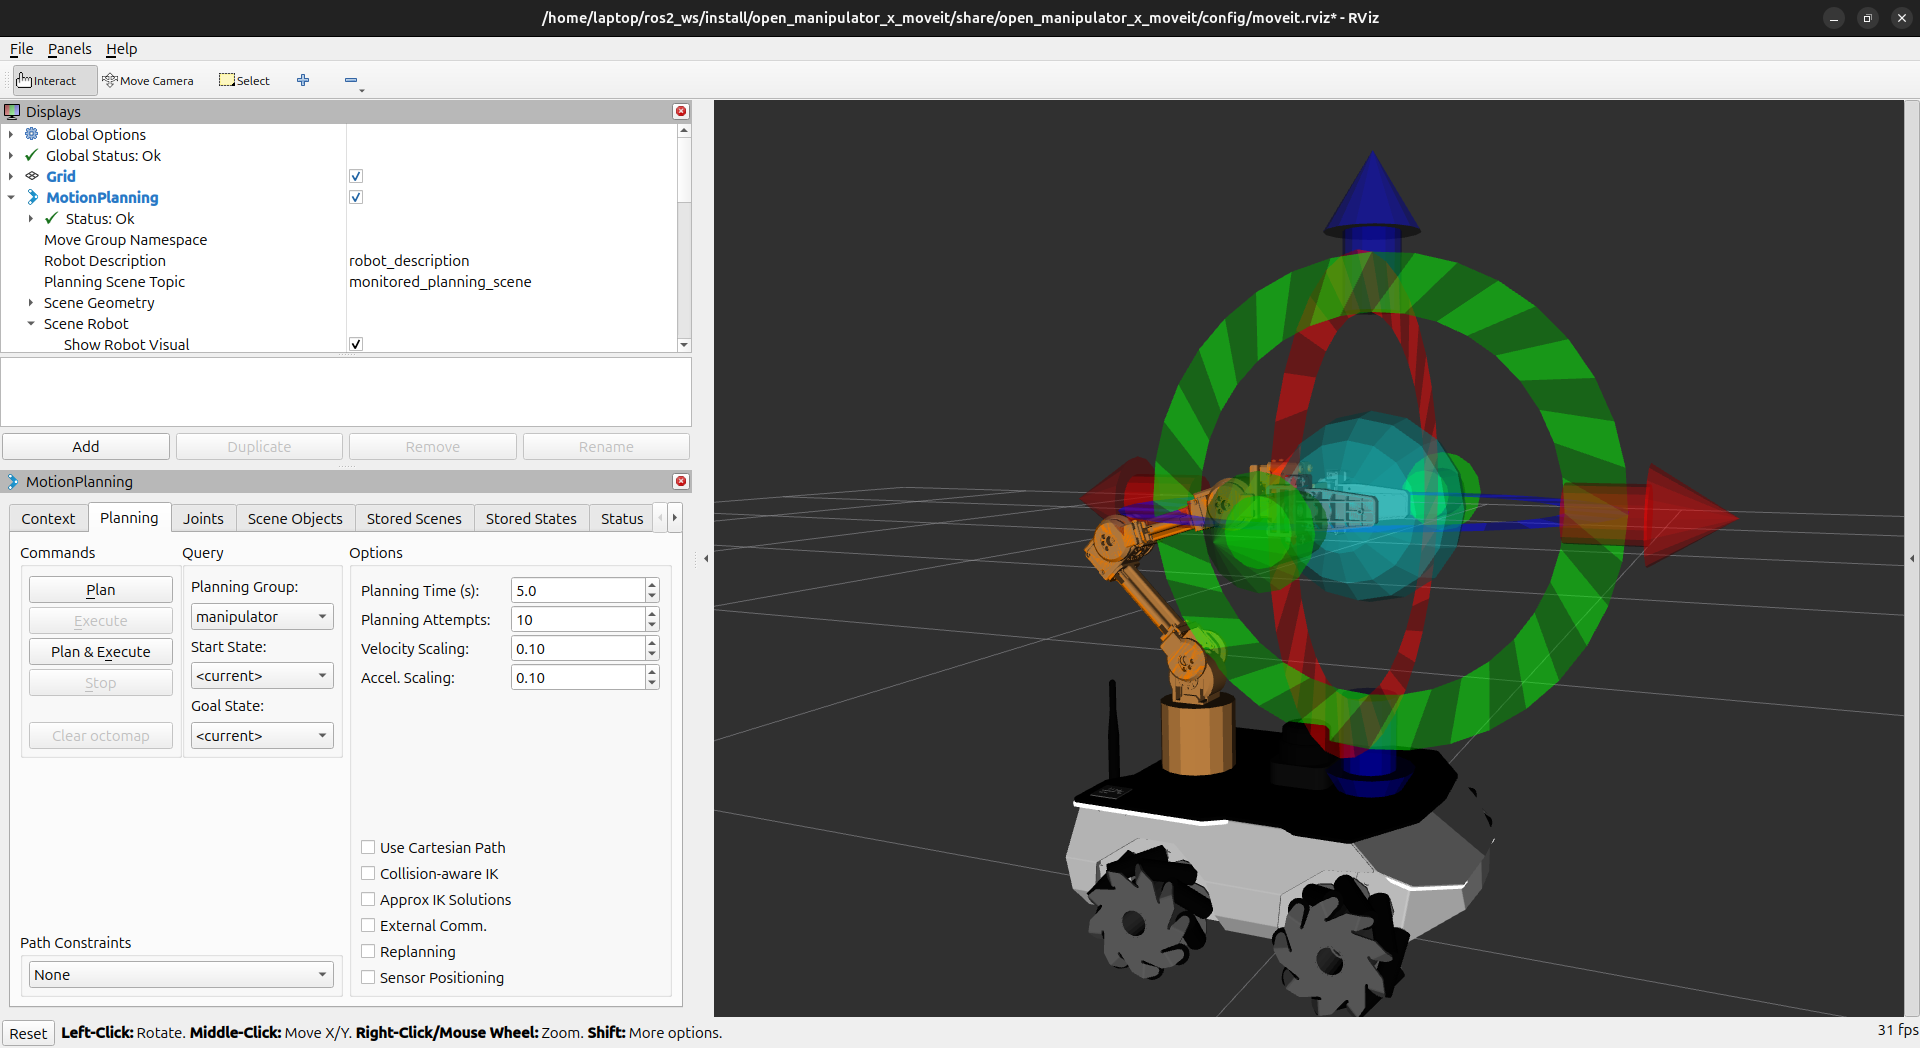
It is also possible to control the manipulator in the RViz using the MotionPlanning plugin. You can move the end effector by dragging the green marker and then click the Plan & Execute button to make the manipulator execute the motion. You may notice that the end effector doesn't follow the marker exactly, and to get Z rotation you have to use the blue ring - this is due to insufficient degrees of freedom of the manipulator, which causes some of the configurations to not be achievable.
If you're not able to move the end effector in the Rviz, make sure that you have enabled the Approx IK Solutions option.
If the manipulator moves too slowly, you can increase Velocity Scaling and Accel. Scaling up to 1.0.
Helpful Resources
Resetting the Manipulator
In some situations it may be necessary to manually move the manipulator out of an invalid configuration. To do it, first you will have to disable the torque of the manipulator, for example using the service. On your ROSbot XL execute. Hold the manipulator while doing it, as it disables the torque and the manipulator can fall.
sudo rosbot.arm-disactivate # if you are using snap
ros2 run rosbot_controller arm_control inactive # if you are using local build
Now you can manually move the manipulator to the desired position and launch:
sudo rosbot.arm-activate # if you are using snap
ros2 run rosbot_controller arm_control active # if you are using local build
Modifications
For more advanced purpose you may want to change default manipulator position or edit dynamixel servo setting. To do this it will be necessary to build rosbot_ros and for:
-
Manipulator position
- change position of the manipulator in the
rosbot_xl.urdf.xacro - regenerate collision matrix using MoveIt Setup Assistant
- change position of the manipulator in the
-
Servo setting Check/change some servo parameters in Dynamixel Wizard 2.0.
Troubleshooting
- Gripper does not move - it could be caused by the wrong initial position. Turn off the torque as described in the Resetting the manipulator. Now manually rotate the hub of the manipulator servo 180 degrees (if the connecting rod of the left finger was below the right finger's one, the hub should be rotated so that it is above). Now once again launch controllers.
- Manipulator stopped moving - it can be too close to collision or singularity (you can verify it by examining console logs). The easiest solution to this problem is to return the manipulator to the Home position (
RT+Startbutton). - Manipulator stopped moving and Start button does not work - if the manipulator still won't move, it could be already in the collision (you can verify it by examining console logs). In this case, follow the Resetting the manipulator step and return it manually to some valid position. If nothing helps try restart power supply.
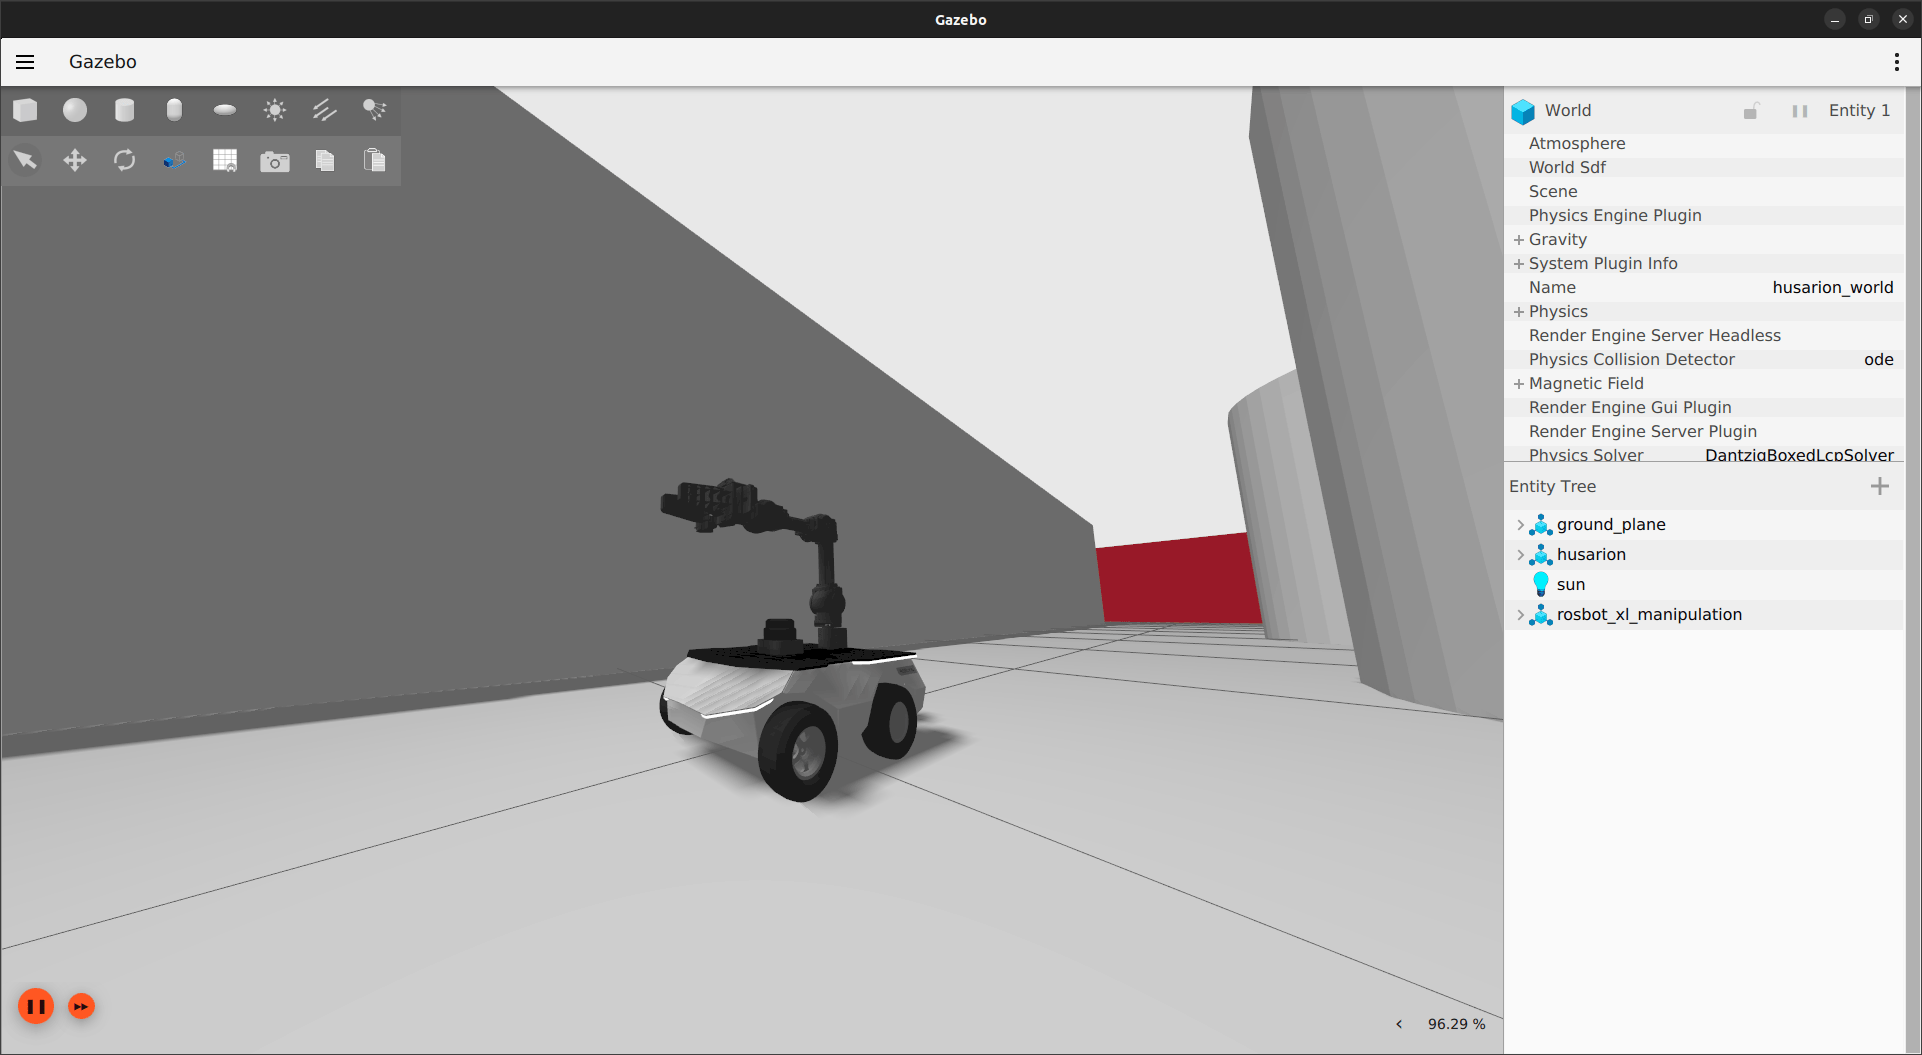
Gazebo simulation
The compose.sim.gazebo.yaml file in this project uses Nvidia Container Runtime, so please install the Nvidia Container Toolkit before moving forward.
To run the Gazebo simulation of the ROSbot XL with OpenMANIPULATOR-X first connect the gamepad to your PC, then navigate to your rosbot-xl-manipulation directory and execute:
xhost +local:docker && \
docker compose -f compose.sim.gazebo.yaml up
Now you will be able to control the robot and manipulator using a gamepad or RViz, just like in the case of the real robot.
Summary
In this tutorial you learned how to combine OpenMANIPULATOR-X with your ROSbot XL and control it using a gamepad. This is only a simple demonstration, and MoveIt is a much more powerful tool. By composing a scene and adding sensors, it can plan complex movements that will avoid obstacles, not only self-collisions. Feel free to use this example as a basis for your next, more advanced project!
by Rafał Górecki, Maciej Stępień, Husarion
Need help with this article or experiencing issues with software or hardware? 🤔
- Feel free to share your thoughts and questions on our Community Forum. 💬
- To contact service support, please use our dedicated Issue Form. 📝
- Alternatively, you can also contact our support team directly at: support@husarion.com. 📧