Robot Management and Configuration
Remote Control
By default, the robot can be controlled using /cmd_vel topic. Panther will process all messages sent to the topic and provide output velocity to the wheels unless E-stop is triggered. Output velocities are scaled according to velocity smoother limits (see Changing Velocity Smoothing Parameters for more information). Below are some tools that allow you to control the Panther robot, but any node publishing to /cmd_vel topic will be valid.
- To control the Panther robot via the
/cmd_veltopic, the E-stop must be reset. This can be done using the ROS service available in the WebUI or the Gamepad controller. - The E-stop cannot be reset while messages are being published to
/cmd_vel. - Do not control the robot from multiple sources simultaneously! This may cause unpredictable behavior.
- For safety, the robot will stop if no velocity command is received for more than 0.2 seconds. When using a custom control system, ensure commands are sent at a sufficient rate (minimum 10 Hz).
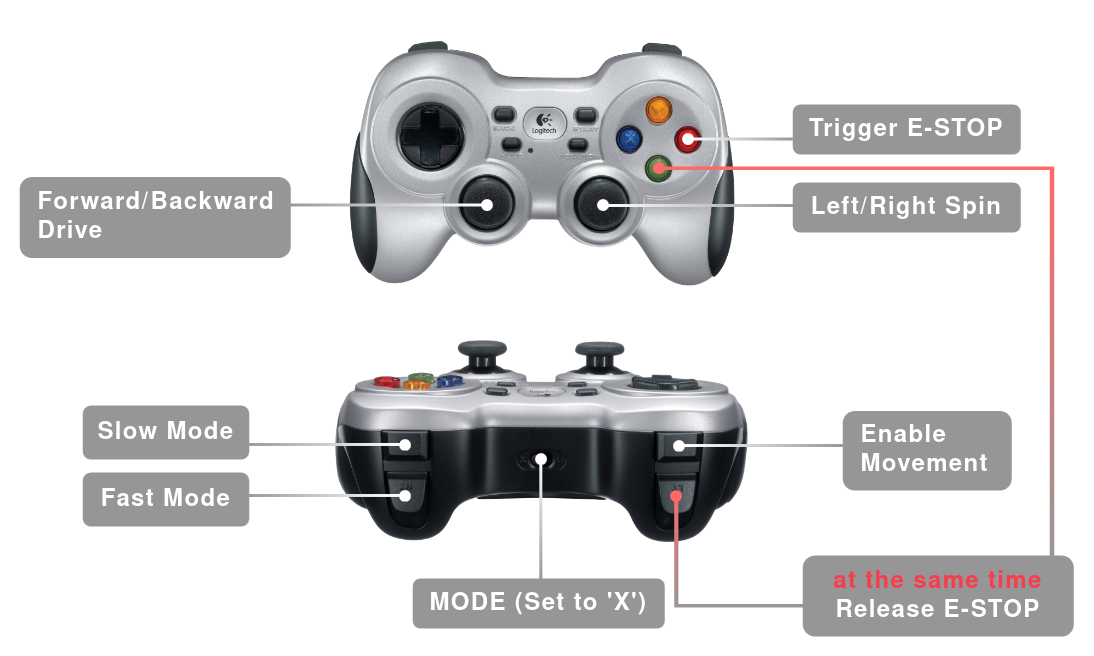
Gamepad
The ROS Joy2Twist node allows controlling the Panther robot with a Gamepad. By default, it can be used with the F710 gamepad, but the node can be configured to work with any Gamepad controller.
- Press
Bto trigger E-stop on Panther. - Hold
LTbutton and pressAto release the E-stop. - To control Panther hold the
LBbutton and use theleft stickto drive forward/backward (additionally left/right when using mecanum wheels) and theright stickto turn the robot.
For more information on how to run and use it, see the Joy2Twist GitHub page.
Keyboard
A teleop_twist_keyboard ROS package is one of the basic ROS tools that allows you to control a robot. It converts keyboard input to velocity commands published in the /cmd_vel topic. It can be easily installed and applied to any device with ROS. When using teleop_twist_keyboard with Panther, the keys must be held down in order to meet the required publishing rate. For more information on how to run and use it, see teleop_twist_keyboard.
teleop_twist_keyboard- ROS 2 Jazzy
- ROS 2 Humble
Under Jazzy, the /cmd_vel topic uses geometry_msgs/msg/TwistStamped instead of geometry_msgs/msg/Twist. An additional parameter must be specified to publish messages of the correct type:
ros2 run teleop_twist_keyboard teleop_twist_keyboard --ros-args -p stamped:=true -r __ns:=/<lynx/panther>
ros2 run teleop_twist_keyboard teleop_twist_keyboard --ros-args -r __ns:=/<lynx/panther>
WebUI
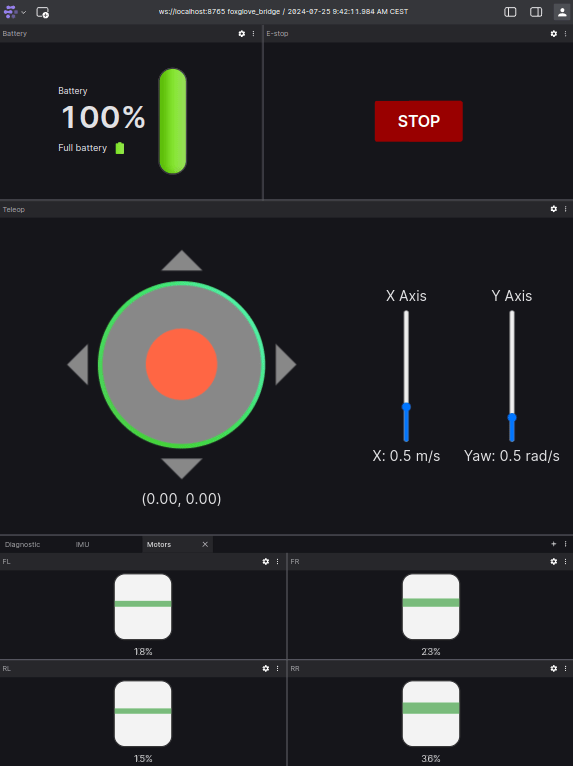
WebUI is a simple user interface that can be accessed through a web browser. The interface allows you to monitor the robot's status and execute commands such as activating or resetting the E-stop or controlling the robot using a joystick.
Installation
WebUI is installed by default on your Built-In computer, and you can access it by typing 10.15.20.2:8080/ui into your browser. After entering the indicated address, you should see following panel:
You can also install WebUI on any device and communicate with it via the LAN address or using husarnet {ip/husarnet_hostname}:8080/ui. The WebUI has several configuration options such as changing namespaces and setting the default ROS middleware. Check husarion-webui to see the full documentation.
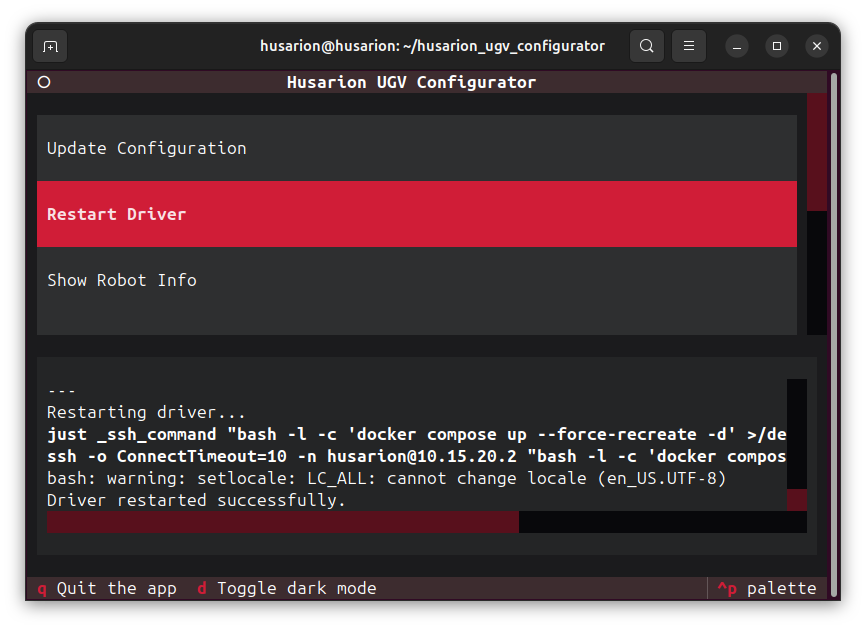
Husarion UGV Configurator
Husarion UGV Configurator is a Text User Interface (TUI) application designed to simplify the configuration and management of Husarion UGV platforms, including Panther and Lynx. It provides an intuitive, terminal-based interface for updating robot parameters, managing driver versions, debugging, and performing maintenance tasks.
Getting Started
Installation
For new robots, the configurator is pre-installed on the built-in computer. If not, follow the Installation Guide. You can also install it on your own computer to manage the robot remotely.
Launching the Configurator
-
Access the Built-in Computer:
Log in to the robot’s built-in computer:
my_device@user:~$ssh husarion@10.15.20.3 -
Launch the Configurator:
husarion@husarion:~$cd husarion_ugv_configurator
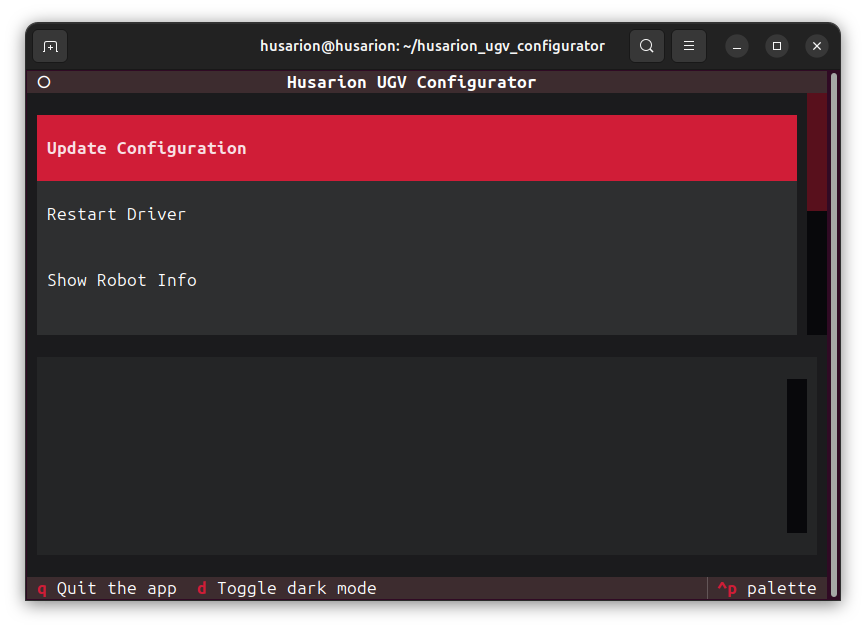
just husarion_ugv_configuratorThe main window of the configurator will appear.
Usage
Available options in the main menu:
- Update Configuration: Easily modify controller parameters (e.g., velocity limits), add new hardware components, create custom animations, and more.
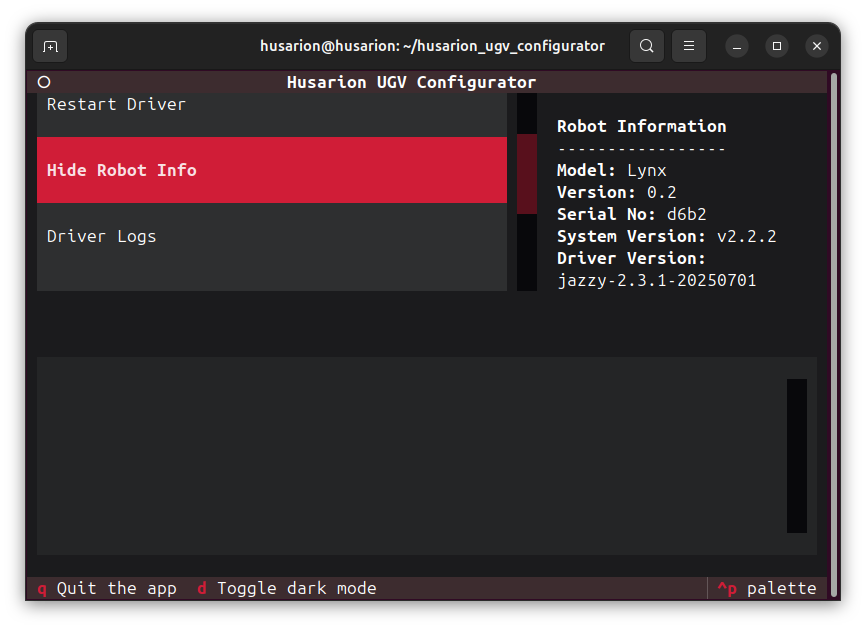
- Show Robot Info: View detailed information about the robot platform and system status.
- Driver Logs: Access, view, and save real-time driver logs for troubleshooting and diagnostics.
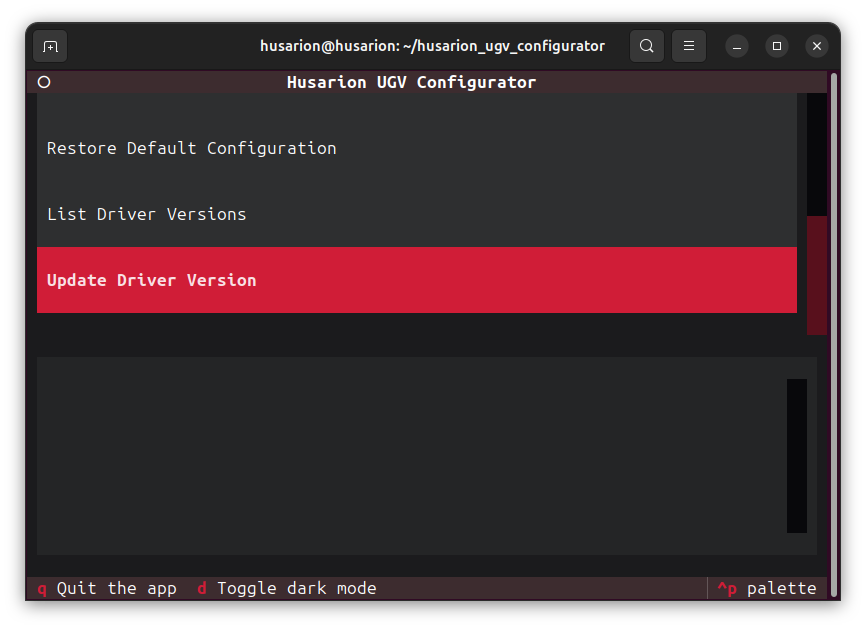
- Update Driver Version: Switch and update driver versions across different ROS 2 distributions.
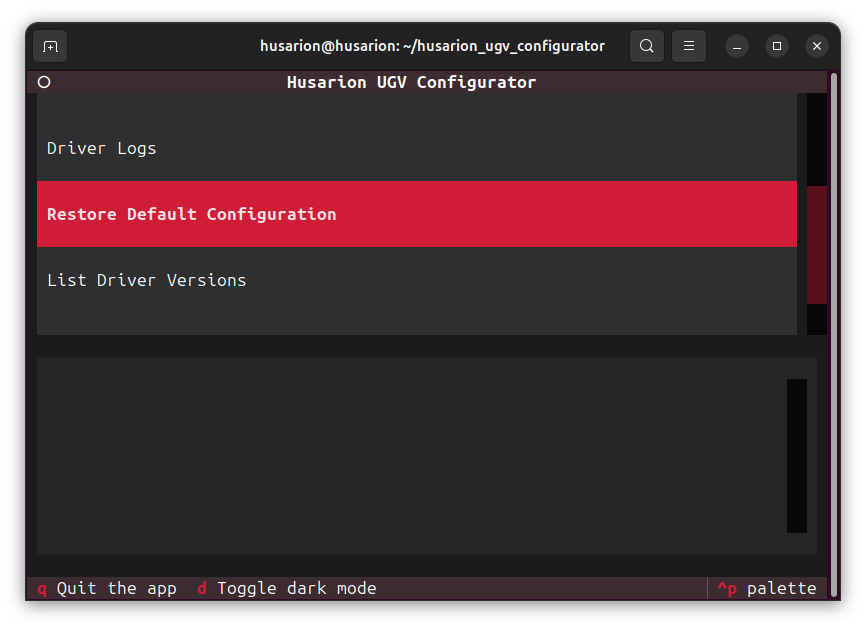
- Restore Default Configuration: Restore default configuration files using either soft or hard reset modes.
- Restart Driver: Apply changes by restarting the robot driver.
Updating configuration
- Configuration files are located in the
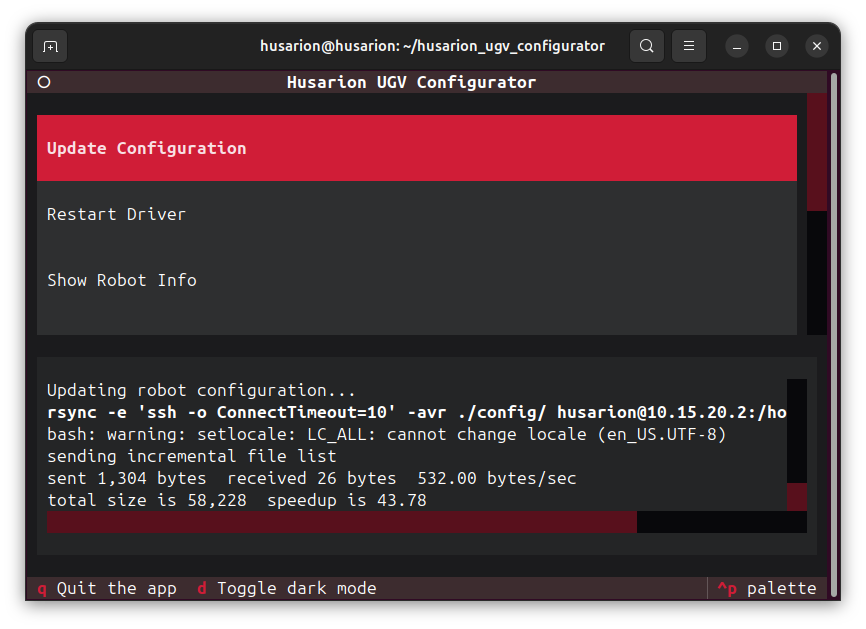
configdirectory insidehusarion_ugv_configurator. To change parameters, edit the relevant files in this directory. See ROS 2 Configuration for examples of configurations that can be adjusted to suit your needs. - After you have modified configuration files, launch the configurator and press Update Configuration.
- To apply changes to the robot, press Restart Driver.
Accessing Robot Information
Press Show Robot Info to display platform details such as robot model, version, serial number, system and driver version.
Debugging Driver
Press Driver Logs to view real-time logs for the robot driver.
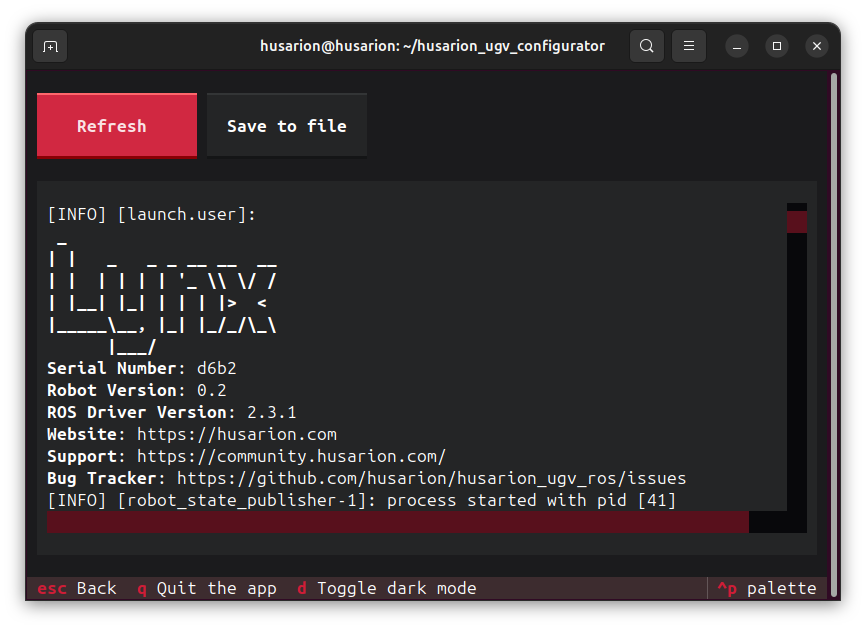
Use Save to File button to export logs for further analysis or reporting issues.
Driver Version Management
- Use Update Driver Version to change current driver version.
- Select the desired ROS 2 distribution and driver version.
- After updating, restart the driver to apply changes.
When switching between ROS 2 distributions, ensure system compatibility and consider restoring default configuration files.
Restoring Configuration
- Use Restore Default Configuration to reset configuration files.
- Choose between hard or soft modes. The hard mode will remove all files from the
configdirectory and copy default ones. The soft mode will overwrite default configurations files, but will preserve files added by the user in theconfigdirectory. - Confirm the restoration when prompted.
Restart Driver
Use Restart Driver to apply changes like configuration updates or driver version changes.
ROS 2 Configuration
Changing Velocity Smoothing Parameters
The default drive controller is based on diff_drive_controller from ros2 control or mecanum_drive_controller. This controller can be customized, among others: by modifying the robot's dynamic parameters (e.g. smooth the speed or limit the robot's speed and acceleration). Its parameters can be found in the husarion_ugv_controller. By default, these values correspond to the upper limits of the robot's velocities and accelerations.
Changing Wheel Type
Changing wheel types is possible and can be done for both the real robot and the simulation. By default, three types of wheels are supported using the launch argument wheel_type. If you want to use custom wheels, all you need to do is point to the new wheel and controller configuration files using the wheel_config_path and controller_config_path parameters. These files should be based on the default files, i.e. WH01_controller.yaml and WH01.yaml.
LED Animations
Basic led configuration is loaded from {robot_model}_animations.yaml file. It includes definition of robot panels, virtual segments and default animations. The default appearance of the animation when looking at the robot is as follows:
| ID | NAME | PRIORITY | ANIMATION |
|---|---|---|---|
| 0 | E_STOP | 3 |  |
| 1 | READY | 3 |  |
| 2 | ERROR | 0 |  |
| 3 | NO_ERROR | 0 |  |
| 4 | MANUAL_ACTION | 3 |  |
| 5 | LOW_BATTERY | 2 |  |
| 6 | CRITICAL_BATTERY | 2 |  |
| 7 | CHARGING_BATTERY | 2 |  |
| 8 | BATTERY_CHARGED | 2 |  |
| 9 | CHARGER_INSERTED | 1 |  |
| 10 | BATTERY_NOMINAL | 2 | |
| 11 | AUTONOMOUS_READY | 3 |  |
| 12 | AUTONOMOUS_ACTION | 3 |  |
| 13 | GOAL_ACHIEVED | 1 |  |
| 14 | BLINKER_LEFT | 1 |  |
| 15 | BLINKER_RIGHT | 1 |  |
The animations work on multiple layers (priorities) and can blend with each other. On a given layer, there can be only one animation at a time. Animations with a lower priority cover those with higher priority, while respecting transparency.
Here are some examples of blended animations:
| STATE | ANIMATION |
|---|---|
| E_STOP + CHARGING_BATTERY at 25% |  |
| E_STOP + CHARGING_BATTERY at 50% |  |
| E_STOP + CHARGING_BATTERY at 75% |  |
| READY + CHARGING_BATTERY at 50% |  |
Panels
The panels section of the YAML file lists all the physical LED panels on the robot. Each panel has two attributes:
channel[int, default: None] the identifier for the LED panel. It is used to differentiate between multiple panels.number_of_leds: defines the total number of LEDs present on the panel.
Segments
The segments section is used to create virtual segments on the robot by dividing the LED panels into different parts. This allows for more precise control over which LEDs are lit up for different effects or indicators. Each segment has three attributes:
name: the identifier for the segment, such as "front" or "rear". It is used to differentiate between multiple segments.channel: This specifies which LED panel the segment belongs to. It has to match one of the channels defined in thepanelssection.led_range: This defines the range of LEDs within the panel that the segment covers. The range is specified as a start-end pair (e.g. 0-45). The range can be specified in reverse order (e.g. 45-0), which may be useful for wiring or orientation reasons.
Each LED in a panel can only belong to one segment. If multiple segments are defined with overlapping led_range values on the same panel, only the first occurrence of each LED will be considered.
Segments map
The segments_map section allows creating named groups of segments on which animations can be displayed. Each entry under segments_map consists of a key representing the group name and a list of segments included in the group. Segment names have to match one of the segments defined in the segments section. By default, you can use provided mapping:
all[list, default: None]: Grouping bothfrontandrearsegments together.front[list, default: None]: Containing only thefrontsegment.rear[list, default: None]: Containing only therearsegment.
Animations
The led_animations section contains a list with definitions for various animations that can be displayed on the LED segments. Supported keys are:
animations[list, default: None]: definition of animation for each Bumper Lights. Supported keys are:type[string, default None]: Specifies the type of animation. Default animation types are:husarion_ugv_lights::ImageAnimation,husarion_ugv_lights::MovingImageAnimation.segments[string, default None]: Indicates which segment mapping this particular animation applies to (e.g., all, front, rear).animation[yaml, default: None]: An animation to be displayed on segments. The keys for the configuration of different animation types are explained in detail under the Animation Types section.
id[int, default: None]: unique ID of an animation.name[string, default: ANIMATION_ID]: name of an animation. If not provided, it will default to ANIMATION_ID, whereIDis equal toidparameter of the given animation.priority[int, default: 3]: defines at what layer animation will be assigned. Animations with higher priority (0 corresponds to the highest) will be on top of animations with lower priority. Priorities are defined as follow:- 0 - ERROR highest priority designed to signal critical errors in the system.
- 1 - ALERT dedicated to display one-time events e.g. goal reached etc.
- 2 - INFO dedicated to display simple information such as battery states.
- 3 - STATE lowest priority designed for indicating robot state.
timeout[float, default: 120.0]: time in [s], after which animation will be removed from the queue.
Animation Types
Animation
Basic animation definition. Keys are inherited from the basic Animation class by all animations. Supported keys are:
duration[float, default: None]: duration of the animation.repeat[int, default: 1]: number of times the animation will be repeated.
Overall display duration of an animation is a product of a single image duration and repeat count. The result of duration x repeat can't exceed 10 [s]. If animation fails to fulfill the requirement, it will result in an error.
ImageAnimation
Animation of type husarion_ugv_lights::ImageAnimation, returns frames to display based on a supplied image. Extends Animation with keys:
image[string, default: None]: path to an image file. Only global paths are valid. Allows using$(find ros_package)syntax.color[int, default: None]: The image is turned into grayscale, and then the color is applied with brightness from the gray image. Values have to be in HEX format. This parameter is not required.
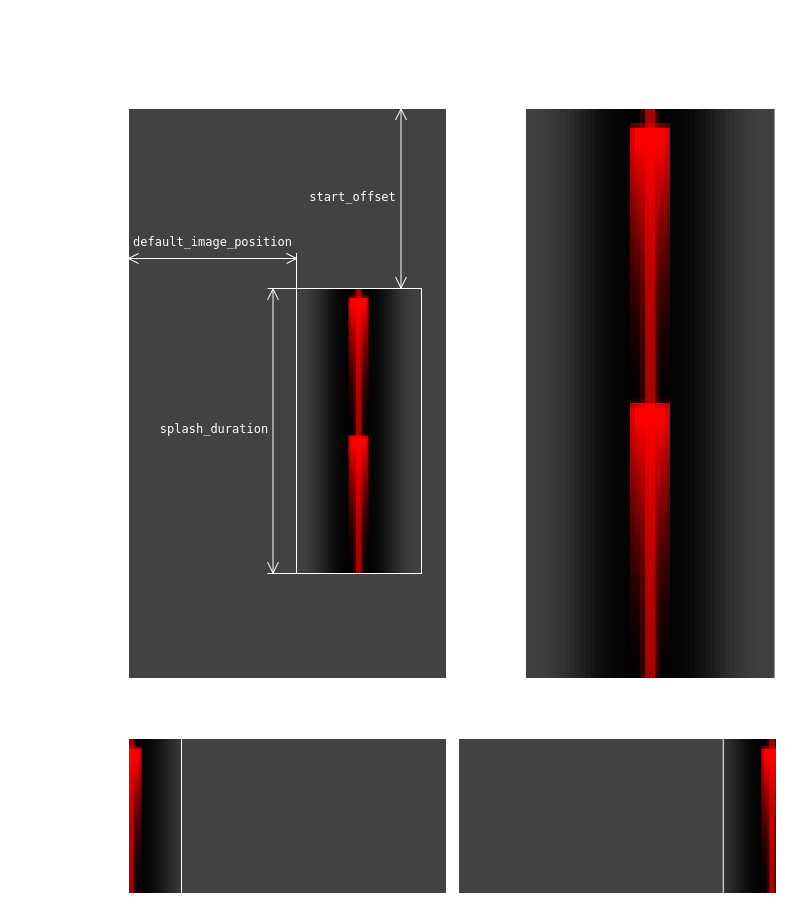
MovingImageAnimation
Animation of type husarion_ugv_lights::MovingImageAnimation, returns frames to display based on a supplied image, that can be shifted using param value. param accepts values between 0.0 and 1.0. Extends Animation with keys:
image[string, default: None]: path to an image file. Only global paths are valid. Allows using$(find ros_package)syntax.color[int, default: None]: The image is turned into grayscale, and then the color is applied with brightness from the gray image. Values have to be in HEX format. This parameter is not required.center_offset[int, default: 0]: distance [in px] from the left edge of the provided image to the start of the always visible part of the image.start_offset[float, default: 0.0]: time [in s] from the beginning of the animation to first row of pixels of the provided image being displayed.object_width[int, default: 0]: width [in px] of the part of the image that for anyparamwill always be visible.splash_duration[float, default: None]: duration [in s] of the provided image. If left unset will play one row of pixels per controller tick.default_image_position[float, default: None]: sets the default value of theparam, making it optional.image_mirrored[bool, default: false]: mirrors the provided image horizontally.position_mirrored[bool, default: false]: switches the position of 0.0 and 1.0 values of the param.
Defining Animations
Users can define their own LED animations using basic animation types. Similar to basic ones, user animations are parsed using YAML file and loaded on node start. For ImageAnimation you can use basic images from the animations folder and change their color with the color key (see ImageAnimation). Follow the example below to add custom animations.
Create a YAML file with an animation description list. Example file:
## my_awesome_user_animations.yaml
user_animations:
  # animation with default image and custom color
  - id: 21
    name: ANIMATION_1
    priority: 2
    animations:
      - type: husarion_ugv_lights::ImageAnimation
        segments: all
        animation:
          image: $(find husarion_ugv_lights)/animations/panther/estop_front.png
          duration: 2
          repeat: 2
          color: 0xffff00

  # animation with custom image
  - id: 22
    name: ANIMATION_2
    priority: 3
    animations:
      - type: husarion_ugv_lights::ImageAnimation
        segments: all
        animation:
          image: /animations/custom_image.png
          duration: 3
          repeat: 1

  # animation with a custom image from custom ROS package
  - id: 23
    name: ANIMATION_3
    priority: 3
    animations:
      - type: husarion_ugv_lights::ImageAnimation
        segments: all
        animation:
          image: $(find custom_pkg)/animations/custom_image.png
          duration: 3
          repeat: 1

  # different animations for Front and Rear Bumper Light
  - id: 24
    name: ANIMATION_4
    priority: 3
    animations:
      - type: husarion_ugv_lights::ImageAnimation
        segments: front
        animation:
          image: $(find custom_pkg)/animations/front_custom_image.png
          duration: 2
          repeat: 2
      - type: husarion_ugv_lights::ImageAnimation
        segments: rear
        animation:
          image: $(find custom_pkg)/animations/rear_custom_image.png
          duration: 3
          repeat: 1
- ID numbers from 0 to 19 are reserved for system animations.
- Priority 0 is reserved for crucial system animations. Users can only define animations with priority 1-3.
Remember to modify launch command to use user animations:
ros2 launch husarion_ugv_bringup bringup.launch user_animations_file:=/my_awesome_user_animations.yaml
Test new animations:
ros2 service call /lights/set_animation husarion_ugv_msgs/srv/SetLEDAnimation "\{animation: {id: 0, param: ''\}, repeating: true}"
Defining a Custom Animation Type
It is possible to define your own animation type with expected, new behavior. For more information, see: Animation API.
Shutdown Behavior
For more information regarding shutdown behavior, refer to ShutdownHostsFromFile BT node in the Actions section. An example of a shutdown hosts YAML file can be found below.
## My shutdown_hosts.yaml
hosts:
  # Intel NUC, user computer
  - ip: 10.15.20.3
    port: 3003
  # Universal robots UR5
  - ip: 10.15.20.4
    port: 3003
  # My device that requires very long shutdown sequence
  - ip: 10.15.20.12
    port: 3003
    secret: password123
    timeout: 40
To allow your computer to be safe shutdown from Built-in Computer, you need to set up a HTTP server capable of turning off your device. This can be done using snap:
sudo snap install husarion-shutdown
sudo snap set husarion-shutdown config.user-computer-ip="10.15.20.12" config.password="password123"
sudo husarion-shutdown.start
Faults Handle
After receiving a message on the battery/battery_status topic, the husarion_ugv_manager node makes decisions regarding safety measures. For more information regarding the power supply status, please refer to the BatteryState message definition and adc_battery.cpp implementation.
| Power Supply Health | Procedure |
|---|---|
| GOOD | - |
| UNKNOWN | - |
| OVERHEAT | 1. Turn on the fan. 2. If the Battery temperature is higher than 55.0 [°C], trigger an emergency stop and turn off AUX. 3. If the Battery temperature is higher than 62.0 [°C], shutdown the robot. |
| DEAD | Shutdown the robot. |
| OVERVOLTAGE | 1. Initiate an emergency stop. 2. Display an error animation if the charger is connected. |
| COLD | - |
- The fan exhibits a form of hysteresis, allowing it to be turned off after a delay of at least 60 seconds.
- Once the Panther ROS stack initializes, the fan activates and operates for a duration of approximately 60 seconds.
BehaviorTree
This package contains two main BehaviorTree projects. One is designed for lights handling and the other for safety and system shutdown.
For a BehaviorTree project to work correctly, it must contain a tree with correct names. The names are: Lights for lights BT project; Shutdown and Safety for safety BT project. Files with trees XML descriptions can be shared between projects. Each tree is provided with a set of default blackboard entries (described below), which can be used to specify the behavior of a given tree.
Nodes
Actions
CallSetBoolService- allows calling the standard std_srvs/SetBool ROS service. Provided ports are:data[input, bool, default: None]: service data - true or false value.service_name[input, string, default: None]: ROS service name.
CallSetLedAnimationService- allows calling custom type husarion_ugv_msgs/SetLEDAnimation ROS service. The provided ports are:id[input, unsigned, default: None]: animation ID.param[input, string, default: None]: optional parameter passed to animation.repeating[input, bool, default: false]: indicates if the animation should repeat.service_name[input, string, default: None]: ROS service name.
CallTriggerService- allows calling the standard std_srvs/Trigger ROS service. The provided ports are:service_name[input, string, default: None]: ROS service name.
ShutdownHostsFromFile- allows to shutdown devices based on a YAML file. ReturnsSUCCESSonly when a YAML file is valid and the shutdown of all defined hosts was successful. Nodes are processed in a semi-parallel fashion. Every tick of the tree updates the state of a host. This allows some hosts to wait for a HTTP server response, while others are already pinged and awaiting a full shutdown. If a host is shutdown, it is no longer processed. In the case of a long timeout is used for a given host, other hosts will be processed simultaneously. The provided ports are:shutdown_host_file[input, string, default: None]: global path to YAML file with hosts to shutdown.
ExecuteCommand- allows to execute system command. Will returnSUCCESSif command was executed successfully. The provided ports are:command[input, string, default: None]: command to execute.timeout[input, string, default: None]: time in [s] to wait for command execution. If this timeout is reached the process executing the command will be killed.
SignalShutdown- signals shutdown of the robot. The provided ports are:message[input, string, default: None]: message with reason for robot to shutdown.
Decorators
TickAfterTimeout- will skip a child until the specified time has passed. It can be used to specify the frequency at which a node or subtree is triggered. The provided ports are:timeout[input, unsigned, default: None]: time in [s] to wait before ticking child again.
Trees
Lights
A tree responsible for scheduling animations displayed on the Bumper Lights based on the Husarion Panther robot's system state.

Default blackboard entries:
battery_percent[float, default: None]: moving average of the Battery percentage.battery_percent_round[string, default: None] Battery percentage rounded to a value specified with~lights/update_charging_anim_stepparameter and cast to string.battery_health[unsigned, default: None]: the current Battery health state.battery_status[unsigned, default: None]: the current Battery status.charging_anim_percent[string, default: None]: the charging animation Battery percentage value, cast to a string.current_anim_id[int, default: -1]: ID of currently displayed state animation.current_battery_anim_id[int, default: -1]: ID of currently displayed battery animation.current_error_anim_id[int, default: -1]: ID of currently displayed error animation.e_stop_state[bool, default: None]: state of E-stop.
Default constant blackboard entries:
BATTERY_STATE_ANIM_PERIOD[float, default: 120.0]: refers tobattery_state_anim_periodROS parameter.CRITICAL_BATTERY_THRESHOLD_PERCENT[float, default: 0.1]: refers tocritical_battery_threshold_percentROS parameter.LOW_BATTERY_ANIM_PERIOD[float, default: 30.0]: refers tolow_battery_anim_periodROS parameter.LOW_BATTERY_THRESHOLD_PERCENT[float, default: 0.4]: refers tolow_battery_threshold_percentROS parameter.E_STOP_ANIM_ID[unsigned, value: 0]: animation ID constant obtained fromhusarion_ugv_msgs::LEDAnimation::E_STOP.READY_ANIM_ID[unsigned, value: 1]: animation ID constant obtained fromhusarion_ugv_msgs::LEDAnimation::READY.ERROR_ANIM_ID[unsigned, value: 2]: animation ID constant obtained fromhusarion_ugv_msgs::LEDAnimation::ERROR.NO_ERROR_ANIM_ID[unsigned, value: 3]: animation ID constant obtained fromhusarion_ugv_msgs::LEDAnimation::NO_ERROR.MANUAL_ACTION_ANIM_ID[unsigned, value: 4]: animation ID constant obtained fromhusarion_ugv_msgs::LEDAnimation::MANUAL_ACTION.LOW_BATTERY_ANIM_ID[unsigned, value: 5]: animation ID constant obtained fromhusarion_ugv_msgs::LEDAnimation::LOW_BATTERY.CRITICAL_BATTERY_ANIM_ID[unsigned, value: 6]: animation ID constant obtained fromhusarion_ugv_msgs::LEDAnimation::CRITICAL_BATTERY.CHARGING_BATTERY_ANIM_ID[unsigned, value: 7]: animation ID constant obtained fromhusarion_ugv_msgs::LEDAnimation::CHARGING_BATTERY.BATTERY_CHARGED_ANIM_ID[unsigned, value: 8]: animation ID constant obtained fromhusarion_ugv_msgs::LEDAnimation::BATTERY_CHARGED.CHARGER_INSERTED_ANIM_ID[unsigned, value: 9]: animation ID constant obtained fromhusarion_ugv_msgs::LEDAnimation::CHARGER_INSERTED.BATTERY_NOMINAL_ANIM_ID[unsigned, value: 10]: animation ID constant obtained fromhusarion_ugv_msgs::LEDAnimation::BATTERY_NOMINAL.AUTONOMOUS_READY_ANIM_ID[unsigned, value: 11]: animation ID constant obtained fromhusarion_ugv_msgs::LEDAnimation::AUTONOMOUS_READY.AUTONOMOUS_ACTION_ANIM_ID[unsigned, value: 12]: animation ID constant obtained fromhusarion_ugv_msgs::LEDAnimation::AUTONOMOUS_ACTION.GOAL_ACHIEVED_ANIM_ID[unsigned, value: 13]: animation ID constant obtained fromhusarion_ugv_msgs::LEDAnimation::GOAL_ACHIEVED.BLINKER_LEFT_ANIM_ID[unsigned, value: 14]: animation ID constant obtained fromhusarion_ugv_msgs::LEDAnimation::BLINKER_LEFT.BLINKER_RIGHT_ANIM_ID[unsigned, value: 15]: animation ID constant obtained fromhusarion_ugv_msgs::LEDAnimation::BLINKER_RIGHT.POWER_SUPPLY_STATUS_UNKNOWN[unsigned, value: 0]: power supply status constant obtained fromsensor_msgs::BatteryState::POWER_SUPPLY_STATUS_UNKNOWN.POWER_SUPPLY_STATUS_CHARGING[unsigned, value: 1]: power supply status constant obtained fromsensor_msgs::BatteryState::POWER_SUPPLY_STATUS_CHARGING.POWER_SUPPLY_STATUS_DISCHARGING[unsigned, value: 2]: power supply status constant obtained fromsensor_msgs::BatteryState::POWER_SUPPLY_STATUS_DISCHARGING.POWER_SUPPLY_STATUS_NOT_CHARGING[unsigned, value: 3]: power supply status constant obtained fromsensor_msgs::BatteryState::POWER_SUPPLY_STATUS_NOT_CHARGING.POWER_SUPPLY_STATUS_FULL[unsigned, value: 4]: power supply status constant obtained fromsensor_msgs::BatteryState::POWER_SUPPLY_STATUS_FULL.
Safety
A tree responsible for monitoring the Panther robot's state and handling safety measures, such as cooling the robot in case of high Built-in Computer's CPU or Battery temperatures.

Default blackboard entries:
aux_state[bool, default: None]: state of AUX Power.bat_temp[double, default: None]: moving average of the Battery temperature.cpu_temp[double, default: None]: moving average of the Built-in Computer's CPU temperaturedriver_temp[double, default: None]: moving average of driver temperature. Out of the two drivers, the one with the higher temperature is taken into account.e_stop_state[bool, default: None]: state of the E-stop.fan_state[bool, default: None]: state of the fan.
Default constant blackboard entries:
CPU_FAN_OFF_TEMP[float, default: 60.0]: refers to thecpu_fan_off_tempROS parameter.CPU_FAN_ON_TEMP[float, default: 70.0]: refers to thecpu_fan_on_tempROS parameter.CRITICAL_BAT_TEMP[float, default: 59.0]: refers to thecritical_bat_tempROS parameter.DRIVER_FAN_OFF_TEMP[float, default: 35.0]: refers to thedriver_fan_off_tempROS parameter.DRIVER_FAN_ON_TEMP[float, default: 45.0]: refers to thedriver_fan_on_tempROS parameter.HIGH_BAT_TEMP[float, default: 55.0]: refers to thehigh_bat_tempROS parameter.POWER_SUPPLY_HEALTH_UNKNOWN[unsigned, value: 0]: power supply status constant obtained from thesensor_msgs::BatteryState::POWER_SUPPLY_HEALTH_UNKNOWN.POWER_SUPPLY_HEALTH_GOOD[unsigned, value: 1]: power supply status constant obtained from thesensor_msgs::BatteryState::POWER_SUPPLY_HEALTH_GOOD.POWER_SUPPLY_HEALTH_OVERHEAT[unsigned, value: 2]: power supply status constant obtained from thesensor_msgs::BatteryState::POWER_SUPPLY_HEALTH_OVERHEAT.POWER_SUPPLY_HEALTH_DEAD[unsigned, value: 3]: power supply status constant obtained from thesensor_msgs::BatteryState::POWER_SUPPLY_HEALTH_DEAD.POWER_SUPPLY_HEALTH_OVERVOLTAGE[unsigned, value: 4]: power supply status constant obtained from thesensor_msgs::BatteryState::POWER_SUPPLY_HEALTH_OVERVOLTAGE.POWER_SUPPLY_HEALTH_UNSPEC_FAILURE[unsigned, value: 5]: power supply status constant obtained from thesensor_msgs::BatteryState::POWER_SUPPLY_HEALTH_UNSPEC_FAILURE.POWER_SUPPLY_HEALTH_COLD[unsigned, value: 6]: power supply status constant obtained from thesensor_msgs::BatteryState::POWER_SUPPLY_HEALTH_COLD.POWER_SUPPLY_HEALTH_WATCHDOG_TIMER_EXPIRE[unsigned, value: 7]: power supply status constant obtained from thesensor_msgs::BatteryState::POWER_SUPPLY_HEALTH_WATCHDOG_TIMER_EXPIRE.POWER_SUPPLY_HEALTH_SAFETY_TIMER_EXPIRE[unsigned, value: 8]: power supply status constant obtained from thesensor_msgs::BatteryState::POWER_SUPPLY_HEALTH_SAFETY_TIMER_EXPIRE.
Shutdown
A tree responsible for the graceful shutdown of robot components, user computers, and the Built-in Computer. By default, it will proceed to shutdown all computers defined in a YAML file with a path defined by the shutdown_host_path ROS parameter.

Default constant blackboard entries:
SHUTDOWN_HOSTS_PATH[string, default: None]: refers toshutdown_hosts_pathROS parameter.
Expected blackboard entries:
signal_shutdown[pair(bool, string), default: (false, '')]: flag to shutdown robot with information to display while shutting down.
Modifying Behavior Trees
Each behavior tree can be easily customized to enhance its functions and capabilities. To achieve this, we recommend using Groot2, a powerful tool for developing and modifying behavior trees. To install Groot2 and learn how to use it, please refer to the official guidelines.
When creating a new BehaviorTree project, it is advised to use an existing project as a guideline and leverage it for reference. You can study the structure and implementation of the behavior trees in the existing project to inform your own development process. The project should consist of Lights behavior tree or both Safety and Shutdown behavior tree. Additionally, you have the option to incorporate some of the files used in the existing project into your own project. By utilizing these files, you can benefit from the work already done and save time and effort in developing certain aspects of the behavior trees.
It is essential to exercise caution when modifying the trees responsible for safety or shutdown and ensure that default behaviors are not removed. Remember to use the files from the existing project in a way that avoids conflicts, such as by saving them under new names to ensure they don't overwrite any existing files.
When modifying behavior trees, you have the flexibility to use standard BehaviorTree.CPP nodes or leverage nodes created specifically for Panther, as detailed in the Nodes section. Additionally, if you have more specific requirements, you can even create your own custom Behavior Tree nodes. However, this will involve modifying the package and rebuilding the project accordingly.
To use your customized project, you can modify the bt_project_file ROS parameter.
Real-time Visualization
Groot2 also provides a real-time visualization tool that allows you to see and debug actively running trees. To use this tool with trees launched with the husarion_ugv_manager package, you need to specify the port associated with the tree you want to visualize. The ports for each tree are listed below:
- Lights tree:
10.15.20.2:5555 - Safety tree:
10.15.20.2:6666 - Shutdown tree:
10.15.20.2:7777
Use of GPS in Simulation
The NavSat system is utilized to publish the robot's position within the Gazebo world. It manages navigation satellite sensors, such as GPS, which report position and velocity in spherical coordinates (latitude/longitude) through Ignition Transport.
The NavSat sensors requires the spherical coordinates of the world origin to be configured. This configuration can be accomplished, for instance, by employing the <spherical_coordinates> tag within the world's SDF or by utilizing the Ignition /world/world_name/set_spherical_coordinates service.
To obtain GPS data in Ignition, follow these steps:
- Include the ANT02 by adding the following lines to your components.yaml file inside the
componentslist:
  - type: ANT02
    parent_link: cover_link
    xyz: 0.185 -0.12 0.0
    rpy: 0.0 0.0 3.14
    device_namespace: gps
- Add the following tag to your world's SDF file and specify this file using the
worldparameter (the defaulthusarion_world.sdffile already includes this tag):
<spherical_coordinates>
  <surface_model>EARTH_WGS84</surface_model>
  <world_frame_orientation>ENU</world_frame_orientation>
  <latitude_deg>53.1978</latitude_deg>
  <longitude_deg>18.3732</longitude_deg>
  <elevation>0</elevation>
  <heading_deg>0</heading_deg>
</spherical_coordinates>
Linear Battery Plugin
It is possible to simulate the battery operation of the simulated robot. By default, this feature is disabled, but you can enable it by setting the simulate_discharging parameter to true in the battery_plugin.yaml file or in the file pointed to by the battery_config_path parameter. Below, you will find the plugin parameters that enable battery simulation.
simulate_discharging[bool, default: false]: Enables battery simulation. If set totrue, the battery will discharge at a constant rate (regardless of joint torque), and if it depletes completely, the robot will stop moving. When set tofalse, the battery will not discharge, but the battery status information will still be published on thebattery/battery_statustopic.initial_charge_percentage[float, default: 70.0]: Sets the initial charge percentage of the battery.charging_time[float, default: 6.0]: Specifies the charging time for the battery in hours.power_load[float, default: 120.0]: Represents the average power load during normal operation [W] and is initially set to 120.0 W. With the default power load of 120.0 W, the robot can operate for up to 8 hours. When thesimulate_dischargingparameter is set tofalse, this value defaults to 0.0 W. Users are encouraged to customize this value to match their specific requirements. For more information on robot power consumption, please refer to Battery & Charging Documentation.
The battery model is quite simple and involves significant simplifications. As a result, the battery discharge rate observed on the physical robot may differ from the model's predictions.
Charging Process
Unfortunately, there is no straightforward way to exchange LinearBatteryPlugin services between ROS and Gazebo Transport, so you need to use the ign commands. As a result, the method of charging differs between the real and simulated robot.
You can start the charging process by calling the Ignition service:
ign service --service /model/\{robot_model\}/battery/battery/recharge/start --reqtype ignition.msgs.Boolean --reptype ignition.msgs.Empty --req '' --timeout 0
and stop it using:
ign service --service /model/\{robot_model\}/battery/battery/recharge/stop --reqtype ignition.msgs.Boolean --reptype ignition.msgs.Empty --req '' --timeout 0
GNSS API
To use the GNSS (including GPS), Panther has to be equipped with the ANT02 option.
GNSS data in NMEA format is forwarded to the Built-in Computer IP address at port 5000. Typically you can access it at upd://10.15.20.2:5000.
You can make sure the address is correct by typing http://10.15.20.1 into your browser (username: admin, password: Husarion1! or Husarion1 for older robots). Navigate to Services -> GPS -> NMEA -> NMEA forwarding -> Hostname and Port. Remember that you must be connected to the robot's WiFi network. If changes are needed, finish the configuration by pressing save & apply at the bottom of the screen. To learn more about GPS configuration, please refer to RUTX11 GPS.
Data frequency is 1 Hz and can be interacted ether with GPSD daemon
gpsd -N udp://10.15.20.2:5000
or directly with the ROS package, translating the signal to a ROS topic.
It is recommended to use a Docker image through a compose.yaml file.
If launching on a Built-in Computer you can utilize the main Panther compose file located at ~/compose.yaml. Edit the file using the text editor of your choice and add the following container:
  nmea-gps:
    image: husarion/nmea-gps:humble
    network_mode: host
    restart: always
    command: >
      ros2 launch /husarion_utils/nmea_navsat.launch.py
        robot_namespace:=panther
To restart Docker containers, execute the following command from within the directory containing the compose file:
docker compose up -d --force-recreate
You should be able to see data from the GNSS by listening to a ROS topic.
ros2 topic echo /panther/gps/fix