Track object with OpenCV
In this tutorial, you will learn how to integrate ROS with the OpenCV library, giving you access to countless vision algorithms widely used in robotics. Using one of these algorithms, a program will be created that will allow you to track any object and control the robot in such a way that the tracked object remains in the camera's working area.
Prerequisites
This tutorial is dedicated to the ROSbot XL equipped with any camera. However, most of the information and commands are also compatible with ROSbot 2R/2 PRO, and most changes are simple and come down to launching the appropriate container, depending on your hardware configuration. It is also possible to solve the tutorial using the Gazebo simulation.
If you don't already own a ROSbot, you can get one from the Husarion store.
The tutorials are designed to flow sequentially and are best followed in order. If you're looking to quickly assess the content of a specific tutorial, refer to the ROS 2 Tutorials repository, which contains the completed outcomes.
Due to the Ubuntu 20.04 operating system, ROSbot 2 PRO uses the opencv library version 4.2.0. For proper operation of the package, it is recommended to use version 4.5.4 or make some modifications to the project.
Introduction
Many robotics projects use a vision system, the greatest advantage of which is collecting extensive information about the surrounding environment. This ability allows the system to seamlessly perform complex, autonomous tasks. In today's tutorial, we will present an algorithm designed specifically for tracking objects. In addition to tracking the object specified by the user, the algorithm will control the robot's orientation to ensure that the object remains in its field of view.
To develop effective tracking algorithms, we will utilize the OpenCV library, renowned for its robust open-source solutions tailored for vision systems. Among these solutions is the Kernelized Correlation Filter (KCF) tracker, a prominent choice. For an in-depth understanding of the tracker's operation, refer to this video.
From the user's point of view, the tracker's operating principle consists of two key stages: initialization and active tracking. At the initialization stage, it is necessary to designate the object that will be tracked. The algorithm continuously monitors the location of the object and determines the control of the ROSbot in such a way that the tracked object is in front of it. Essentially, the algorithm achieves this by comparing successive image frames and determining the position of the object relative to its position in the previous frame.
To run this tutorial, you must have a camera attached to your ROSbot.
Explanation of the problem
Some additional difficulties may arise when performing an object tracking task. For example, ROS saves an image in a different format than OpenCV does. Below is a diagram that will explain the flow of information in the tracking algorithm.
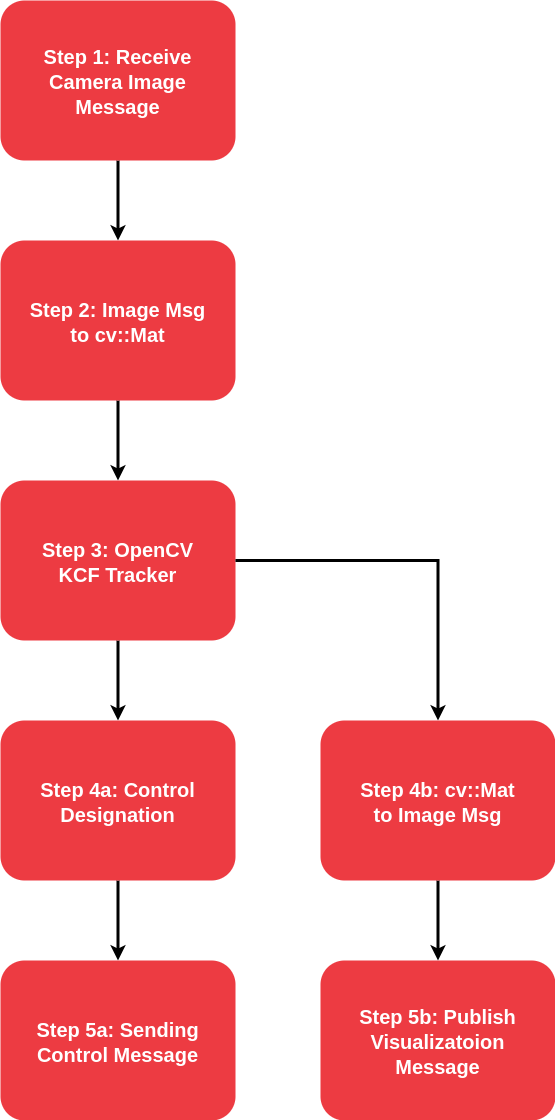
Image Processing - Steps: 1, 2, 3
The presented scheme is quite simple, and it all starts with the appearance of a photo frame. As already mentioned, camera data is saved in a different format than required by OpenCV. For this purpose, it is worth using the cv_bridge package, which will convert the image from cv:Mat to sensor_msgs::msg::Image and vice versa. Which will make image implementation much easier. We then use the KCF tracker from the OpenCV library to determine the new position of the object.
ROSbot Control - Steps: 4a, 5a
The robot is controlled by determining the distance between the center of the object and the center of the camera image. In order to maintain smooth movement, a proportional controller with a saturator was created to protect the system against oscillations. Control commands are sent in the form of a Twist message to the topic /cmd_vel, enabling the robot to move accordingly.
Diagnostic Message - Steps: 4b, 5b
The last step is to reusing cv_bridge to convert an image in OpenCV format to ROS format and sending an image with a selected object for diagnostic purposes.
Track object
Prepare environment
To run this tutorial you must have the OpenCV library and the cv_bridge package installed. If you don't have these dependencies installed yet, use the command below:
sudo apt install libopencv-dev ros-$ROS_DISTRO-cv-bridge
The project used the OpenCV library version 4.x.x. If the cv::TrackerKCF object does not work properly, please refer to the documentation or install the appropriate version of OpenCV.
Code implementation
Header
Thanks to the use of the openCV library, the code responsible for tracking objects in dew is much simpler. Let's start by creating a header file tracker.hpp in the include/tutorial_pkg directory, where we will define the Tracker class.
#pragma once

#include <rclcpp/rclcpp.hpp>
#include <geometry_msgs/msg/twist.hpp>
#include <sensor_msgs/msg/image.hpp>
#include <opencv2/tracking.hpp>

class Tracker : public rclcpp::Node
{
public:
  constexpr static float MIN_ANG_VEL = 0.15f;
  constexpr static float MAX_ANG_VEL = 0.5f;
  constexpr static float ANGULAR_GAIN = 1.7f;

  Tracker();

private:
  void _imageCallback(const sensor_msgs::msg::Image::SharedPtr msg);
  void _initTracker(cv::Mat frame, cv::Rect obj);
  void _designateControl(geometry_msgs::msg::Twist &vel_msg, cv::Rect obj, uint32_t img_width);

  rclcpp::Subscription<sensor_msgs::msg::Image>::SharedPtr _img_sub;
  rclcpp::Publisher<sensor_msgs::msg::Image>::SharedPtr _visualization_pub;
  rclcpp::Publisher<geometry_msgs::msg::Twist>::SharedPtr _vel_pub;
  cv::Ptr<cv::Tracker> _tracker;
  bool _is_tracker_initialized;
};
Source
Then let's create a source file tracker.cpp in the src directory, responsible for image processing and visualization of the result.
#include "tutorial_pkg/tracker.hpp"
#include <cv_bridge/cv_bridge.h>
#include <opencv2/opencv.hpp>
using namespace std::placeholders;
Tracker::Tracker() : Node("tracker"), _is_tracker_initialized(false)
{
// Subscribers
_img_sub = create_subscription<sensor_msgs::msg::Image>("/image", rclcpp::SensorDataQoS(), bind(&Tracker::_imageCallback, this, _1));
// Publishers
_visualization_pub = create_publisher<sensor_msgs::msg::Image>("/visualization", rclcpp::SensorDataQoS());
_vel_pub = create_publisher<geometry_msgs::msg::Twist>("/cmd_vel", rclcpp::SystemDefaultsQoS());
RCLCPP_INFO(get_logger(), "Node started!");
}
void Tracker::_imageCallback(const sensor_msgs::msg::Image::SharedPtr msg)
{
// Convert the image message to an OpenCV Mat
cv_bridge::CvImagePtr cv_image = cv_bridge::toCvCopy(msg, "bgr8");
cv::Mat frame = cv_image->image;
cv::Rect obj;
geometry_msgs::msg::Twist vel_msg;
if (!_is_tracker_initialized)
{
_initTracker(frame, obj);
}
bool ok = _tracker->update(frame, obj);
if (ok) {
// Calculate angular speed based on the position of the object
_designateControl(vel_msg, obj, msg->width);
RCLCPP_INFO(get_logger(), "Angular velocity: %0.2f", vel_msg.angular.z);
}
else {
// Log a warning message if tracking fails and display it on the image
RCLCPP_WARN(get_logger(), "Tracking failure detected. Stop vehicle!");
putText(frame, "Tracking failure detected", cv::Point(100, 80), cv::FONT_HERSHEY_SIMPLEX, 0.75, cv::Scalar(0, 0, 255), 2);
}
_vel_pub->publish(vel_msg);
// Publish visualization with rectangle around the tracked object
rectangle(frame, obj, cv::Scalar(255, 0, 0), 2, 1);
cv_image->image = frame;
auto img_msg = cv_image->toImageMsg();
_visualization_pub->publish(*img_msg);
}
void Tracker::_initTracker(cv::Mat frame, cv::Rect obj)
{
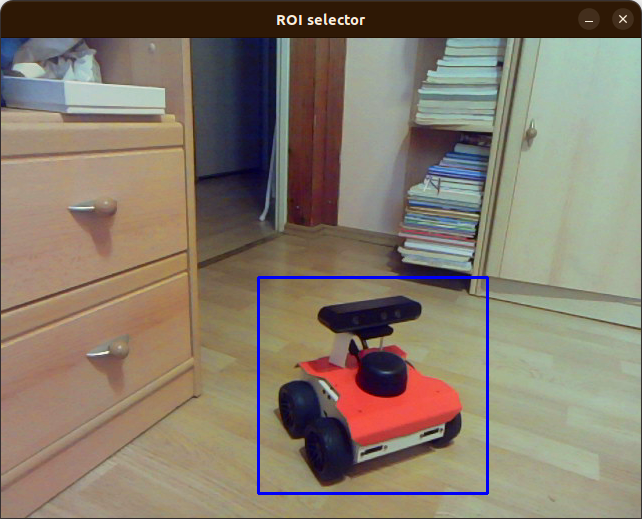
obj = selectROI("ROI selector", frame, false);
_tracker = cv::TrackerKCF::create();
_tracker->init(frame, obj);
_is_tracker_initialized = true;
cv::destroyWindow("ROI selector");
cv::waitKey(1);
}
void Tracker::_designateControl(geometry_msgs::msg::Twist &vel_msg, cv::Rect obj, uint32_t img_width)
{
int obj_x_center = obj.x + obj.width / 2;
int px_to_center = img_width / 2 - obj_x_center;
float ang_vel = ANGULAR_GAIN * px_to_center / static_cast<float>(img_width);
// Ensure angular velocity is within bounds
if ((ang_vel >= -MAX_ANG_VEL && ang_vel <= -MIN_ANG_VEL) || (ang_vel >= MIN_ANG_VEL && ang_vel <= MAX_ANG_VEL)) {
vel_msg.angular.z = ang_vel;
}
}
int main(int argc, char **argv)
{
rclcpp::init(argc, argv);
auto node = std::make_shared<Tracker>();
rclcpp::spin(node);
rclcpp::shutdown();
return 0;
}
The code explained
-
Tracker()constructor is responsible for creating appropriateImagesubscriber and publisher. -
_imageCallback()function is responsible for image preprocessing. It consists of 4 stages:- Convert image from ROS format to OpenCV format using
cv_bridge. - Initialization of the OpenCV tracker if it has not been done yet.
- Designating control for the robot.
- Visualization of the tracking result.
- Convert image from ROS format to OpenCV format using
-
_initTracker()function is responsible for pointing and initializing the OpenCV tracker. -
_designateControl()function is responsible for computing the angular velocity (ang_vel) based on the position of a tracked object within an image. It calculates the distance of the object's center from the image center and uses a proportional gain to determine the angular velocity that will guide the tracking.
Build project
As in this project we use an external library OpenCV, we must mark the desire to use it in the CMakeList.txt configuration file.
cmake_minimum_required(VERSION 3.8)
project(tutorial_pkg)

# Set C++ standard to C++14
if(NOT CMAKE_CXX_STANDARD)
  set(CMAKE_CXX_STANDARD 14)
endif()

if(CMAKE_COMPILER_IS_GNUCXX OR CMAKE_CXX_COMPILER_ID MATCHES "Clang")
  add_compile_options(-Wall -Wextra -Wpedantic)
endif()

# find dependencies
find_package(OpenCV REQUIRED)
find_package(cv_bridge REQUIRED)

find_package(ament_cmake REQUIRED)
find_package(rclcpp REQUIRED)
find_package(sensor_msgs REQUIRED)
find_package(std_msgs REQUIRED)
find_package(std_srvs REQUIRED)

include_directories(
  include
)

add_executable(my_first_node src/my_first_node.cpp)
ament_target_dependencies(my_first_node rclcpp sensor_msgs std_msgs std_srvs)

add_executable(tracker src/tracker.cpp)
ament_target_dependencies(tracker rclcpp OpenCV cv_bridge geometry_msgs sensor_msgs std_msgs)

install(TARGETS
  my_first_node
  tracker
  DESTINATION lib/${PROJECT_NAME}
)

install(DIRECTORY
  launch
  DESTINATION share/${PROJECT_NAME})

ament_package()
The code explained
-
Using the
find_packagefunction to find out where the OpenCV package is located on our computer. -
Using the
include_directoriesfunction we add theincludepath inside your package. -
Indicating the file to be compiled (
add_executable) and all dependencies (ament_target_dependencies) necessary to build the code and installing (install) the resulting executable files.
Build code
colcon build
source install/setup.bash
Run code
- ROSbot
- Gazebo simulator
Running the ROSbot is very easy thanks to the created docker services.
docker compose up -d microros <rosbot_service> <camera_service>
Depending on your ROSbot model and specific configuration you should use an appropriate name for your
<rosbot_service>and<camera_service>. Check Husarion Docker to find suitable image.
ros2 run tutorial_pkg tracker --ros-args -r /image:=/your/camera/image_raw
Running the simulator is very easy thanks to the created aliases. If you haven't done so already check configure your environment.
ROSBOT_SIM
Then in new terminal start your tracker node.
ros2 run tutorial_pkg tracker --ros-args -r /image:=/your/camera/image_raw
To place objects in front of camera inside Gazebo simulation, you can click at + next to the Entity Tree and select Mesh. You can find many mesh in Gazebo libraries (e.g fire_hydrant)
Result
The OpenCV window should appear on the screen in which we select the object to be tracked by dragging the mouse. Then click Enter to start tracking.
If you are running the program on ROSbot, you should use Remote Desktop to display the OpenCV window.
To see tracing results open RViz2 add /visualization topic and change Reliability Policy to Best effort.
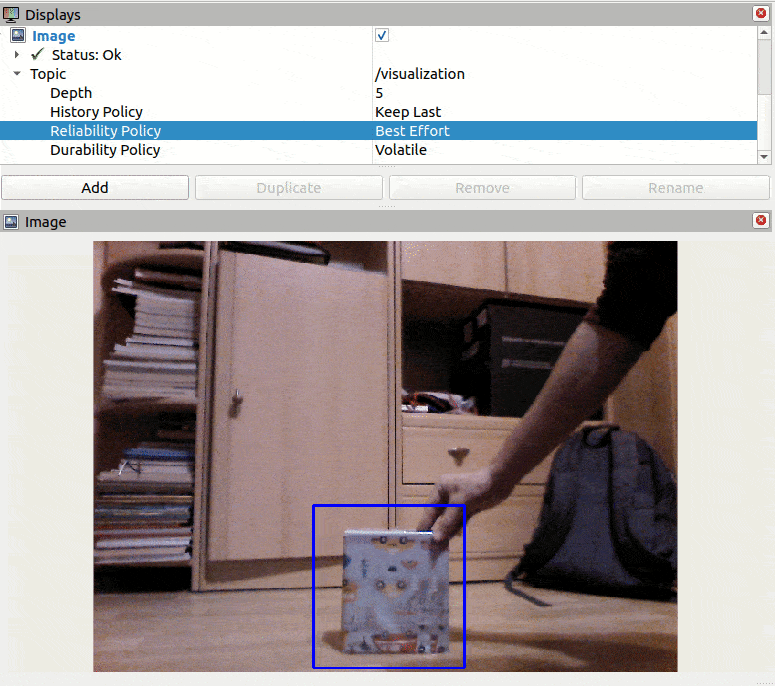
Image processing is quite computationally expensive, so ROSbot can react with a slight delay to a change in the position of the object.
Summary
After completing this tutorial, you should no longer have problems adding the OpenCV library to your project. In the next tutorial you will learn how to create a network in which robots can communicate with each other via the Internet.
by Rafał Górecki, Husarion
Need help with this article or experiencing issues with software or hardware? 🤔
- Feel free to share your thoughts and questions on our Community Forum. 💬
- To contact service support, please use our dedicated Issue Form. 📝
- Alternatively, you can also contact our support team directly at: support@husarion.com. 📧