Lynx - quick start
Lynx is a compact and robust Unmanned Ground Vehicle (UGV) platform designed for seamless operation in both indoor and outdoor environments. Featuring an IP54/66-rated, rugged alloy chassis, Lynx withstands harsh conditions while measuring just 54 cm in width—allowing it to navigate tight spaces and standard doorways effortlessly. Its modular design includes a hot-swappable battery system and a customizable user compartment, allowing users to tailor the robot to their specific needs without overcomplicating the setup. Lynx facilitates the integration of LIDARs, 3D cameras, manipulators, and other components through its T-slot mounting rail, accessible power ports, and extensive communication interfaces. Supported by open-source ROS 2 driver and a comprehensive suite of software examples, Lynx simplifies the development process for your product or research project.
If you don't have Lynx yet, you can get it from the online store.
Unboxing
Package Content
The standard package contains:
- Lynx robot
- Accessories box:
- Charger
- Logitech F710 gamepad
- RUTX11 accessories
- Additional content may vary depending on optional items purchased
Unboxing Robot
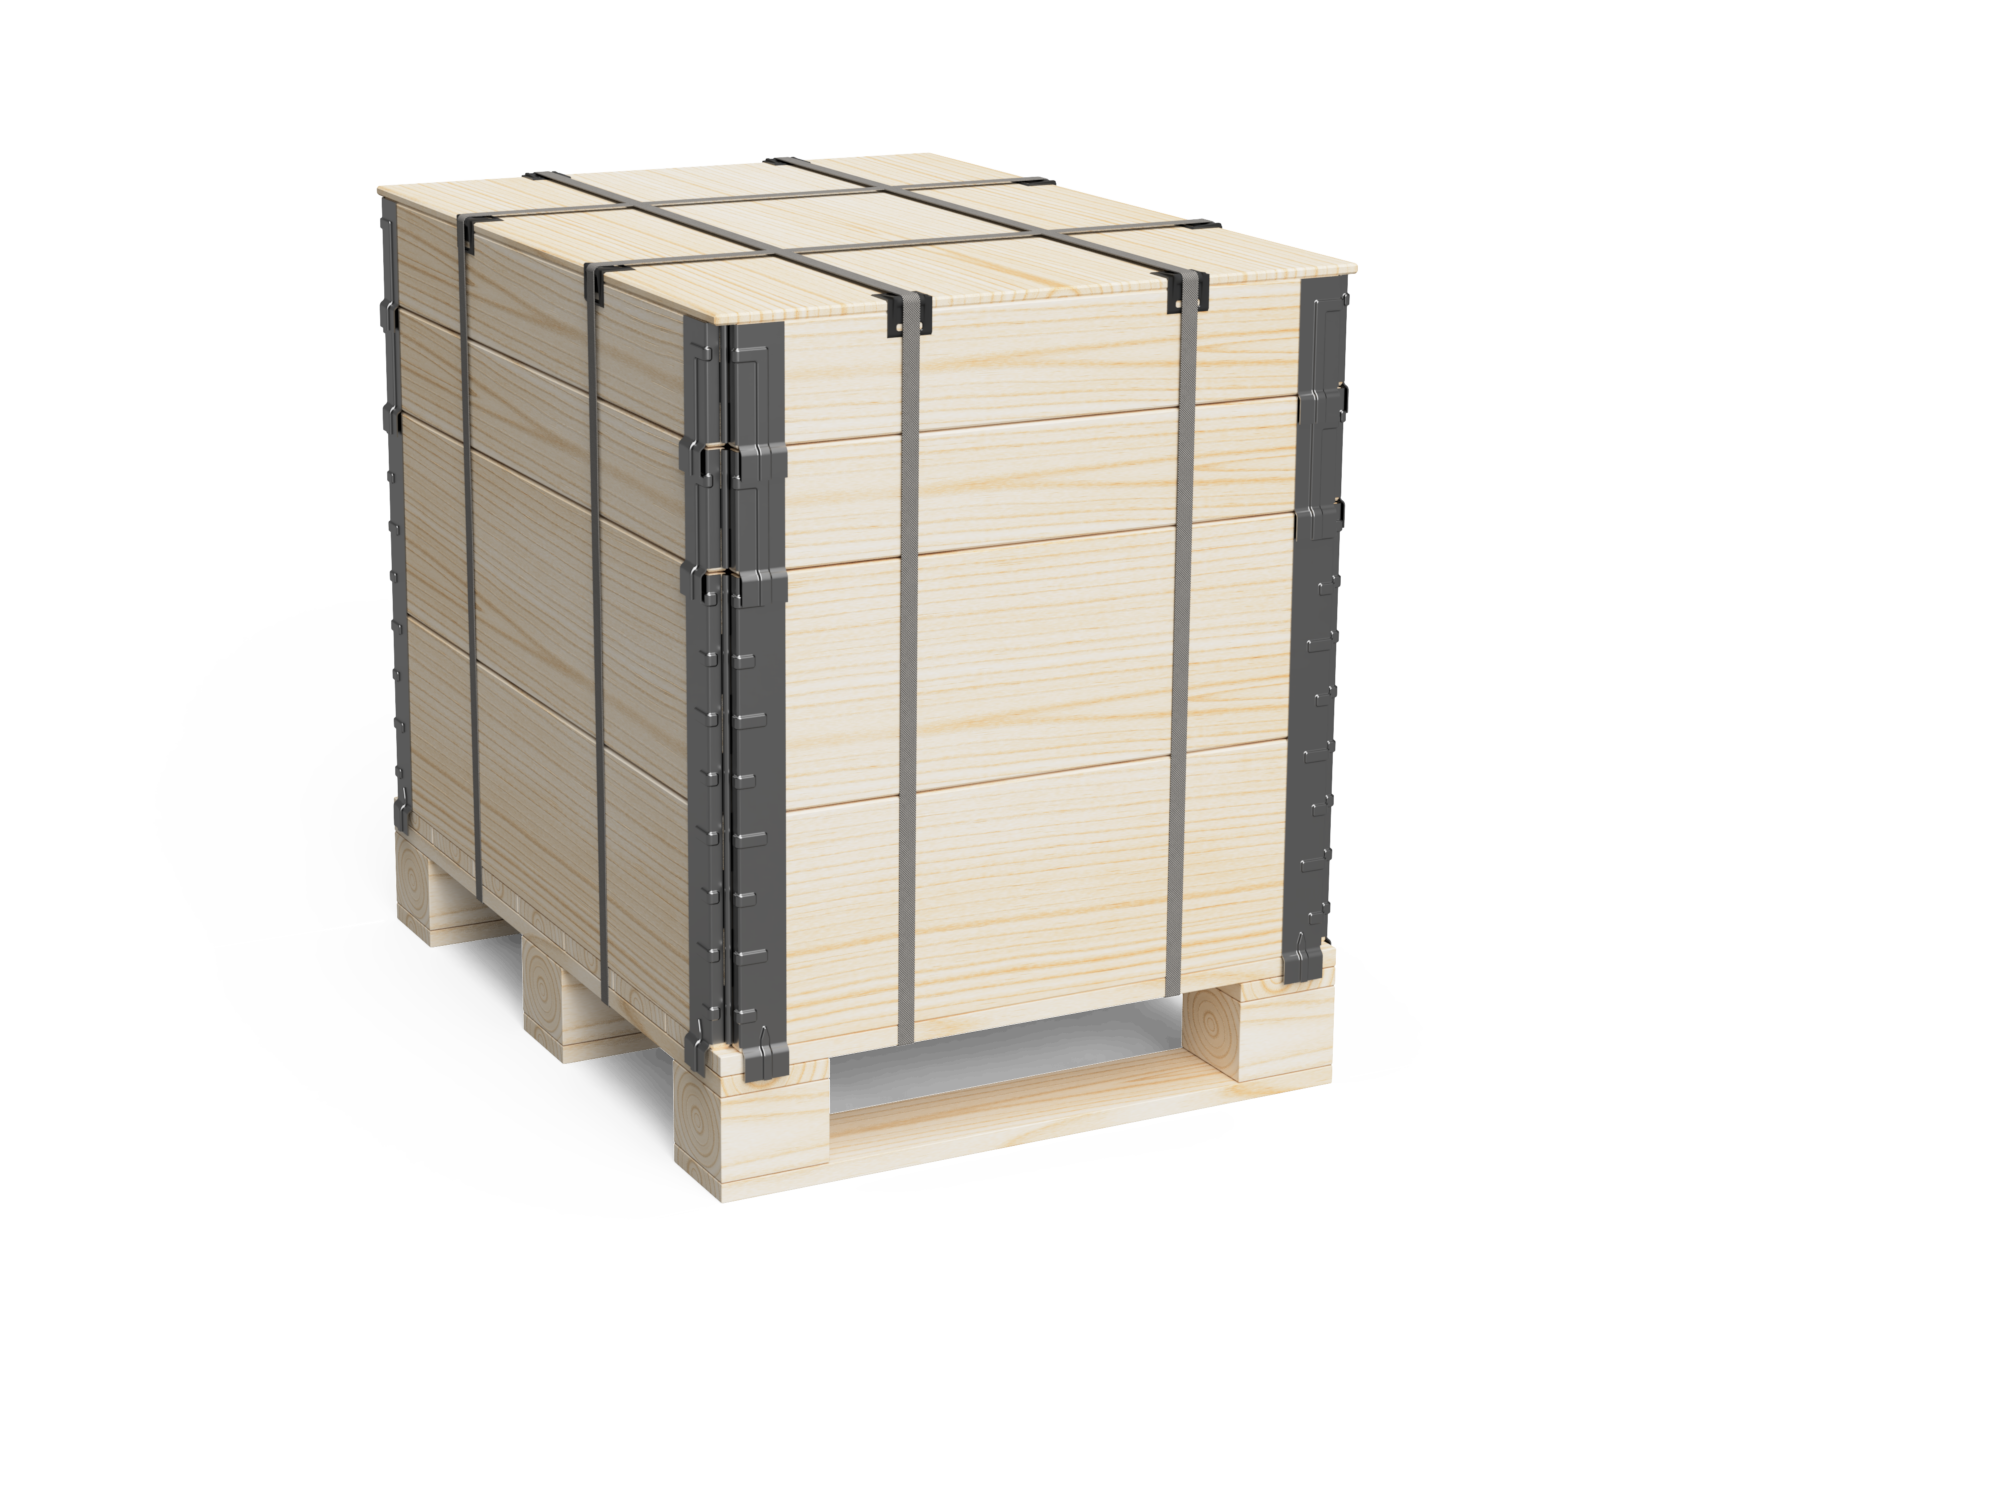
The Lynx robot is shipped in a wooden box, like the one shown below. Unboxing is quick and can be done in a few simple steps. Follow the instructions carefully when you receive your robot. For some destinations the wooden box can be bigger, the same as for Panther robot. In this case please follow also the Panther unboxing guide.
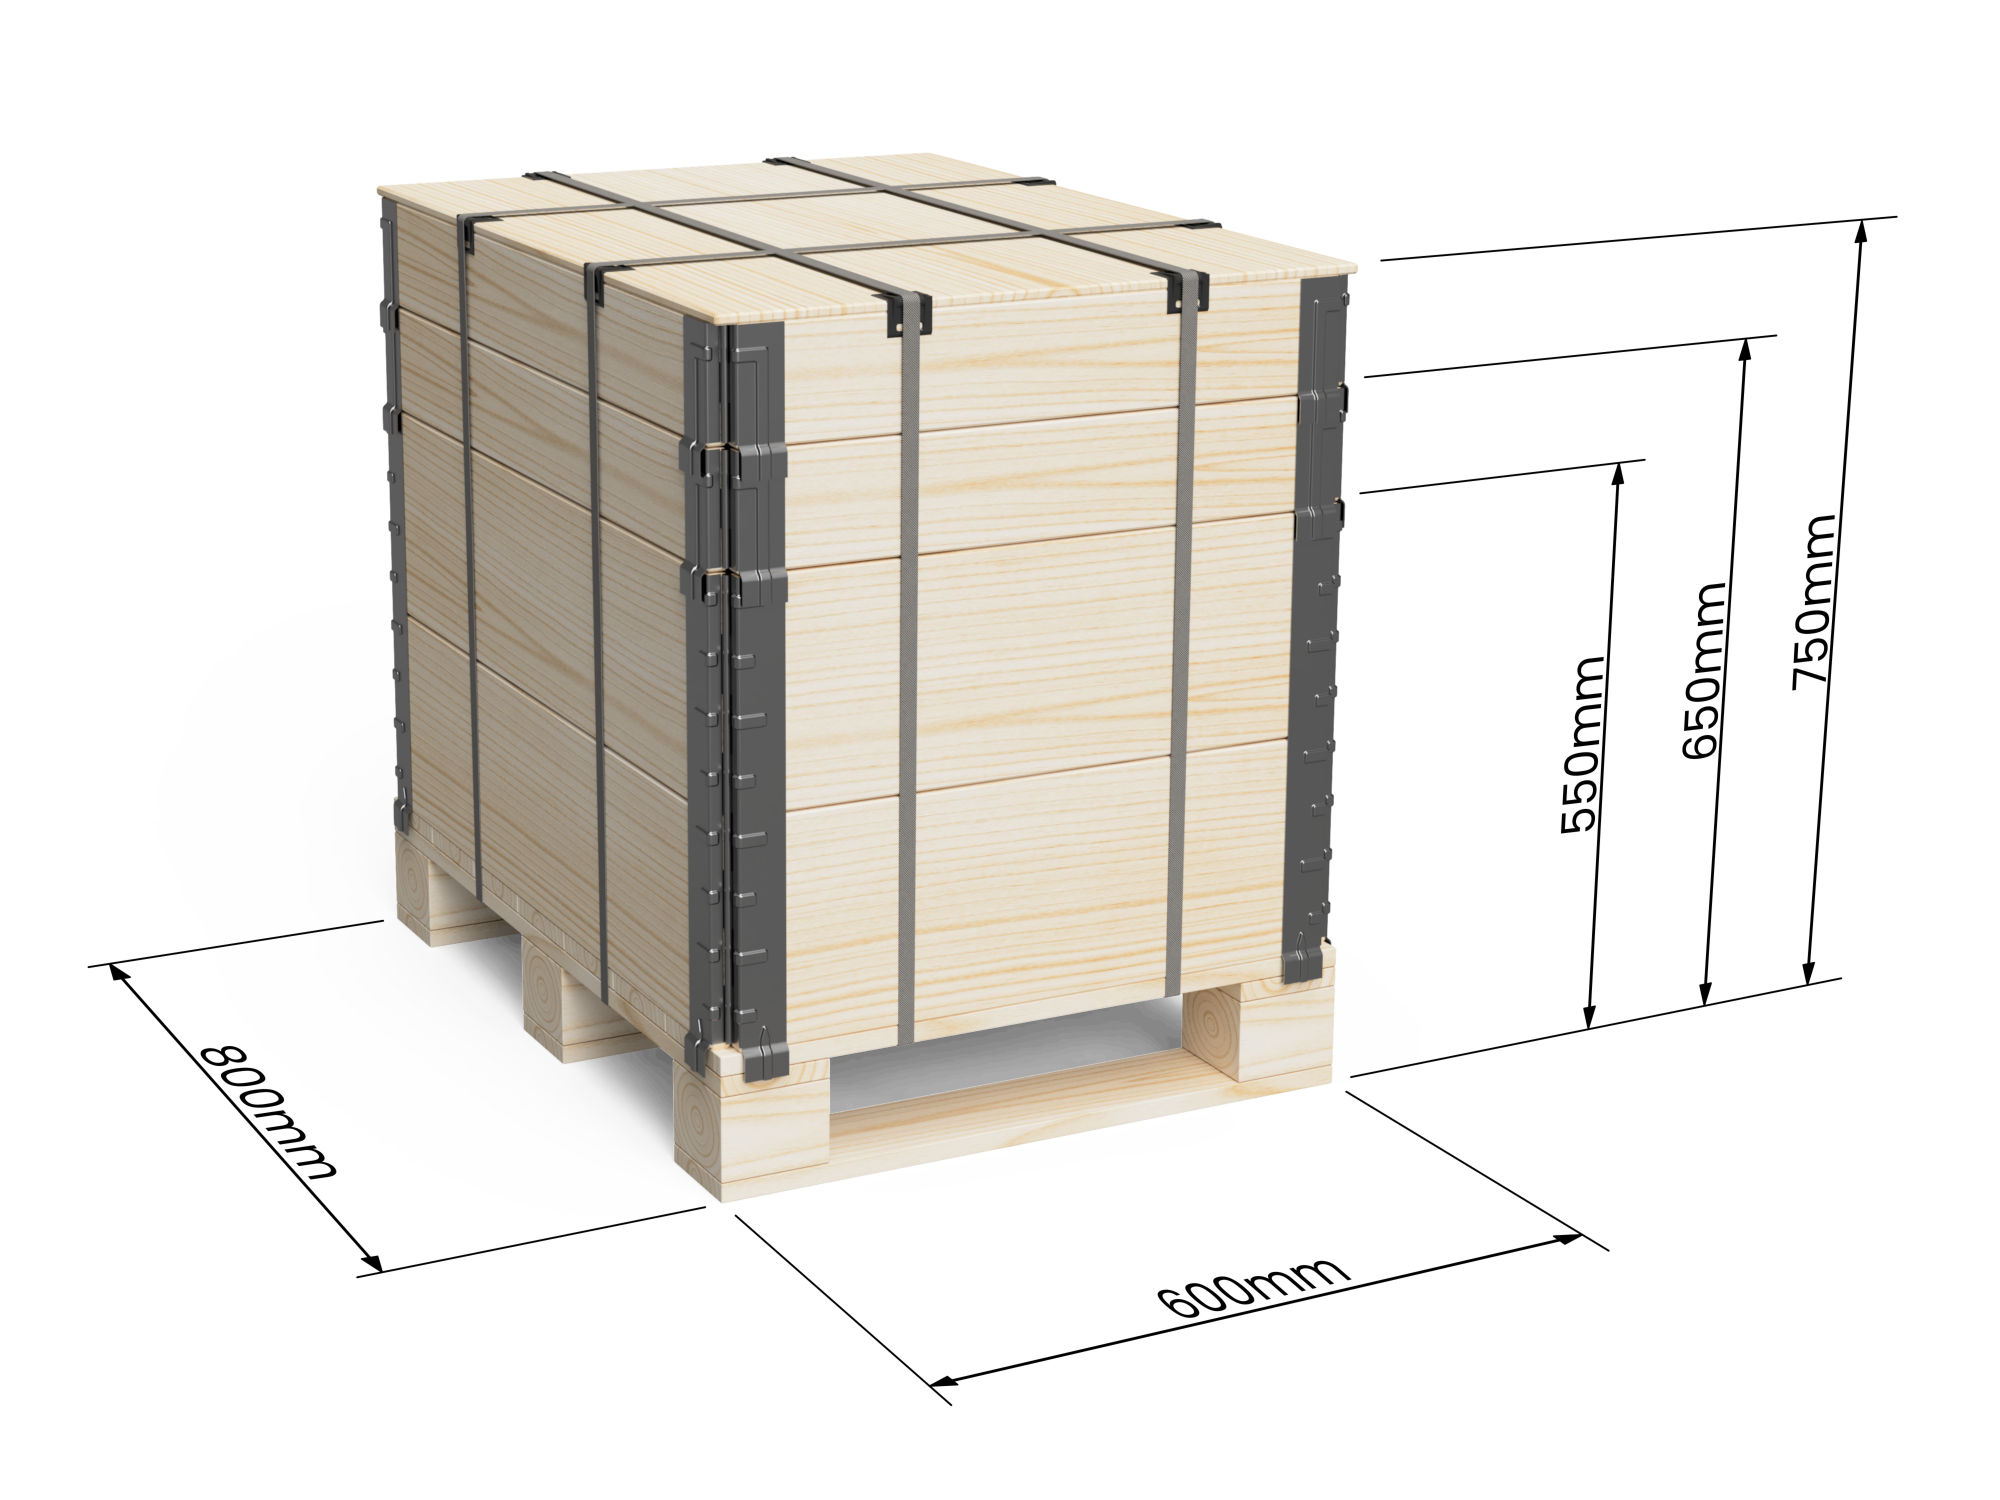
First, cut the plastic straps and open the top side (lid) of the box. Then you can remove the pallet extensions (walls).
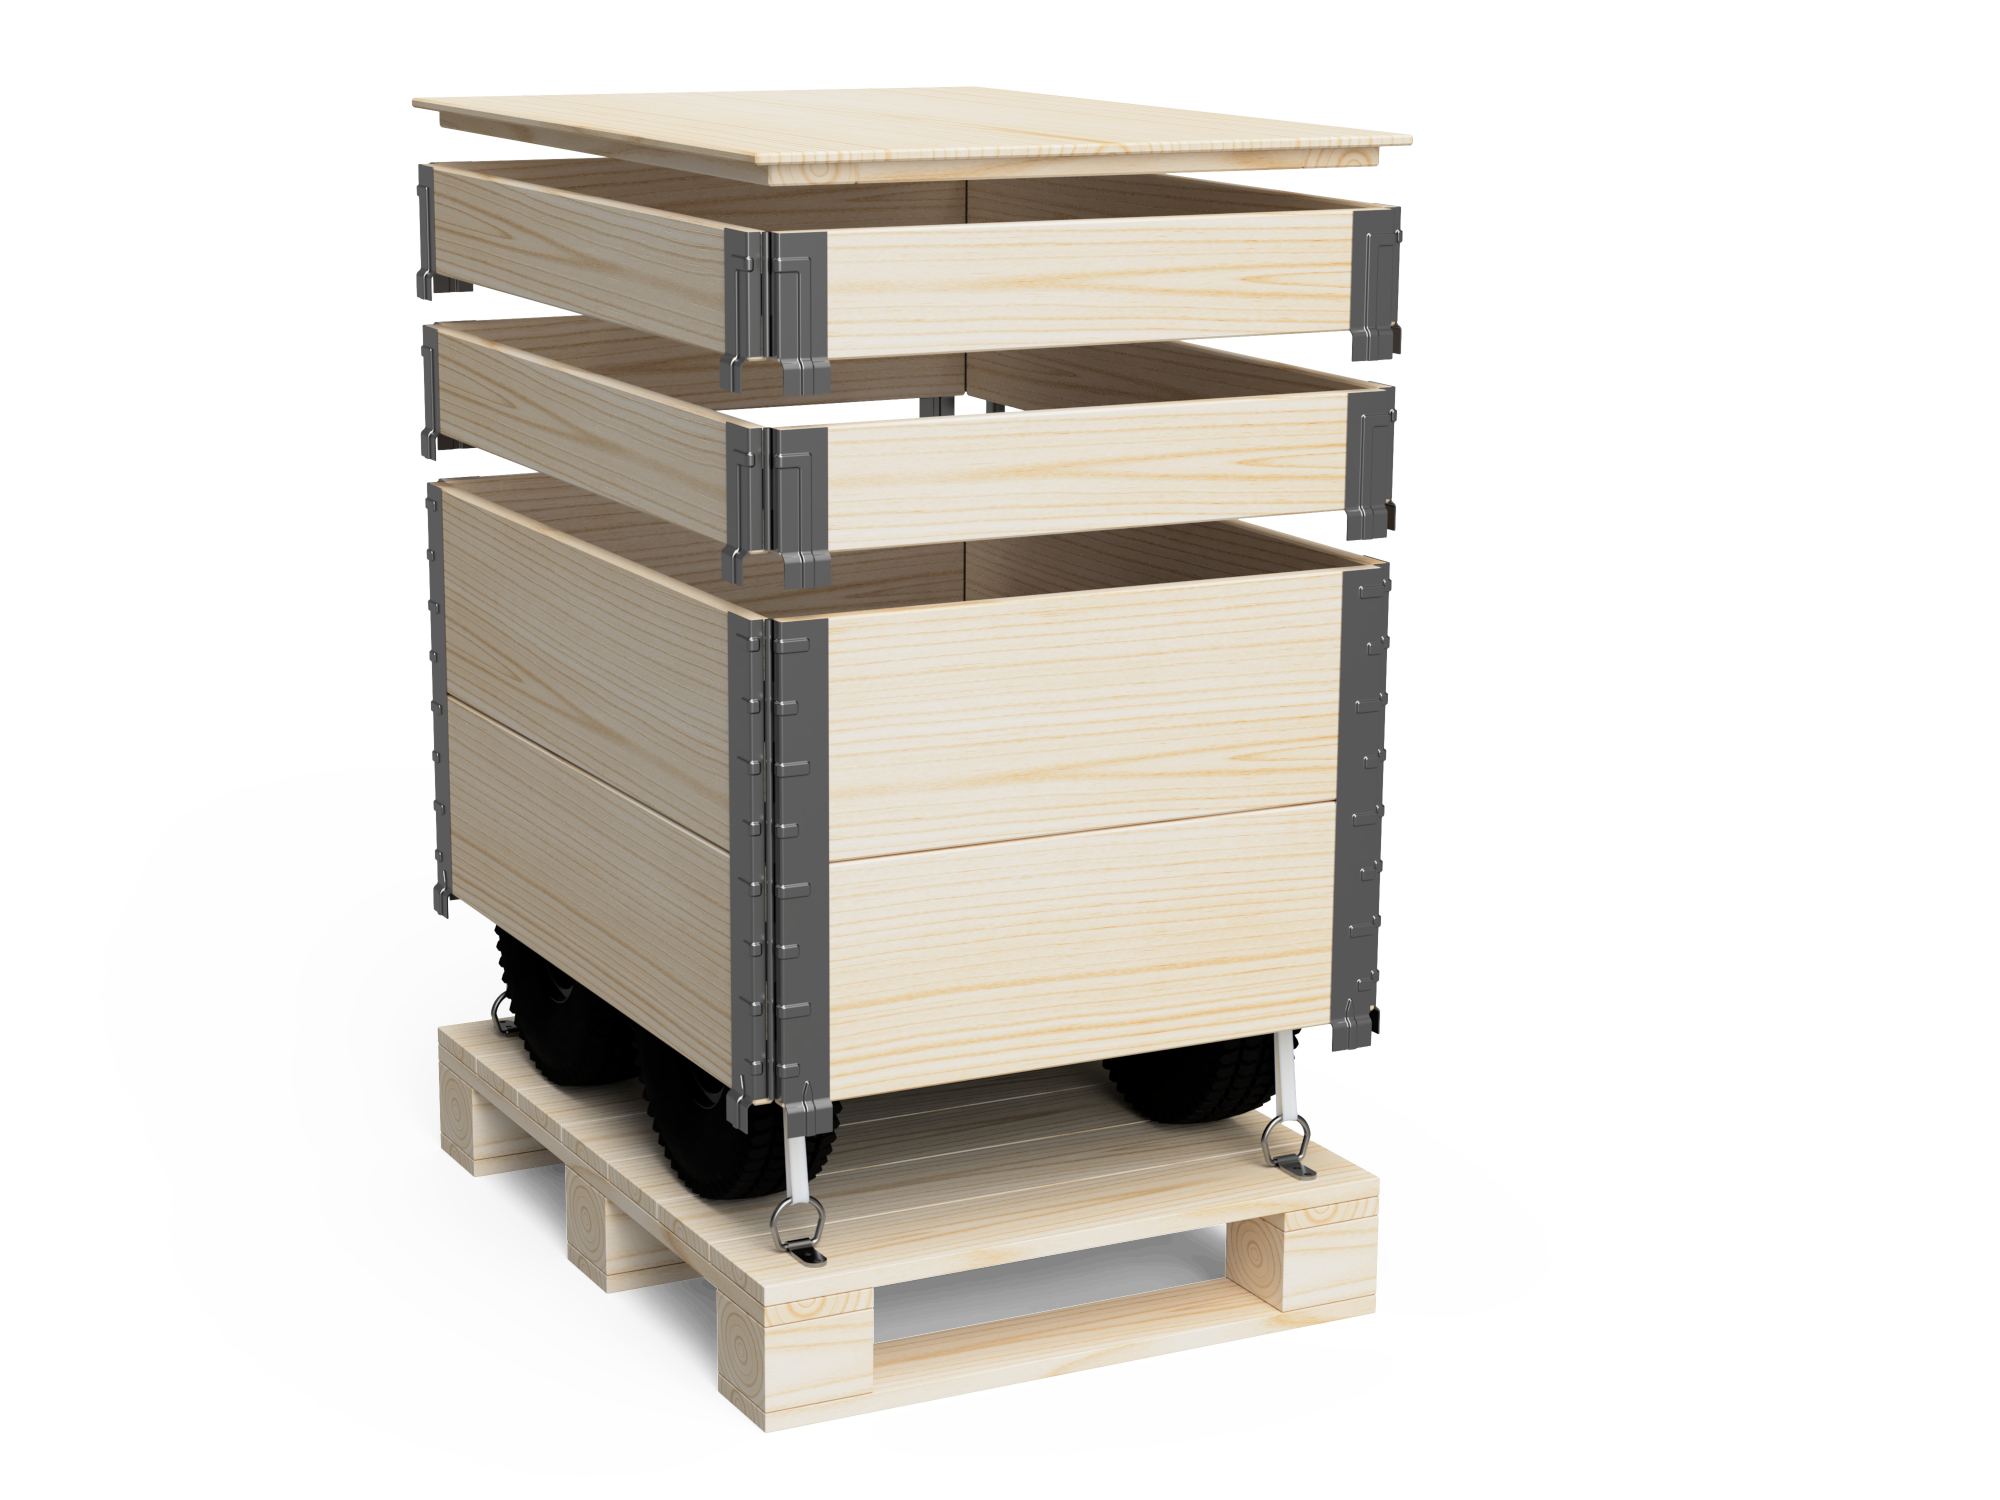
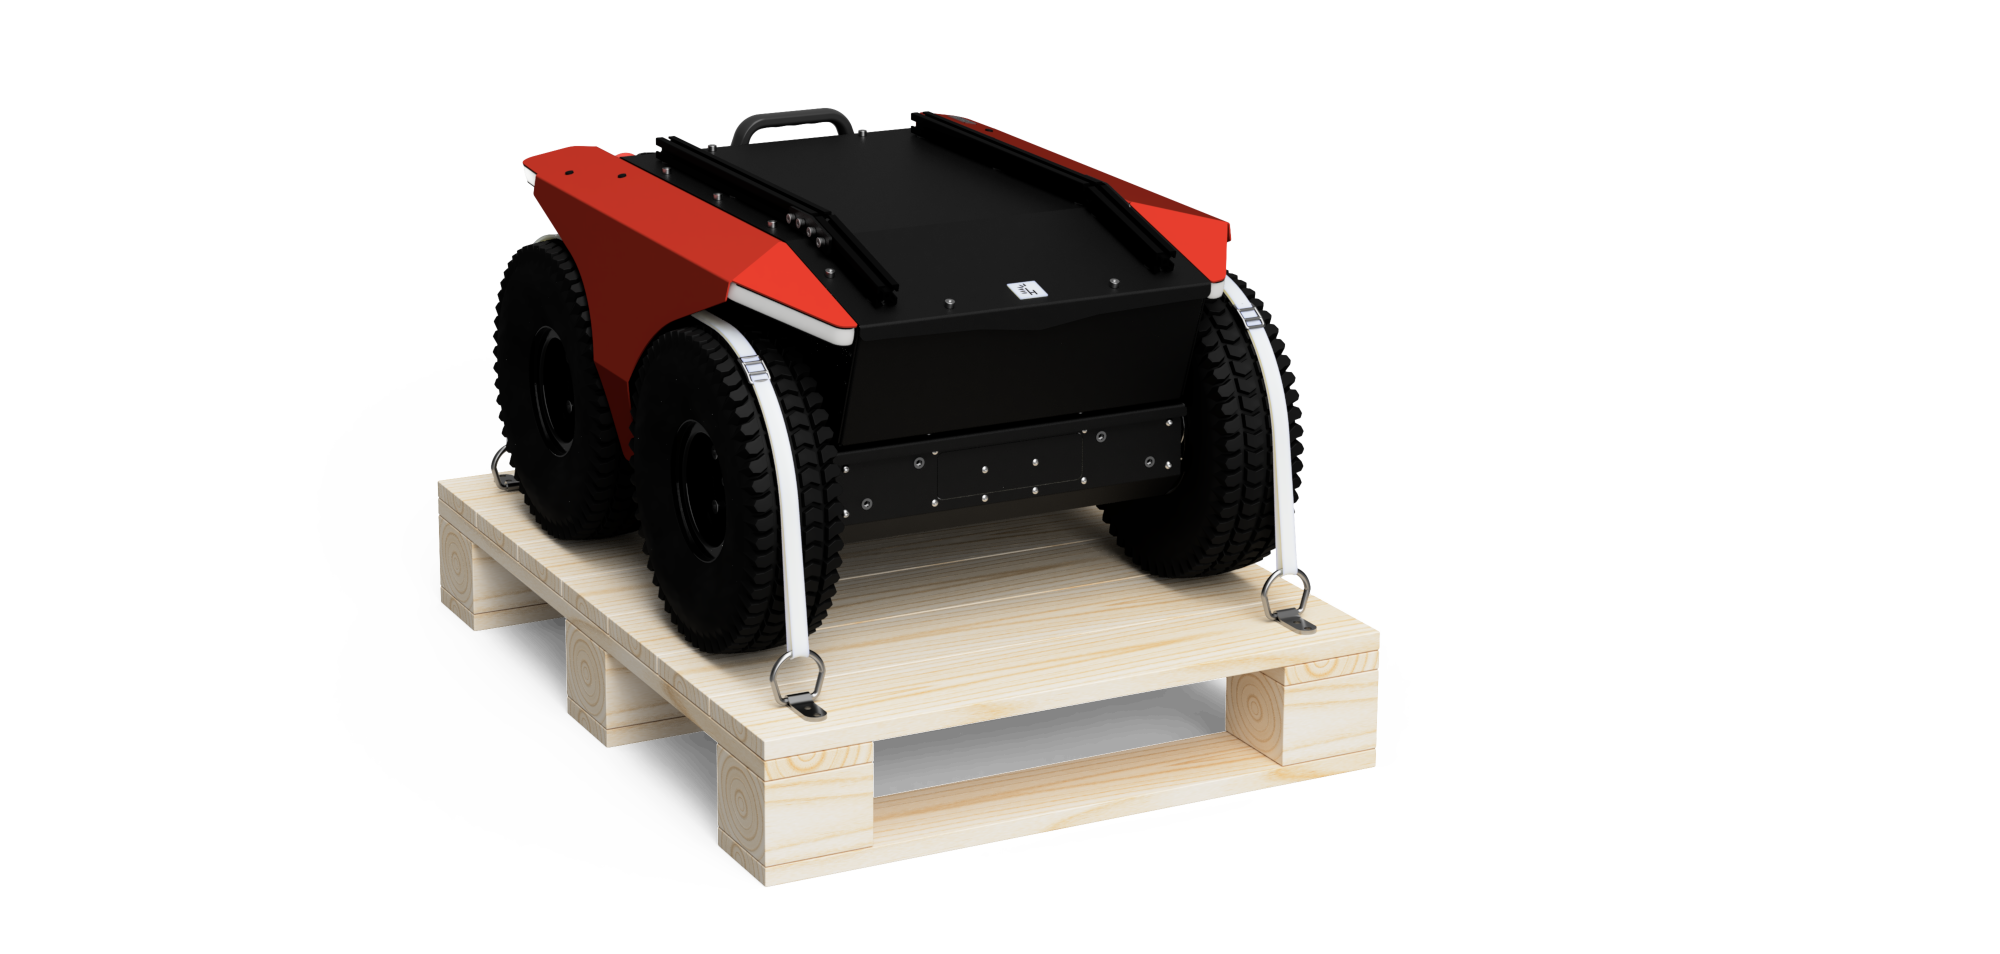
Before taking the robot out, remove any components blocking it, such as the accessories box, and cut the plastic straps that secure the robot. Then, gently push the robot off the pallet.
Quick Demo
We know that you would really like to read the Quick Demo section now, but your safety is the most important thing.
A brief safety information
- Please read the Safety Instructions first.
- If you are not sure how something works, please read the Lynx manual.
- Please remember that the mechanical Emergency Button is available on the robot as well as software one in the WebUI and the Gamepad, but in some cases, you may not be able to use them quickly enough to stop the robot before causing damage.
- A detailed description of the safety features is available in the Safety section.
Here is a very basic demo that allows you to use your Lynx for the first time without coding:
Rotate the two-position Main Switch to the ON position. Push the Power Button for 1 second, a red light on the Power Button, and the LED panels on the Bumpers (called Bumper Lights) will light up. Wait for Wi-Fi to come up:
SSID: Lynx_<serial_number> or Lynx_5G_<serial_number>
PASS: husarion
- Gamepad
- WebUI
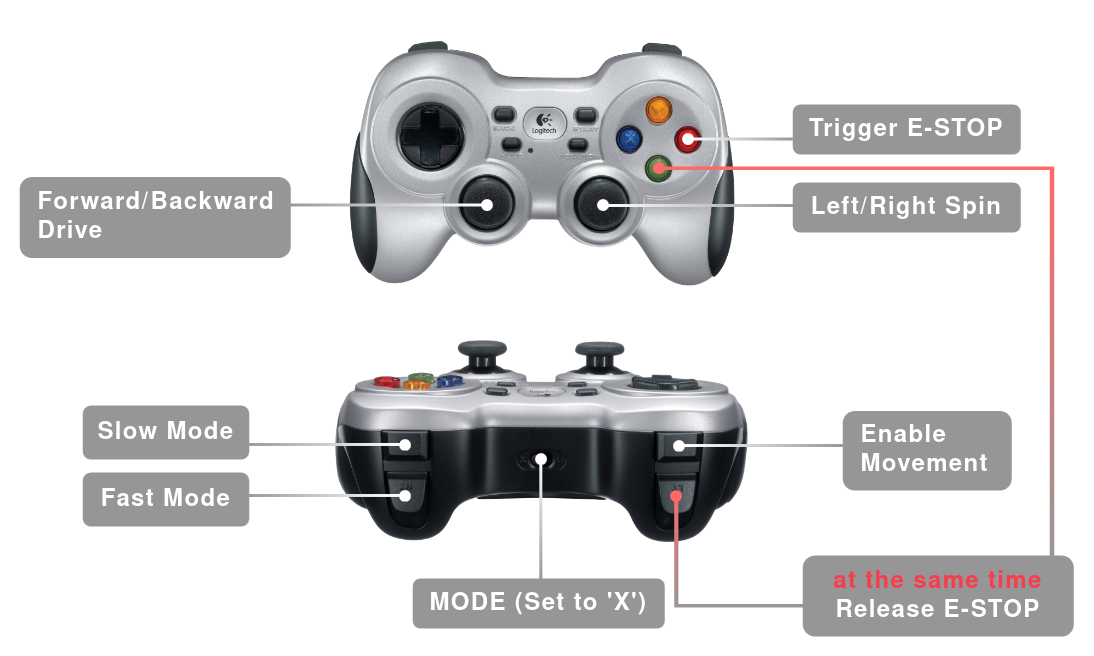
Joystick control is possible by connecting a dongle to the USB port on the rear panel of the robot. When the robot boots correctly (white light at the front and red lights at the rear), you can:
- Hold LT button and press A to release the E-stop.
- To control Panther hold the LB button and use the left stick to drive forward/backward (additionally left/right when using mecanum wheels) and the right stick to turn the robot.
- Press B to trigger E-stop on Panther.
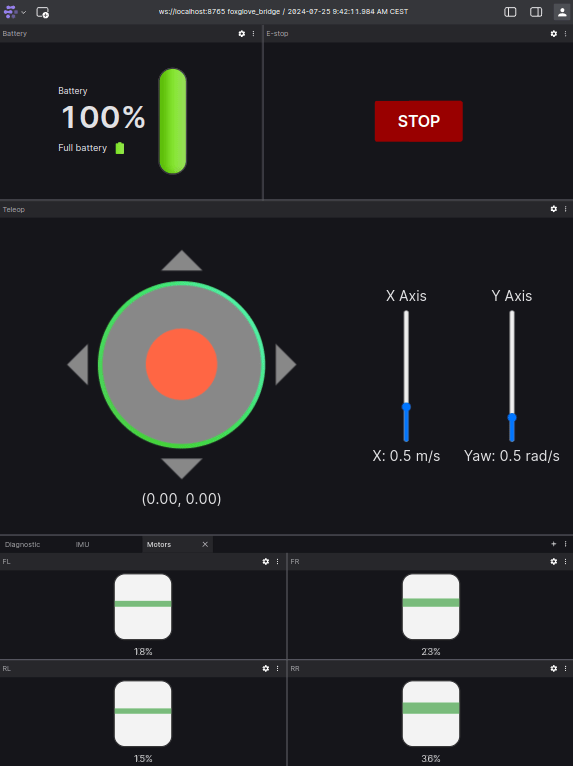
Connect to Wi-Fi and open the WebUI joystick in your browser at http://10.15.20.2:8080/ui. It allows you to monitor the robot’s status and execute commands such as activating or resetting the E-stop, as well as controlling the robot using a joystick.
When the robot boots correctly (white light at the front and red lights at the rear), you can unlock the Emergency Button and reset the E-stop using the WebUI. The bumper lights should start animating and moving to the sides.
Useful Resources
Below is a list of links to the most important and frequently used sections about the robot.
- Connecting a User Computer
One of the most important aspects of most projects is installing a User Computer, which is responsible for operating sensors and running user-defined functionalities. Read the detailed instructions on how to install and configure the User Computer. - Get Internet Access
To complete the User Computer setup, you need to provide Internet access to it. Follow the steps to connect your Lynx to a Wi-Fi network. - Husarion UGV Configurator
A TUI application that simplifies configuration changes, ROS driver version updates, and log retrieval. - Manual
The complete Lynx manual contains detailed information about the robot’s hardware and software. - ROS 2 API
A description of the software architecture design and shared ROS 2 API documentation, containing detailed information about all available ROS 2 nodes, topics, and services.
Reference Projects
Below youi can find some example projects and demos that you can use as a starting point for your own applications.
| link | description |
|---|---|
| husarion_ugv_autonomy_ros | Autonomous mapping & navigation demo for Panther. Using navigation2 and slam_toolbox |