ROS2 Demo for ROSbot 2.0 (using Docker)
Intro
The end result of this tutorial will be the same as in the previous one, but this time all ROS 2 nodes will run in Docker containers.
That means ROS 2 is not needed on the host system at all!
You should be able to run this project even by using a standard OS image provided by manufacturers of Upboard Single Board Computer powering ROSbot PRO (of course you need to install Docker and Docker compose at first).
The goal of this tutorial is to launch navigation2 demo, which will allow the robot to navigate autonomously and avoid obstacles. The ROSbot will be visualized and controlled through Rviz2.
Install ROS2 image on ROSbot
Get a system image
Working on your laptop, visit downloads, find Ubuntu 20.04 + ROS2 Foxy + Docker + Husarnet client and download:
- Tinker Board version for ROSbot 2.0
- UpBoard version for ROSbot 2.0 PRO
Instructions for system installation can be found here.
First ROSbot Configuration
Connecting to Wi-Fi
In the ROSbot 2.0 set there is one USB-Ethernet card.
-
Turn on the robot and wait until it boots.
-
Plug in Ethernet adapter (included in set) to USB port in the rear panel
-
Plug in one end of the Ethernet cable into your computer and other one to the adapter
-
To connect with ROSbot via ssh, type in terminal application on the computer:
ssh husarion@192.168.0.1a password is also
husarion -
To connect to a Wi-Fi network in the terminal type
nmcli d wifi connect <WiFi-SSID> password <WiFi-PASSWORD> -
Type
ip ato find your IP address -
Reconnect with ssh but this time connect with IP address assigned by WiFi network
Flashing STM32 firmware
If this is your first launch of ROS2 Foxy on ROSbot make sure to upgrade STM32 firmware to one used by docker (pay attention because firmware version for each ROS distribution is different).
STM32 firmware upgrade can be done purely using Docker. Just execute the following line in the Linux terminal of ROSbot:
docker run --privileged --rm husarion/rosbot:latest ./flash_firmware_diff.sh
Setting up your ROSbot
Create folder rosbot-nav2-demo and create file compose.rosbot.yaml in it.
mkdir rosbot-nav2-demo
cd rosbot-nav2-demo
touch compose.rosbot.yaml
Open this file in your favorite text editor and paste :
# Quick Start (at fist stop ROS Master if working on host)
# $ docker compose -f compose.rosbot.yaml up

version: "2.3"

services:

  # ROS Galactic
  nav2:
    image: husarion/nav2:galactic-latest
    restart: unless-stopped
    network_mode: host
    ipc: host
    environment:
      - ROS_DOMAIN_ID=228
    command: ros2 launch husarion_nav2 bringup_both.launch.py

  # ROS Noetic + ROS 2 Galactic
  bridge:
    image: ros:galactic-ros1-bridge
    restart: unless-stopped
    network_mode: host
    ipc: host
    environment:
      - ROS_IP=127.0.0.1
      - ROS_MASTER_URI=http://127.0.0.1:11311
      - ROS_DOMAIN_ID=228
    command: ros2 run ros1_bridge dynamic_bridge

  # ROS Master (using custom port in case Master is already running on host OS)
  ros-master:
    image: ros:melodic-ros-core
    restart: unless-stopped
    network_mode: host
    ipc: host
    environment:
      - ROS_IP=127.0.0.1
    command: stdbuf -o L roscore

  # ROS Melodic rosbot hardware layer
  rosbot:
    image: husarion/rosbot
    restart: unless-stopped
    network_mode: host
    ipc: host
    devices:
      - /dev/ttyS4   # must match environment SERIAL_PORT
    environment:
      - ROS_IP=127.0.0.1
      - ROS_MASTER_URI=http://127.0.0.1:11311
      - SERIAL_PORT=/dev/ttyS4 # default: ttyS1 - rosbot2.0; ttyS4 - rosbot2.0 `pro
    command: roslaunch --wait rosbot_description rosbot_docker.launch

  # ROS Melodic Rplidar
  rplidar:
    image: husarion/rplidar:latest
    restart: unless-stopped
    network_mode: host
    ipc: host
    devices:
      - /dev/ttyUSB0
    environment:
      - ROS_IP=127.0.0.1
      - ROS_MASTER_URI=http://127.0.0.1:11311
    command: roslaunch --wait rplidar_ros rplidar_a3.launch # For Rosbot 2.0 PRO use roslaunch rplidar_ros rplidar_a3.launch
Save the file and execute in the ROSbot's terminal:
docker compose -f compose.rosbot.yaml pull
To download Docker images specified in compose.rosbot.yaml from Docker Hub.
Setting up your PC
While your ROSbot is preparing move to your PC. Make sure you have docker and docker compose installed:
$ docker --version
Docker version 20.10.10, build b485636

$ docker compose version
Docker Compose version v2.2.3
If you don't have installed docker follow official installation guide. Do the same in case of lacking docker compose v2. There are also additional steps if you want to skip typing sudo before each docker command available here.
After making sure you have docker installed just like before create folder with compose.pc.yaml file and edit it with a text editor.
mkdir rosbot-nav2-demo
cd rosbot-nav2-demo
touch compose.pc.yaml
- CPU only
- GPU acceleration
# Quick Start
# $ xhost local:root
# $ docker compose -f compose.pc.yaml up

version: "2.3"

services:

  # ROS Galactic
  rviz:
    image: husarion/rviz2
    restart: unless-stopped
    network_mode: host
    ipc: host
    volumes:
      - /tmp/.X11-unix:/tmp/.X11-unix:rw
      - ./rosbot_pro.rviz:/root/.rviz2/default.rviz
    environment:
      - ROS_DOMAIN_ID=228
      - DISPLAY
# Quick Start
# $ xhost local:root
# $ docker compose -f compose.pc-gpu.yaml up

version: "2.3"

services:

  # ROS Galactic
  rviz:
    image: husarion/rviz2
    restart: unless-stopped
    network_mode: host
    ipc: host
    runtime: nvidia
    volumes:
      - /tmp/.X11-unix:/tmp/.X11-unix:rw
      - ./rosbot_pro.rviz:/root/.rviz2/default.rviz
    environment:
      - ROS_DOMAIN_ID=228
      - DISPLAY
      - NVIDIA_VISIBLE_DEVICES=all
      - NVIDIA_DRIVER_CAPABILITIES=all
After that download all Docker Images specified in the compose.pc.yaml file by using the command:
docker compose -f compose.pc.yaml pull
Launching a demo project
In order to start the demo on your ROSbot make sure you are in the same directory as you were in previous step and start the demo.
docker compose -f compose.rosbot.yaml up
On your PC also make sure to navigate to that directory and start the demo with:
xhost local:root
docker compose -f compose.pc.yaml up
remember about executing:
$ xhost local:root
Using a demo
Once ROSbot launched lidar should begin to rotate and logs starts to pop out on terminal.
In Rviz2 add displays you want but for navigation add at least map and select global frame to map.

To add destination use green "2D Goal Pose" arrow in the top bar.
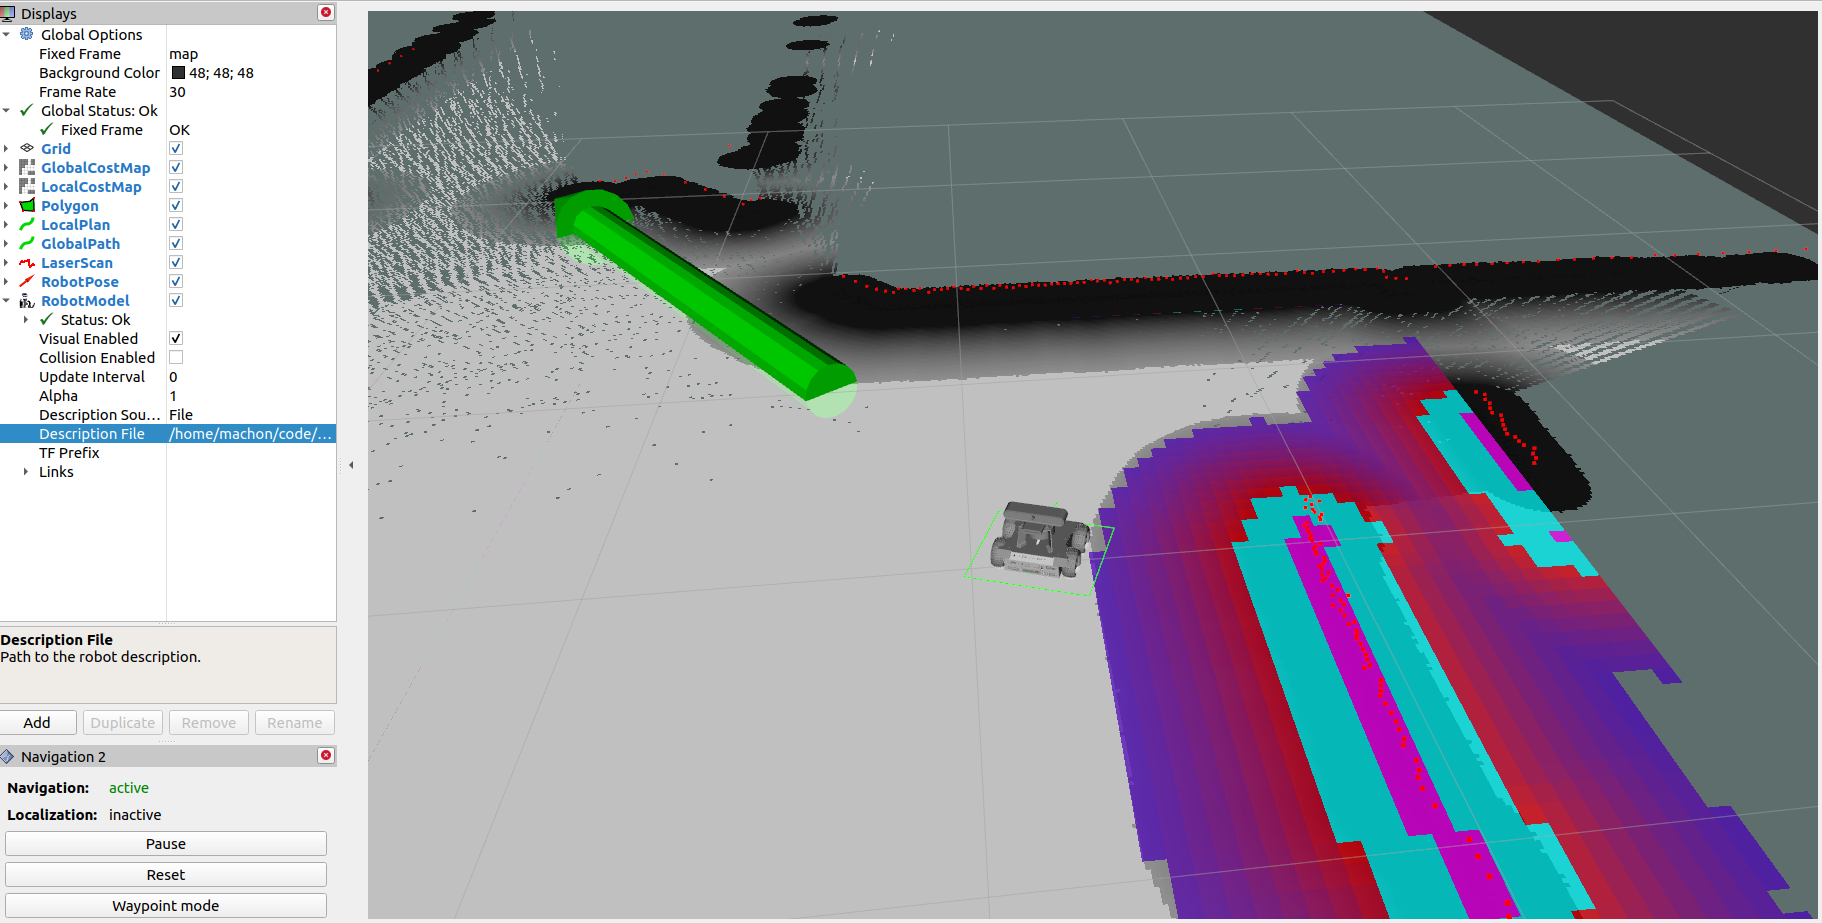
If you want to see rosbot model displayed in rviz2 you will have to select the rosbot_description/urdf/rosbot.urdf file in RobotModel section.
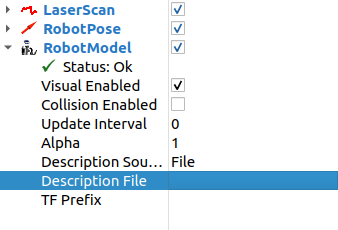
NOTE Currently dds implementations are heavy on resources so please limit shown displays.
Using many ROS2 devices it the same network (Optional)
ROS2 (DDS) provide a concept of multi cast for machines discovery. As a result every machine running ROS2 can see every nodes/topics on all running machines in the same network.
If you want to limit this behavior change ROS_DOMAIN_ID in both docker-compose.yaml files this might be number 0-255 (default is 0).
Connecting ROSbot and a laptop over the Internet
You can run the system not only in LAN, but also over the Internet, by adding additional lines to docker-compose.yml files (both in ROSbot and laptop):
    husarnet:
        image: husarnet/husarnet
        restart: unless-stopped
        volumes:
            - /var/lib/husarnet  # This will persist your Husarnet Client keys, thus IP of the container will be stable/the same between (re)boots
        sysctls:
            - net.ipv6.conf.all.disable_ipv6=0  # Husarnet is using IPv6 for the internal connections
        cap_add:
            - NET_ADMIN
        devices:
            - /dev/net/tun
        env_file:
            - ./.env  # create .env file in the same folder as Dockerfile and specify HOSTNAME and JOINCODE there
Additionally add network_mode: service:husarnet in the definitions of other services listed in docker-compose.yml.
It will start an low-latency, P2P VPN network between containers defined in docker-compose.yml without exposing that network to your host system.
To learn more how to do it, read Connecting Remote Robots Using ROS2, Docker & VPN article from Husarnet's blog.
by Krzysztof Wojciechowski, Adam Krawczyk and Kamil Machoń, Husarion
Need help with this article or experiencing issues with software or hardware? 🤔
- Feel free to share your thoughts and questions on our Community Forum. 💬
- To contact service support, please use our dedicated Issue Form. 📝
- Alternatively, you can also contact our support team directly at: support@husarion.com. 📧