ROSbot 2 - quick start
ROSbot 2 has reached end-of-life status as of August 31, 2023. From this date, there will be no further feature development or ongoing support for ROSbot 2. For those looking for ongoing support and access to advanced capabilities, we recommend considering upgrading to ROSbot 2R or ROSbot 2 PRO.
ROSbot 2 is an autonomous, open source robot platform for research and quick prototyping use cases. It can be used as a learning platform for Robot Operating System (ROS) as well as a base for a variety of robotic applications like inspection robots, custom service robots etc.
Unboxing
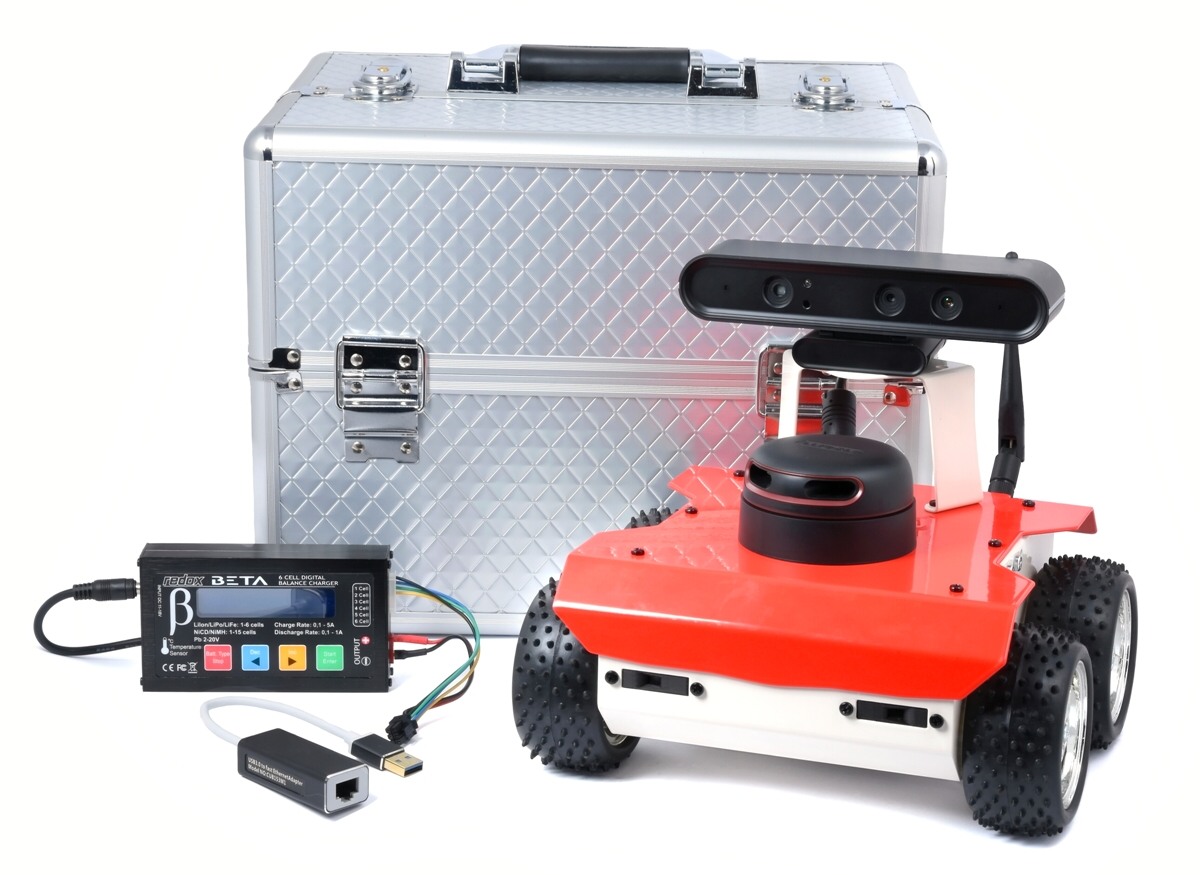
What's in the box:
- carrying case
- ROSbot 2 (with optional 3D camera and LiDAR already assembled)
- Wi-Fi 2.4GHz antenna
- 3x 18650 Li-Ion rechargeable batteries
- universal charger with power adapter
- charging cable
- microSD card with the software for ROSbot
- USB to Ethernet adapter
Inserting Li-ION batteries and mounting Wi-Fi antenna
Your ROSbot is assembled, but to get it ready to work, you need to provide a power supply and attach the antenna.
To mount batteries:
- turn ROSbot upside down
- unscrew battery cover mounted with two screws
- remove the battery cover
- place batteries accordingly to the symbols, keeping the black strip under the batteries
- place battery cover and mount it with screws
To charge the batteries, follow this guide.
To attach the antenna, screw it to the SMA antenna connector on the ROSbot rear panel.
Installing ROSbot's system image
ROSbot 2 is shipped with pre-installed ROS Melodic OS image. If you have just received your brand new ROSbot and you need ROS Melodic you can go to the next step.
In some cases you will need to restore ROSbot system to its default settings:
- in case of accidental damage of the system,
- to update the OS to the newest version with the supported documentation,
- to clear all user changes and restore factory settings.
Please find the OS reinstalation guide here.
Connecting ROSbot to your Wi-Fi network
At first ROSbot need to be connected to your Wi-Fi network.
Option 1: Using display, mouse and keyboard
ROSbot is basically a computer running Ubuntu, so let's open it like a standard PC.
- Plug in a display with HDMI, mouse and keyboard into USB port in the rear panel of ROSbot.
- Turn on the robot and wait until it boots.
- Connect to a Wi-Fi network using Ubuntu GUI.
- Open Linux terminal and type
ifconfigto find your IP address. Save it for later.
Option 2: Using Ethernet adapter
In the ROSbot 2 set, there is one USB-Ethernet card.
- Turn on the robot and wait until it boots.
- Plug in Ethernet adapter (included in set) to USB port in the rear panel.
- Plug in one end of the Ethernet cable into your computer and another one to the adapter.
- To connect with ROSbot via ssh, type in your terminal application:
ssh husarion@192.168.0.1and passwordhusarion. - Connect to a Wi-Fi network.
- In the terminal, type
nmtuiand press Enter. You should see:
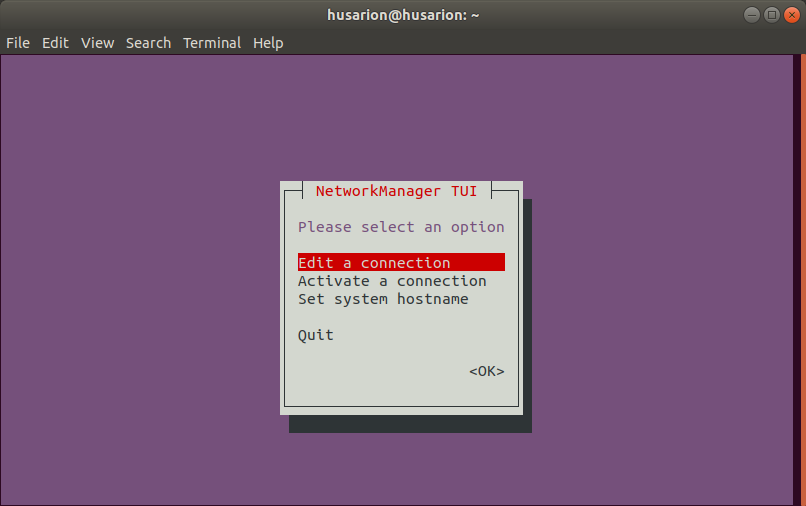
- Go to
Active a connectionand tapEnter
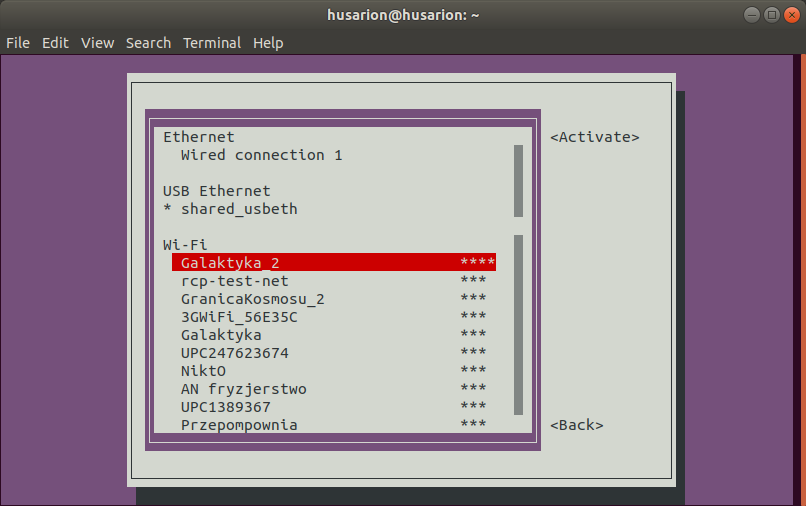
- Chose your Wi-Fi network and tap
Enterone more time. Enter your password, confirm it and tapEscto get back to main menu.
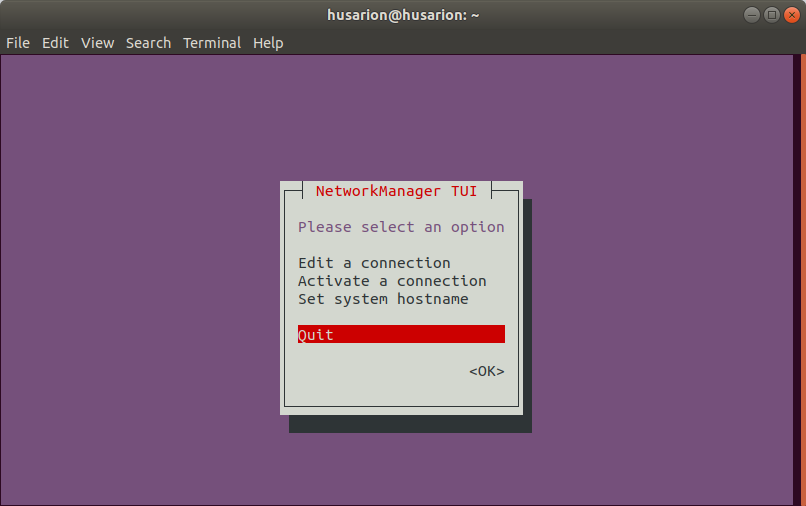
- Use
Quitto closenmtui.
- Type
ifconfigto find your IP address. Save it for later.
Remote access in LAN
While ROSbot is connected to Wi-Fi network, you can access it by using it's IPv4 address by:
SSH
It's the simplest way to access ROSbot if you don't need to use graphic tools. You just have to type:
ssh husarion@<ROSBOT_IP>
Virtual Desktop (VNC)
1. Enable VNC server on the robot
ssh husarion@<ROSBOT_IP>
vncserver -localhost no -geometry 1280x720
you should see a similar output:
New 'ubuntu:1 (husarion)' desktop at :1 on machine ubuntu

Starting applications specified in /home/husarion/.vnc/xstartup
Log file is /home/husarion/.vnc/ubuntu:1.log

Use xtigervncviewer -SecurityTypes VncAuth,TLSVnc -passwd /home/husarion/.vnc/passwd ubuntu:1 to connect to the VNC server.
Note that, the desktop number is :1, we will use it in the following step
2. Install VNC client on your laptop to access the remote desktop of the robot:
sudo apt-get install tigervnc-viewer
xtigervncviewer <ROSBOT_IP>:1
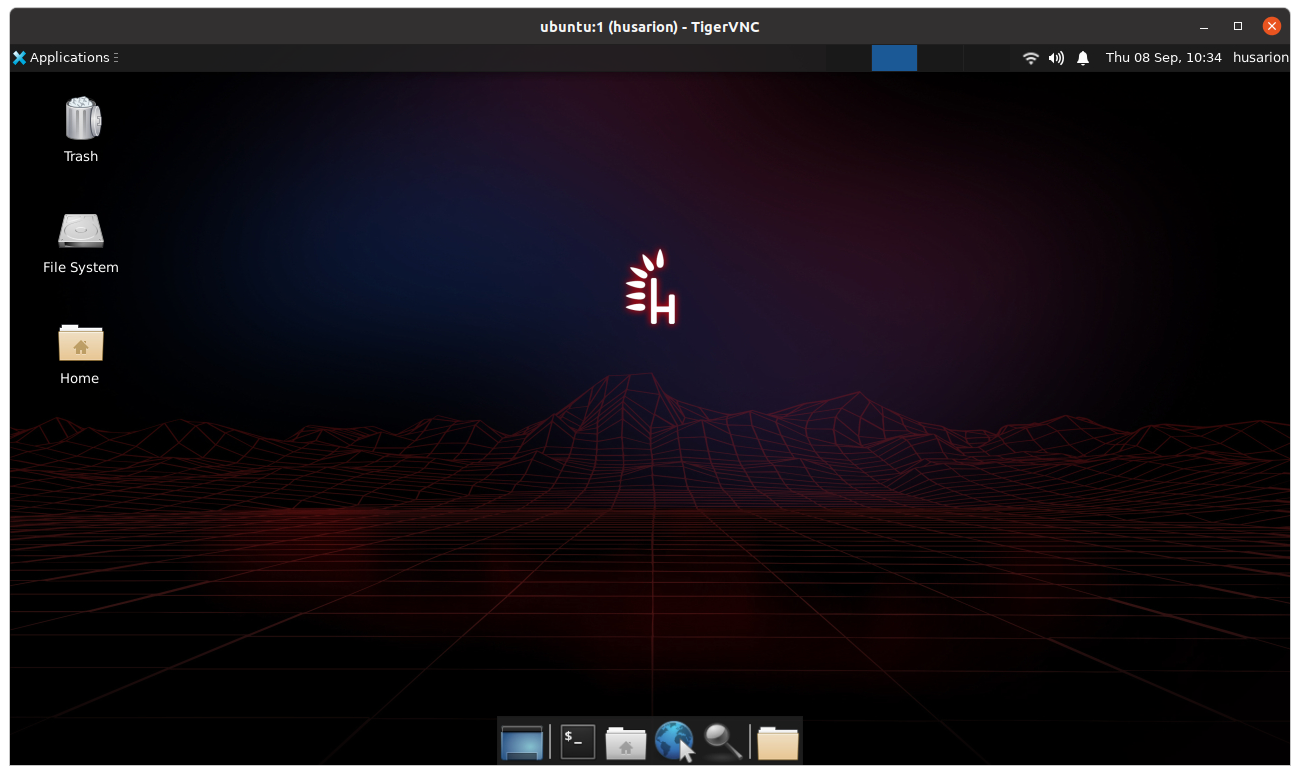
after you type the password (the default one is husarion) you should see the desktop of your ROSbot:
Remote access over the Internet (VPN)
Instead of using a local IPv4 address, you can access the robot by using its hostname - both in LAN and over the Internet. You just need to set up a VPN connection (Husarnet VPN client is pre-installed)
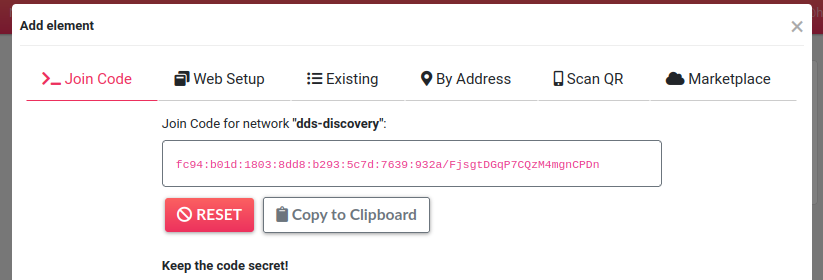
Find the Join Code
To connect your devices to the same Husarnet VPN network, you need to use the Join Code associated with that network.
You will find your Join Code in your account at https://app.husarnet.com
-> Click on the desired network
-> Add element button
-> Join Code tab
Connecting your ROSbot
sudo systemctl enable husarnet
sudo systemctl start husarnet
sudo husarnet join PASTE_YOUR_JOIN_CODE_HERE rosbot
Connecting your laptop
Install Husarnet VPN client on your laptop:
curl https://install.husarnet.com/install.sh | sudo bash
sudo systemctl restart husarnet
sudo husarnet join PASTE_YOUR_JOIN_CODE_HERE mylaptop
Testing the connection
That's all - now you can use your device hostname instead of IPv4 addr, e.g.:
ssh husarion@myrosbot
to access the robot over SSH, or
xtigervncviewer myrosbot:1
For a virtual desktop.
ROSbot ROS packages
At this stage you should have your ROSbot up and running, with remote (LAN or VPN) connection from your laptop.
You can run ROSbot's ROS packages natively on your ROSbot's host OS, by just cloning and building rosbot_ros repo, however the more convenient way is using Docker images for that.
Pulling basic docker images for ROSbot:
Create a new file /home/husarion/compose.minimal.ros.yaml
nano /home/husarion/compose.minimal.ros.yaml
and paste the following content inside (the source code is also here):
# Quick Start
# $ docker compose -f compose.minimal.ros.yaml up

services:

  ros-master:
    image: ros:melodic-ros-core
    restart: unless-stopped
    network_mode: host
    tty: true
    environment:
      - ROS_IP
    command: roscore

  rosbot:
    image: husarion/rosbot:melodic
    container_name: rosbot
    restart: unless-stopped
    network_mode: host
    tty: true
    devices:
      - ${SERIAL_PORT}
    environment:
      - SERIAL_PORT
      - ROS_MASTER_URI
      - ROS_IP
    command: >
      roslaunch --wait rosbot_bringup rosbot_docker.launch
Press ctrl + o and then ctrl + x to save and quit.
Create also the /home/husarion/.env file
nano /home/husarion/.env
with the following content:
SERIAL_PORT=/dev/ttyS1
ROS_IP=127.0.0.1
ROS_MASTER_URI=http://127.0.0.1:11311
(save it).
Pull docker images with:
docker compose -f /home/husarion/compose.minimal.ros.yaml pull
Flashing the firmware
Both husarion/rosbot:noetic and husarion/rosbot:melodic docker images include corresponding firmware for STM32F4 (a low level microcontroller that controls motors, GPIO ports and TOF distance sensors).
To flash the right firmware, open ROSbot's terminal and execute one of the following command (if you use ROS noetic tag):
-
for differential drive (regular wheels):
husarion@rosbot:/home/husarion/$docker run --rm -it --privileged \husarion/rosbot:melodic \/flash-firmware.py /root/firmware_diff.bin -
for omnidirectional wheeled ROSbot (mecanum wheels):
husarion@rosbot:/home/husarion/$docker run --rm -it --privileged \husarion/rosbot:melodic \/flash-firmware.py /root/firmware_mecanum.bin
Running the ROSbot Docker image (host mode)
![]()
![]()
To launch ROSbot nodes, paste the following command in the ROSbot's terminal (depending on the OS images you use):
docker compose -f /home/husarion/compose.minimal.ros.yaml up -d
At this point, ROS nodes from the containers are available on the level of the host operating system.
Open a new terminal and check available ROS topics:
rostopic list

Manual ROSbot driving with teleop_twist_keyboard
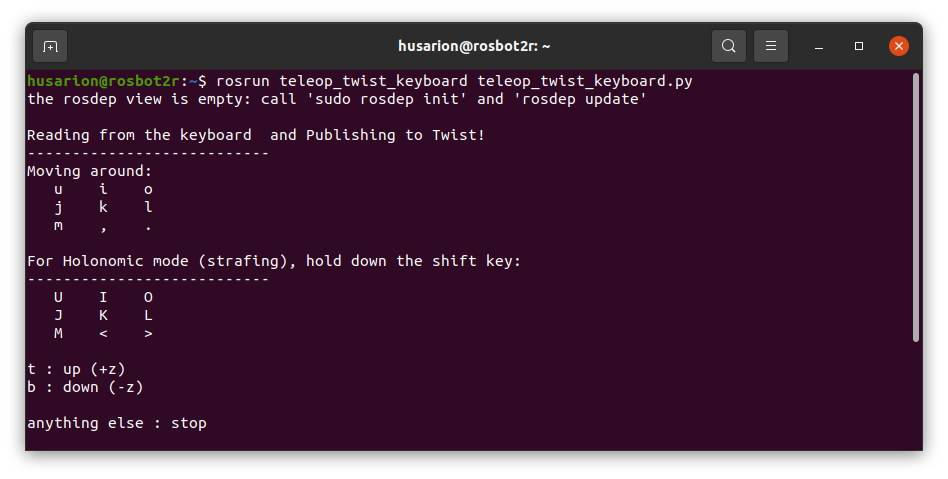
Now launch a teleop_twist_keyboard ROS node for manual ROSbot control:
rosrun teleop_twist_keyboard teleop_twist_keyboard.py
After running the command, you will see the usage instruction:
Next steps
Visit our ROS 1 tutorials to learn how to program using ROS 1.
ROSbot 2 is based on ARM32 architecture that is not supported from ROS 2 Foxy. This is why ROSbot 2R (ARM64) and ROSbot 2 PRO (x64) are recommended for ROS 2 projects.