Route Admin Panel
About
The Route admin panel is a web user interface for managing routes of ROS and ROS2 based mobile robots.
It allows to:
- Define destination points
- Save robot position as destination point
- Send destination point
- Upload custom map
- Set a sequence of destination points
The Route admin panel is built as a Node.js application. On one side it is interfacing with ROS topics, while on another side it presents a frontend for managing robot destinations.
Application is available both for ROS1 and ROS2, branch master is compatible with ROS1, while branch ros2 is for ROS2.
Installation and usage will differ for each version.
Installation
Most of the nodejs libraries are common for both versions. Main difference is ROS interfacing library, for ROS1 it is rosnodejs and for ROS2 it is custom fork of rclnodejs.
Install for ROS1
Install Node.js:
curl -sL https://deb.nodesource.com/setup_12.x | sudo -E bash -
sudo apt install -y nodejs
Create workspace and clone dependency repositories, it may happen that you already have it done, in that case, skip this step:
mkdir ~/ros_workspace
mkdir ~/ros_workspace/src
cd ~/ros_workspace/src
catkin_init_workspace
echo '. ~/ros_workspace/devel/setup.sh' >> ~/.bashrc

git clone https://github.com/husarion/husarion_ros.git
git clone https://github.com/husarion/rosbot_description.git
Clone route_admin_panel repository:
cd ~/ros_workspace/src
git clone https://github.com/husarion/route_admin_panel.git
Install dependencies:
cd ~/ros_workspace/src/route_admin_panel/nodejs
npm install rosnodejs express socket.io quaternion-to-euler math3d multer yargs
npm install
Build workspace:
cd ~/ros_workspace
catkin_make
. ~/ros_workspace/devel/setup.sh
Install for ROS2
Install Node.js:
curl -sL https://deb.nodesource.com/setup_10.x | sudo -E bash -
sudo apt install -y nodejs
Create workspace and clone dependency repositories, it may happen that you already have it done, in that case, skip this step:
mkdir ~/ros_workspace
mkdir ~/ros_workspace/src
cd ~/ros_workspace/src
echo '. ~/ros_workspace/install/setup.sh' >> ~/.bashrc

git clone -b ros2 --single-branch https://github.com/husarion/rosbot_description.git
Clone route_admin_panel repository:
cd ~/ros_workspace/src
git clone -b ros2 --single-branch https://github.com/husarion/route_admin_panel.git
Build workspace:
cd ~/ros_workspace
colcon build
. ~/ros_workspace/install/setup.sh
Install nodejs packages:
cd ~/ros_workspace/install/route_admin_panel/share/route_admin_panel/nodejs
npm install express socket.io quaternion-to-euler math3d multer yargs uuid
wget https://forked-rclnodejs.s3-eu-west-1.amazonaws.com/rclnodejs-0.10.3.tgz
npm install rclnodejs-0.10.3.tgz
npm install
How to use
RAP offers the same functionalities regardless of ROS version, thus launching the panel will vary a little depending on version.
Launching with ROS1
Panel comes with prepared launch files for move_base, gmapping, node.js server and all other required components.
Depending on your ROSbot version, you can start it with:
-
for ROSbot 2.0 with
MBEDfirmware:roslaunch route_admin_panel demo_rosbot_mbed_fw.launch -
for ROSbot 2.0 PRO with
MBEDfirmware:roslaunch route_admin_panel demo_rosbot_pro_mbed_fw.launch -
for Gazebo simulator:
roslaunch route_admin_panel demo_gazebo.launch -
for ROSbot 2.0 with
hFramework(deprecated):roslaunch route_admin_panel demo_rosbot.launch -
for ROSbot 2.0 PRO with
hFramework(deprecated):roslaunch route_admin_panel demo_rosbot_pro.launch
Launching with ROS2
Panel comes with prepared launch files for running it on ROSbot, in simulation environment or as a standalone panel.
Launching the panel on ROSbot
Prior to launching the panel, it is required to establish communication with CORE2 board:
-
for ROSbot 2.0:
sudo MicroXRCEAgent serial --dev /dev/ttyS1 -b 500000 -
for ROSbot 2.0 PRO:
sudo MicroXRCEAgent serial --dev /dev/ttyS4 -b 460800
Enable communication between FastRTPS on IPv4 and CycloneDDS on IPv6:
ros2 run dds_bridge dds_bridge
To find out more regarding the interoperability issue, refer to dds_bridge documentation
By default CORE is measuring time since reset, thus timestamps are published the same.
If you want to use system time, use rosbot_time_publisher node:
RMW_IMPLEMENTATION=rmw_fastrtps_cpp ros2 run dds_bridge rosbot_time_publisher
Last step is to launch the panel application:
-
for ROSbot 2.0:
ros2 launch route_admin_panel panel_rosbot.launch.py -
for ROSbot 2.0 PRO:
ros2 launch route_admin_panel panel_rosbot_pro.launch.py
Launching the standalone panel
Standalone panel does not require any additional steps:
ros2 launch route_admin_panel panel.launch.py
Launching the panel with Gazebo simulator
ros2 launch route_admin_panel panel_sim.launch.py
Accessing the panel
Once all nodes are running, go to web browser and type in address bar:
ROSBOT_IP_ADDRESS:8000
You need to substitute phrase ROSBOT_IP_ADDRESS with IP address of your device.
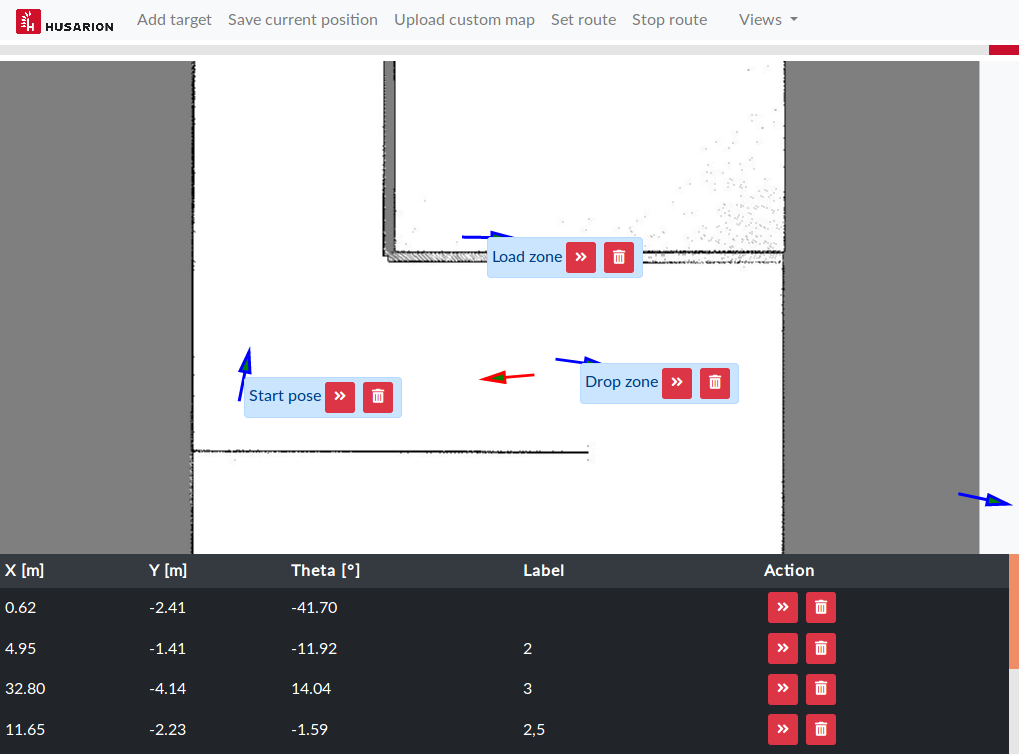
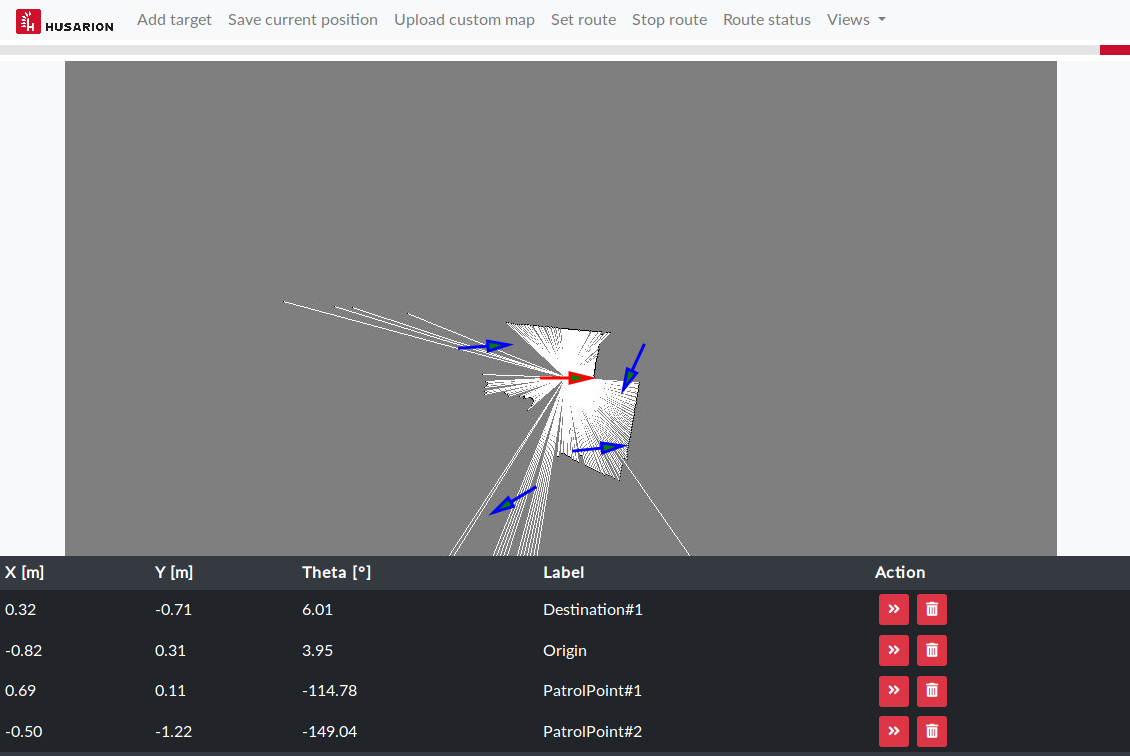
You should see interface like below:
ROS1 API
Below are ROS1 interfaces used by the route admin panel:
Topics
| Topic | Message type | Direction | Description |
|---|---|---|---|
/tf | tf2_msgs/TFMessage | subscriber | Transform from map to base_link frame. |
/map_image/full/compressed | sensor_msgs/CompressedImage | subscriber | Map converted to grayscale image and compressed in PNG format. |
/map_metadata | nav_msgs/MapMetaData | subscriber | Metadata for map. |
/map_zoom | std_msgs/Int16 | publisher | Current value of map zoom. |
/plan | nav_msgs/Path | publisher | Currently analyzed path from make_plan service. |
Services
| Service name | Service type | Role | Description |
|---|---|---|---|
/move_base/make_plan | nav_msgs_service/GetPlan | client | Get proposed path for given points without sending goal to navigation stack. |
Actions
| Action name | Action type | Role | Description |
|---|---|---|---|
/move_base | move_base_msgs/MoveBase | client | Set destinations for navigation stack. |
Map to image conversion
RAP is using additional node map_to_img_node for conversion from nav_msgs/OccupancyGrid to sensor_msgs/CompressedImage from husarion_ros package. The map_to_img_node subscribes map as nav_msgs/OccupancyGrid and publishes it as grayscale image with full resolution or cropped depending on current map zoom.
| Topic | Message type | Direction | Description |
|---|---|---|---|
/map | nav_msgs/OccupancyGrid | subscriber | Map source |
/map_zoom | std_msgs/Int16 | subscriber | Current value of map zoom. |
/map_metadata | nav_msgs/MapMetaData | publisher | Metadata for map. |
/map_image/full | sensor_msgs/Image | publisher | Map converted to grayscale image. |
/map_image/tile | sensor_msgs/Image | publisher | Map cropped according to zoom and converted to grayscale image. |
ROS2 API
Below are ROS2 interfaces used by the route admin panel:
Topics
| Topic | Message type | Direction | Description |
|---|---|---|---|
/tf | tf2_msgs/msg/TFMessage | subscriber | Transform from map to base_link frame |
/map_image/full/compressed | sensor_msgs/msg/CompressedImage | subscriber | Map converted to grayscale image and compressed in PNG format |
/map_metadata | nav_msgs/msg/MapMetaData | subscriber | Metadata for map |
Actions
| Action name | Action type | Role | Description |
|---|---|---|---|
NavigateToPose | nav2_msgs/action/NavigateToPose | client | Set destinations for navigation stack. |
Map to image conversion
Additional node map_to_img_node for conversion from nav_msgs/msg/OccupancyGrid to sensor_msgs/msg/CompressedImage has interfaces:
| Topic | Message type | Direction | Description |
|---|---|---|---|
/map | nav_msgs/msg/OccupancyGrid | subscriber | Map source |
/map_metadata | nav_msgs/msg/MapMetaData | publisher | Metadata for map |
/map_image/full | sensor_msgs/msg/Image | publisher | Map converted to grayscale image |
Node is using image_transport::ImageTransport plugin to provide compressed images. RAP accepts only PNG compressed image, thus parameters for this image transport must be as follows:
map_to_img_node:
    ros__parameters:
        publish_map_metadata: true
        format: png
Using panel from any network
In case you would like to manage robot destinations outside of local network, you could use Husarnet for secure connection with your robot.
All Husarion devices comes with Husarnet preisntalled, if you are using your own device, install Husarnet according to installation guide.
If you do not have a Husarnet account, create it and log in to Husarnet dashboard.
In Husarnet dashboard, click Create network button, you will get a dialog:
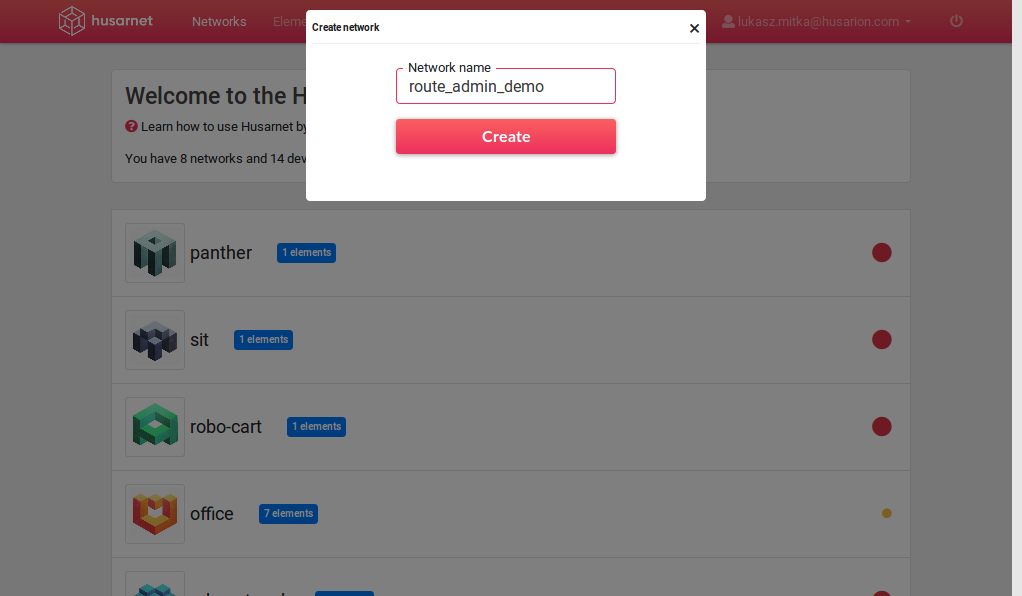
Type route_admin_demo as network name then click Create button.
Go to your device and register it in Husarnet network by executing in terminal:
sudo husarnet websetup
You will get a registration link as a response, open it in web browser:
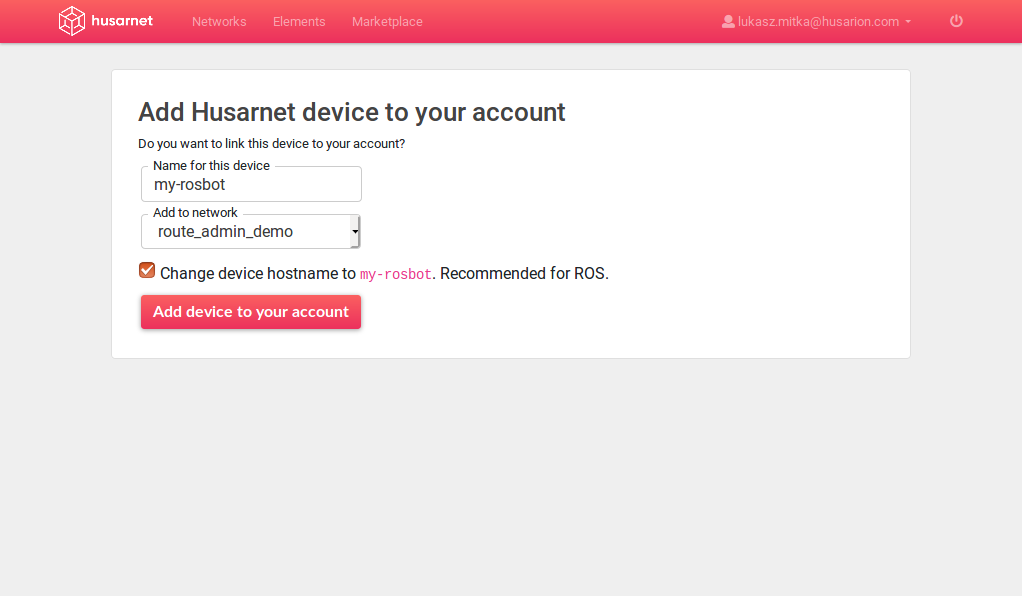
- In Name for this device provide
my-rosbot - In Add to network dropdown menu choose
route_admin_demo - Check Change device hostname checkbox
- Click Add device to your account button
You will be redirected to network summary view:
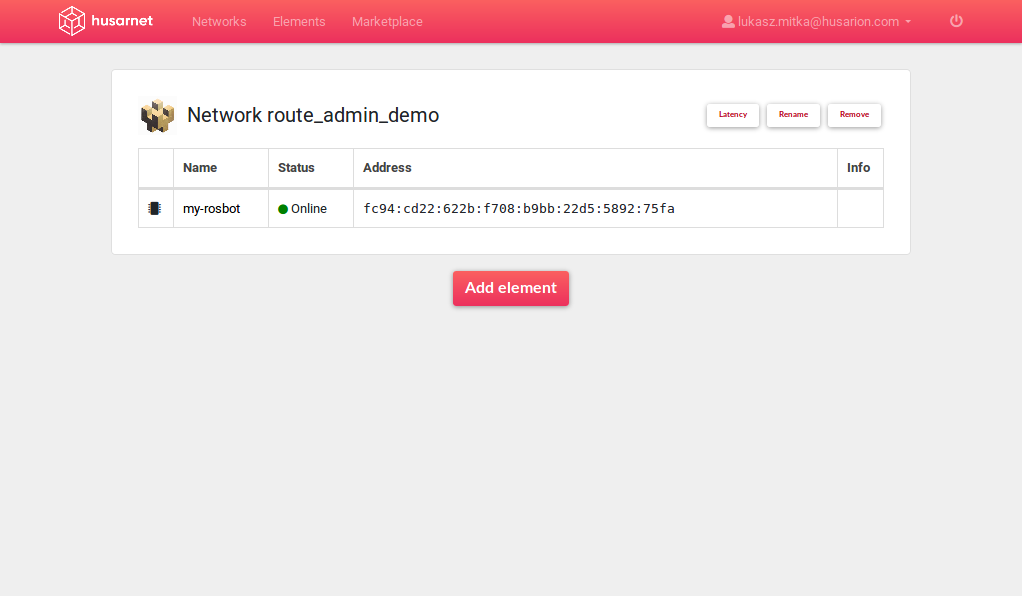
Click device name to open its configuration:
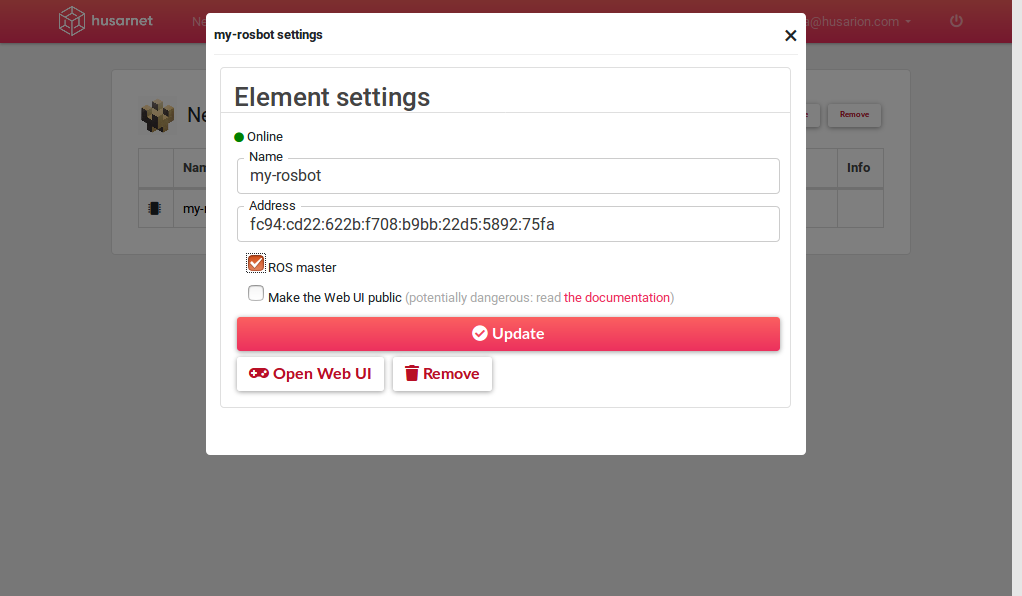
Check ROS master checkbox.
Optionally you can also check Make the Web UI public if you want to make panel accessible for anyone knowing device address.
Go back to your device and start panel with the same launch file as for local network.
Once the panel is running, you will notice new button WebUI next to your device address in Husarnet dashboard, use this button to view panel.

Wait! But what about real peer-to-peer connection?
To get access without need to log into any server, you will have to install Husarnet client also on your laptop, procedure is the same as for any other device.
Then register your laptop in Husarnet network the same way as you did with robot.
On laptop open browser and in address bar type: [ROSBOT_HUSARNET_ADDRESS]:8000
ROSBOT_HUSARNET_ADDRESS ia a value that you can find in Husarnet dashboard in device settings.
In the end you will be able to access route_admin_panel from any network using a secure peer-to-peer connection: